Hello! Welcome back.
In our last lesson, we mastered the event delegation pattern, learning how to handle user interactions efficiently across many elements. Those interactions—clicks, hovers, form submissions—are often the catalyst for changing what the user sees on the screen. Today, we'll dive into what happens after your JavaScript has instructed the DOM to change. How does the browser take that instruction and turn it into visible pixels?
This lesson addresses the learning outcome: Explain the difference between reflow/layout and repaint and their performance implications on user experience. We will demystify the browser's rendering process, differentiate between the costly operations of layout (or reflow) and paint, and understand how they directly impact the smoothness and responsiveness of your web applications. For an experienced developer like yourself, mastering this topic is key to diagnosing performance bottlenecks and building truly high-performance UIs.
The Pixel Pipeline: From Code to Screen
Before we can differentiate between reflow and repaint, we need to understand the sequence of steps the browser takes to render a page. This is often called the critical rendering path or the pixel pipeline.

The process begins when the browser parses your HTML and CSS to create the DOM and CSSOM, respectively. It then combines them into a Render Tree, which represents only the visible elements on the page (for instance, elements with display: none are omitted). From there, the real work of turning this tree into pixels begins.
The article 'Rendering performance' on web.dev provides an excellent, clear breakdown of the five key stages in this pipeline. Understanding these stages is fundamental to our topic.
Please read the introductory section and the list under 'The pixel pipeline'. This will define the five main stages: JavaScript, Style, Layout, Paint, and Composite.
As you just read, after any JavaScript has run and styles have been calculated, the browser moves to three critical visual stages: Layout, Paint, and Composite. Our focus today is on the first two.
Defining Layout (Reflow) and Paint (Repaint)
Although often used interchangeably, "layout" and "reflow" refer to the same process, as do "paint" and "repaint". Let's define them clearly.
1. Layout (or Reflow)
Layout is the process of calculating the geometry of elements. This is where the browser determines the exact size and position of every element on the page.
- What it does: It computes the
width,height,margin,padding,top,left, etc., for all visible elements in the render tree. - Why it's expensive: The web's layout model means elements influence each other. If you change the width of an element at the beginning of the document, it can shift the position of every subsequent element. The browser must recursively traverse the render tree (or a part of it) to calculate these new positions, making it a computationally intensive operation.
The MDN guide on the Critical Rendering Path provides a concise and authoritative definition of the Layout stage.
Read the section titled 'Layout'. Pay close attention to the description of what this step determines and what triggers it (e.g., modifying box model styles).
2. Paint (or Repaint)
Paint is the process of filling in the pixels for each element. After the browser knows the size and position of everything, it needs to draw them onto the screen.
- What it does: It draws out the visual parts of the elements—
color,background-image,border,box-shadow, etc.—based on the geometry calculated during the layout phase. The browser is smart about this and will try to only "repaint" the areas of the screen that have actually changed. - Why it has a cost: While generally faster than layout, painting is still work. Complex styles like gradients or shadows can be more expensive to paint than simple solid colors. The browser often paints content onto different layers, which are then combined in the final "Composite" step.
Now, let's look at MDN's definition of the Paint stage.
Read the short section titled 'Paint'. Note that on initial load the whole screen is painted, but subsequently, the browser attempts to repaint only the affected areas.
The Crucial Difference and Its Consequences
Here is the most important distinction:
A change that triggers Layout will always be followed by a Paint, because changing an element's geometry means its pixels need to be redrawn. However, a change that only triggers Paint does not require a Layout.
For example, changing an element's width triggers Layout + Paint. But changing only its background-color triggers just Paint.
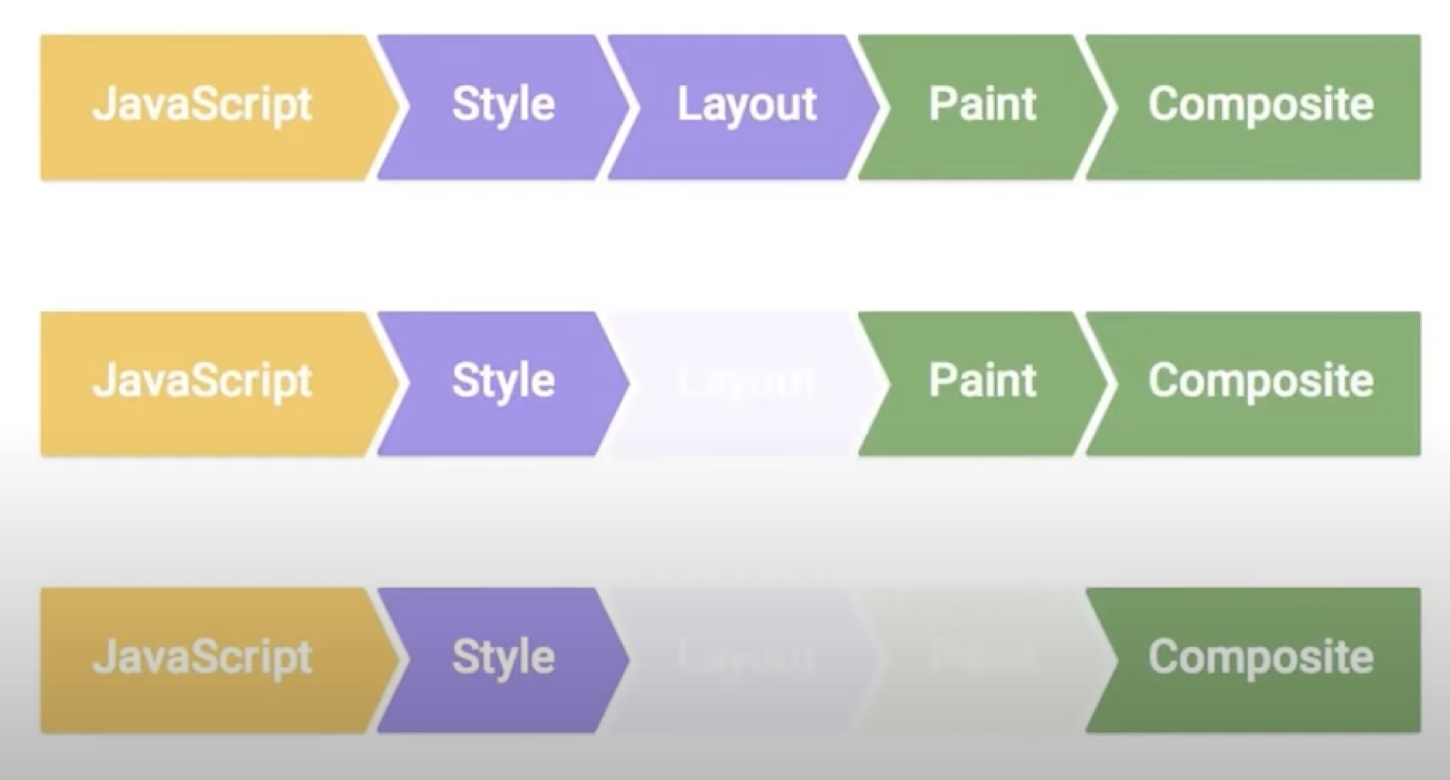
This gives us three different "pipelines" a visual update can follow, from most to least expensive:
- Layout → Paint → Composite: Triggered by changing geometric properties (e.g.,
width,height,left,font-size). This is the most expensive path. - Paint → Composite: Triggered by changing paint-only properties (e.g.,
color,background-color,box-shadow). This skips the costly layout step. - Composite: Triggered by changing properties that can be handled by the compositor alone, like
transformandopacity. This is the cheapest path and is ideal for animations.
The 'Rendering performance' article elegantly illustrates these three pathways. Understanding them is the key to writing performant CSS and JavaScript.
Read the three numbered sections starting with '1. JS / CSS > Style > Layout > Paint > Composite'. This clearly maps property changes to their corresponding rendering path.
Performance Implications: The 16ms Budget and "Jank"
Why do we care so much about avoiding layout? Because our goal is to provide a smooth user experience, which on modern displays means rendering at 60 frames per second (fps).
Simple math tells us our budget per frame:
If all the work needed to produce a single frame (running JavaScript, calculating styles, layout, and paint) takes longer than ~16ms, the browser drops a frame. The user perceives this as a stutter or a freeze, which is known as "jank".
Critical rendering path - Crash course on web performance (Fluent 2013)
Ilya Grigorik's talk on the critical rendering path is a classic. This segment vividly explains the 16ms budget and what happens when your code exceeds it.
Watch the clip from 26:34 to 32:46. Focus on the concept of the 16ms budget, what causes dropped frames, and the performance difference between desktop and mobile CPUs. The rule of thumb to aim for under 10ms of work on your development machine is a valuable takeaway.
Layout Thrashing: The Performance Killer
One of the most severe performance anti-patterns is layout thrashing (also called forced synchronous layout). This occurs when your JavaScript rapidly alternates between writing to the DOM (changing a style that affects layout) and reading from the DOM (accessing a property like offsetHeight or clientWidth).
When you ask the browser for a geometric property like element.offsetHeight, it must give you the correct, up-to-date value. If you have just changed a style that affects layout, the browser is forced to stop, run a full synchronous layout right then and there, and then give you the value. If you do this in a loop, you're forcing the browser to perform multiple, unnecessary layouts, completely destroying your frame budget.
Ryan Seddon: So how does the browser actually render a website | JSConf EU 2015
The JSConf EU talk by Ryan Seddon contains an excellent, practical demonstration of layout thrashing and how to fix it. This will be very clear given your coding background.
Watch from 17:10 to 22:39. Pay close attention to the 'bad example' where the code reads and writes in a loop, forcing reflows. The solution—batching all your reads first, then all your writes—is the critical pattern to understand and implement.
The solution is simple in principle: Batch your DOM manipulations. First, read all the values you need from the DOM. Then, perform all your writes. This allows the browser to perform a single layout operation for all the changes at once.
Conclusion
Understanding the distinction between reflow and repaint is not just academic; it's a practical skill for building fast, fluid web experiences. By being mindful of which properties you're changing, you can guide the browser down the most efficient rendering path.
Key Takeaways:
- Reflow/Layout: Calculates the size and position of elements. It's computationally expensive because one change can affect the entire page.
- Repaint: Fills in the pixels (colors, backgrounds, etc.) after layout is complete. It's less expensive than layout but still has a cost.
- The Golden Rule: Layout changes always trigger a repaint, but repaint changes do not trigger a layout.
- Performance Goal: To achieve a smooth 60fps experience, all work for a frame must complete within ~16ms to avoid "jank."
- Layout Thrashing: An anti-pattern caused by alternating DOM reads (e.g.,
offsetHeight) and writes (style.width) in JavaScript, which forces multiple synchronous layouts. It can be fixed by batching reads and writes. - Optimization Strategy: For animations, always prefer changing
transformandopacity, as they can be handled by the compositor and often avoid both layout and paint.
What's Next?
Now that we understand the performance cost of querying the layout of elements, our next lesson will introduce a modern browser API designed to avoid this exact problem. We will explore the Intersection Observer API, which provides an efficient, asynchronous way to determine if an element is visible in the viewport without repeatedly calling methods like getBoundingClientRect() in a scroll event listener and causing constant reflows. It's a perfect application of the principles we've learned today.