Hello!
In our last lesson, you mastered the critical skill of laying out sprinklers to achieve perfect head-to-head coverage. You now have a site plan with every sprinkler head placed to ensure uniform watering. The logical next question is: how do we organize all these sprinklers so they can be controlled and supplied with water?
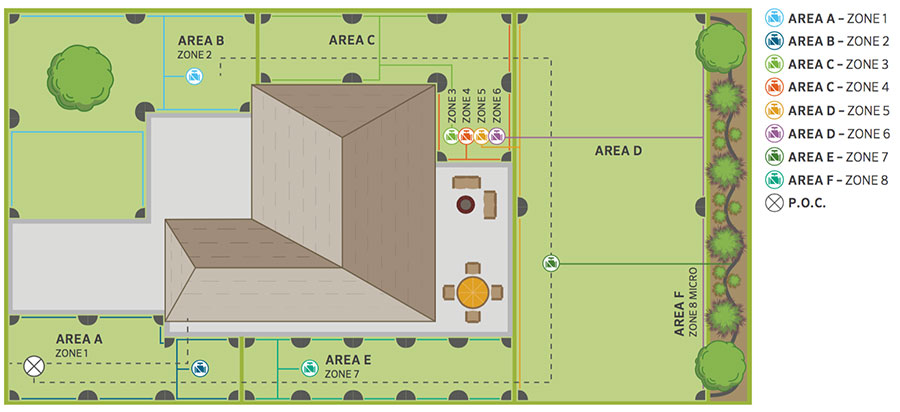
This lesson answers that question by teaching you how to group sprinklers into zones, ensuring all heads within a zone have matched precipitation rates. A "zone" (or "circuit") is a group of sprinklers operated by a single control valve. Getting the zoning right is just as important as the layout itself. It's the key to an efficient and healthy irrigation system.
By the end of this lesson, you will understand the single most important rule of sprinkler zoning and be able to apply it to your designs.
1. What is Precipitation Rate and Why is it the Key to Zoning?
Before we group sprinklers, we need to understand the concept that governs how we group them: Precipitation Rate (PR).
- Flow Rate (L/min or m³/h) is the volume of water a single sprinkler emits.
- Precipitation Rate (mm/hr) is the depth of water applied over a specific area in one hour.
Think of it this way: flow rate is how fast water leaves the sprinkler; precipitation rate is how fast the ground gets wet. They are not the same! A sprinkler with a high flow rate covering a very large area can have a lower precipitation rate than a sprinkler with a low flow rate covering a tiny area.
When we create a zone, all sprinklers in it will run for the same amount of time. If they apply water at different rates, some parts of your landscape will be flooded while others remain dry. This is why we have the golden rule of zoning:
Rule: Never install sprinklers with different precipitation rates on the same zone.
To understand this concept and its importance, let's start with a foundational reading.
PreciPitation rates and sPrinkler irrigation
The document 'Precipitation rates and sprinkler irrigation' provides an excellent definition of 'Matched Precipitation Rates' (MPR) and clearly illustrates the problems that arise when this principle is ignored.
Please read the sections titled 'Matched Precipitation Rates' (page 19), 'A System Without Matched Precipitation Rates' (page 21), and 'The Dry Spot Drives the System' (page 24). Focus on the definition of an MPR system and the visual explanation of what happens when rates are not matched.
As the reading shows, unmatched rates lead to poor distribution uniformity, creating overwatered and underwatered areas and forcing you to waste water just to keep the dry spots green.
2. The Principle of Matched Precipitation: Arc vs. Flow
So, how do we ensure precipitation rates are matched? The key is the relationship between a sprinkler's arc of coverage and its flow rate.
To keep the precipitation rate constant, the flow rate must be directly proportional to the area being covered.
Consider sprinklers with the same throw radius:
- A 90° (quarter-circle) head covers a certain area. Let's say it requires a flow of X.
- A 180° (half-circle) head covers twice that area, so it needs a flow of 2X to apply the same depth of water.
- A 360° (full-circle) head covers four times the area of the quarter-circle, so it needs a flow of 4X.
This simple relationship is the foundation of matched precipitation design. The following reading illustrates this perfectly.
PreciPitation rates and sPrinkler irrigation
Let's return to the 'Precipitation rates and sprinkler irrigation' document to see a clear, diagram-based explanation of this principle.
Read the section 'Achieving Matched Precipitation Rates' on page 20. Pay close attention to the diagram and the table that shows how the flow rate doubles as the spray arc doubles.
Test your understanding!
You are reviewing an irrigation plan. One zone contains three types of sprinklers, all with the same throw radius.
- Quarter-circle (90°) heads with a flow of 0.9 GPM (Gallons Per Minute).
- Half-circle (180°) heads with a flow of 1.8 GPM.
- Full-circle (360°) heads with a flow of 3.6 GPM.
Do the sprinklers in this zone have matched precipitation rates?
Show answer
Yes, they do.
- The half-circle (180°) head has a flow (1.8 GPM) that is exactly twice the quarter-circle (90°) head's flow (0.9 GPM).
- The full-circle (360°) head has a flow (3.6 GPM) that is exactly twice the half-circle head's flow (1.8 GPM) and four times the quarter-circle head's flow.
Since the flow rate is proportional to the arc, these sprinklers have matched precipitation rates and can be on the same zone.
3. Applying the Principle with Real Products
Fortunately, you don't always have to do these calculations from scratch. Manufacturers design their products to make achieving MPR simple.
Standard Sprays and Rotors
For most spray heads and rotors, you achieve MPR by selecting the correct nozzle from the "nozzle tree" that comes with the sprinkler. For a rotor covering a 90° arc, you would choose a smaller nozzle than for a rotor in the same zone covering a 180° arc. The manufacturer's catalog provides performance charts to help you select the right nozzle combinations.
MP Rotators: Automatic MPR
A major advantage of modern MP Rotator nozzles is that they often have automatic matched precipitation. All nozzles within a specific family (e.g., the standard black-bodied MP1000/2000/3000 series) are engineered to deliver the same precipitation rate regardless of their arc or radius setting. This drastically simplifies design.
MP Rotator® Nozzle Product Guide: Models and Distances, 2024
Let's watch a short video from Hunter Industries that explains this feature of their MP Rotator product line. This is a key example of how modern products can streamline your design process.
Watch from 00:54 to 01:57 and then from 03:42 to 04:27. Focus on the concepts of 'automatic matched precipitation' and the different PR families (standard at 0.4 in/hr and MP800 at 0.8 in/hr).
The key takeaway is you cannot mix a standard (black) MP Rotator with an MP800 (gray) on the same zone, but you can mix any combination of standard MP Rotators (e.g., an MP1000-90, an MP2000-180, and an MP3000-360) together.
Handling Irregular Shapes and "Odd Arcs"
Your projects will feature curved beds and irregular lawn shapes, which require sprinklers with "odd arcs" (e.g., 67°, 110°, 240°). The principle of MPR still applies. The reading PreciPitation rates and sPrinkler irrigation provides a formula to calculate the required flow rate for any arc, which is perfect for tackling the "complex plantation placements" you'll be designing.
Formula for Odd Arcs:
Where:
- is the flow rate you need to find for the new head.
- is the arc (in degrees) of the new head.
- is the arc of an existing head in the zone.
- is the flow rate of that existing head.
Example: A zone has 180° heads using 2.0 GPM. You need to add a 270° head.
You would then look at the manufacturer's chart to find the nozzle that provides approximately 3.0 GPM at your design pressure.
4. The Complete Zoning Workflow
Now let's put it all together into a clear workflow. You've finished your head-to-head layout. What's next?
Step 1: Group by Hydrozone and Precipitation Rate
Look at your plan and group sprinklers into "families" that can be watered together.
- Family A: All lawn sprinklers (e.g., MP Rotators, all with 10 mm/hr PR).
- Family B: All spray heads for flower beds (e.g., with a 40 mm/hr PR).
- Family C: Drip irrigation for shrubs (which we will cover later).
You now have large groups based on plant type and hardware. You would never put a sprinkler from Family A in the same zone as one from Family B.
Step 2: Sub-divide Groups by Available Flow (Sub-Zoning)
The "Family A" group of all your lawn sprinklers might require a total flow of 100 L/min. However, your water source might only provide 30 L/min. You obviously cannot run them all at once.
You must therefore subdivide "Family A" into smaller zones.
- Calculate the total flow required for the entire hydrozone (e.g., add up the GPM of all sprinklers in Family A).
- Divide this total by your system's available flow rate (which you learned to determine in Module 1).
Round this number up to the nearest whole number. If you get 3.3, you need 4 zones.
- Distribute the sprinklers from "Family A" among these 4 zones, ensuring the total flow of each zone is less than or equal to the available flow rate.
This process creates logical, functional zones that respect both matched precipitation and the physical limitations of your water supply.
Conclusion
You have now learned the most important rule for grouping sprinklers and the workflow for applying it. This crucial step organizes your layout into a manageable system that can be built and controlled effectively.
Key Takeaways:
- The "golden rule" of sprinkler zoning is one zone, one precipitation rate.
- Matched Precipitation Rate (MPR) is achieved when a sprinkler's flow rate is proportional to its arc of coverage.
- Manufacturers design nozzle families (like the MP Rotator series) to simplify achieving MPR.
- Zoning is a two-step process: first, group sprinklers by PR family, then sub-divide those groups into zones that do not exceed the available water flow.
In our next lesson, we will put this into practice by calculating the total flow rate for a sprinkler zone. This simple calculation is the first piece of data we need to begin the hydraulic design of our system.