Hello!
In our last lesson, we focused on selecting the right type of sprinkler for different lawn areas based on their size and shape. You now know when to choose rotors, spray heads, or MP Rotators to match the site's requirements.
Today, we move from selecting hardware to deploying it. This lesson addresses the most critical principle in sprinkler system design: applying 'head-to-head' coverage to create a sprinkler layout plan. We will translate your sprinkler choice into a precise spatial arrangement on your design plan to guarantee uniform and efficient watering. As a landscape architect, you are already an expert in the spatial organization of site elements; we will now apply that skill to the flow of water.
1. The Principle of Head-to-Head Coverage
The single most important rule in sprinkler layout is head-to-head coverage. It means that the water thrown from one sprinkler head must reach the physical location of the adjacent sprinkler head.
Why is this so crucial? A sprinkler does not apply water evenly across its throw radius. The amount of water delivered decreases significantly as the distance from the head increases. Without proper overlap, you get dry spots between your sprinklers.
To see why this is so important, let's watch a short clip.
Sprinkler layout: The how and why
This video from Phil Busey's channel clearly demonstrates the consequence of ignoring head-to-head coverage and introduces the two primary layout patterns we'll be discussing.
Watch from 01:19 to 02:59, and then from 10:04 to 10:46. Pay close attention to the visual of 'green islands in a sea of brown'—this is the exact outcome we want to avoid.
The key takeaway is that proper overlap is non-negotiable for a professional-grade system. Let's formalize this with a reading.
The Basic Irrigation Design workbook from Toro provides a concise explanation of this principle, including a helpful diagram showing how water application falls off with distance.
Read the first two pages of the 'Sprinkler Layout' section (pages 10-11 in the PDF). Focus on the 'Sprinkler Distribution Curve' diagram and the definition of 'head-to-head' spacing as 100% of the radius.
The simple rule is: Spacing between heads should equal the sprinkler's radius.
2. Standard Layout Patterns
To achieve head-to-head coverage systematically, designers use two primary geometric patterns: square and triangular.
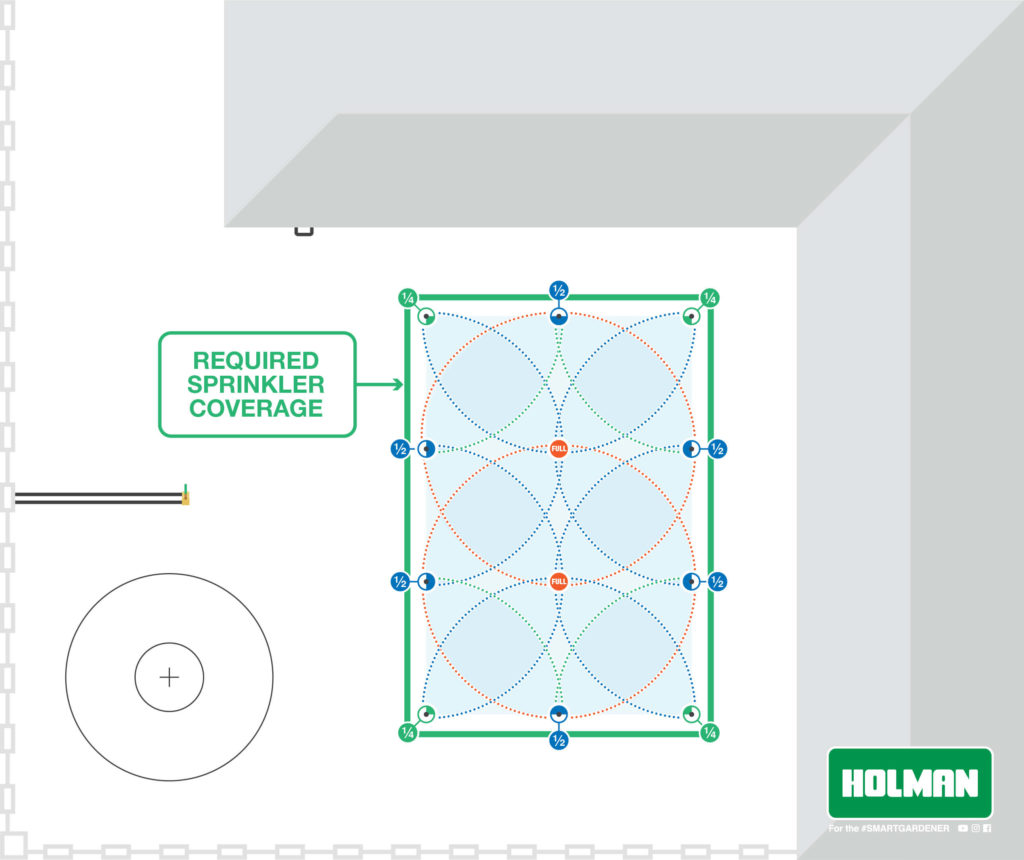
Let's examine the two main patterns used to create a layout like the one above.
The Hunter Irrigation System Design guide provides clear definitions and diagrams for both square and triangular spacing.
Please read the section 'Sprinkler Placement' (starts on page 11 of the PDF). Focus specifically on the subsections 'Square Spacing Patterns' and 'Triangular Spacing Patterns' and study Figures 26, 27, and 28. Also, note the discussion on wind effects.
Here is a summary of the two patterns:
| Pattern | Description | Best For |
|---|---|---|
| Square | Sprinklers are placed in a grid, forming squares. Spacing between heads and rows is the same (equal to the radius). | Rectangular areas and sites with hard boundaries (walkways, buildings) where minimizing overspray is critical. This is the most common pattern for villa gardens. |
| Triangular | Sprinklers are placed at the corners of equilateral triangles. Rows are staggered. Row spacing is about 87% of the head spacing (Head Spacing × 0.866). | Irregularly shaped areas, large open fields, and windy conditions. It provides slightly better uniformity but can cause more overspray at the edges. |
3. The Step-by-Step Layout Process
For a typical rectangular lawn area, the layout process is methodical. You work from the outside in.
- Place Corner Heads: Start by placing 90° (quarter-circle) sprinklers in each corner of the area.
- Place Perimeter Heads: If the distance between corner heads is more than twice the sprinkler's radius, fill in along the edges with 180° (half-circle) sprinklers, maintaining head-to-head spacing.
- Fill the Interior: If the width of the area requires it, place 360° (full-circle) sprinklers in the middle, using the perimeter heads as a guide for your square or triangular grid.
This process ensures the boundaries are watered precisely before the main interior area is covered. The Basic Irrigation Design workbook you reviewed earlier has an excellent summary of this process.
4. Layout for Irregular and Complex Shapes
Of course, your villa designs will rarely be simple rectangles. You will have curves, obstacles, and irregular boundaries. This is where layout becomes more of an iterative art, guided by the principles we've discussed. For these areas, forcing a perfect grid is not the goal; achieving complete coverage is.
The best way to learn this is to watch a professional work through the problem. This is a design process of trial and refinement, much like sketching a landscape plan.
How to Place Sprinkler Heads in an Irrigation Design
This video from Prof. Mark Valen is a fantastic demonstration of laying out sprinklers in a real-world, irregularly shaped area. It shows the thought process, from initial calculations to refining the placement for full coverage.
This is the core practical exercise for the lesson. Watch from 00:58 to 30:46. I encourage you to watch the entire segment to understand the workflow: Initial Analysis (00:58 - 10:05): See how the designer calculates different spacing options for a long edge. Visualizing with a Compass (10:05 - 16:17): Observe how a compass is used to draw the throw arcs and check for head-to-head coverage along the perimeter. This is a classic manual design technique. Refining and Filling Gaps (16:17 - 28:26): This is the most important part. Watch how 'fill-in' heads are added to cover the dry spots in the middle, creating true head-to-head coverage throughout. Comparing Options (28:26 - 30:46): The designer compares the two options and chooses the more efficient one. This highlights that there can be multiple 'correct' solutions.
This video shows that layout isn't about finding one perfect answer on the first try. It's about starting with a plan, identifying its weaknesses (dry spots), and iteratively adding or moving heads until the coverage is complete and efficient.
For further reference on specific complex situations, the Hunter Design Guide provides excellent static examples. This resource is a great companion to the video you just watched, and it directly addresses the types of "complex plantation placements" you'll encounter.
To supplement the video, this guide provides diagrams and solutions for many special situations you will encounter in high-end residential design.
Review the section titled 'Solutions to the Design Problems' (starts on page 14 of the PDF). Pay particular attention to the subsections on 'Curved Landscapes', 'The Radius Edge', 'The Angled Border', 'The Irregular Border', and 'Obstructions in the Landscape'.
Test your understanding!
You need to design a layout for a simple rectangular lawn that measures 24 meters long by 12 meters wide. You have selected rotors with an effective radius of 6 meters.
Using a square layout pattern, sketch the layout and determine:
- How many 90° (quarter-circle) heads are needed?
- How many 180° (half-circle) heads are needed?
- How many 360° (full-circle) heads are needed?
Show answer
Here's the breakdown:
-
Spacing: The spacing between heads and rows will be 6 meters.
-
Layout:
- Length (24m): 24m / 6m = 4 spaces. This requires 5 heads along the length.
- Width (12m): 12m / 6m = 2 spaces. This requires 3 rows of heads.
-
Head Count:
- 90° Heads: You need one in each of the 4 corners. Total: 4 heads.
- 180° Heads:
- Along the 24m sides: You have 5 head locations, 2 are corners. So, 3 heads per side. (3 heads x 2 sides = 6 heads).
- Along the 12m sides: You have 3 head locations, 2 are corners. So, 1 head per side. (1 head x 2 sides = 2 heads).
- Total: 8 heads.
- 360° Heads: You have one row in the center. This row has 5 head locations, but the two on the ends are the 180° heads. This leaves the 3 heads in the middle of the center row. Total: 3 heads.
The final plan would have a grid of 3 rows with 5 sprinklers in each row.
Conclusion
You have now learned the foundational principle of sprinkler layout and how to apply it to both simple and complex areas. This skill is the bridge between a good parts list and a functional, efficient irrigation system.
Key Takeaways:
- Head-to-head coverage is essential: Spacing sprinklers at their radius ensures uniform water application and prevents dry spots.
- Work from the outside in: Always start by placing corner and perimeter heads to define the boundaries before filling the interior.
- Use systematic patterns: Square spacing is ideal for most rectangular villa lawns, while triangular spacing offers advantages in larger, irregular areas.
- Layout is an iterative design process: For complex shapes, start with a logical placement, then use a compass (or CAD) to find and fill coverage gaps until the layout is complete.
In our next lesson, we will address a crucial question: how do we group all the sprinklers we've just placed? We will learn how to group sprinklers into zones, ensuring all heads within a zone have matched precipitation rates, a key step in preparing our design for hydraulic calculations.