Hello! Welcome to the fourth lesson in our Irrigation Design course.
In our last lesson, you learned how to analyze a landscape's plant palette and group plants based on their specific water needs, quantified by the Crop Coefficient (Kc). We established the critical rules for dealing with mixed plantings, which is the key to water efficiency.
Today, we transition from analysis to action. Our learning outcome is to divide a given site plan into distinct hydrozones and calculate the area (m²) of each. You will take the conceptual groupings from our last lesson and translate them onto a physical plan, then perform the essential area calculations that form the basis for all future hydraulic math. As a landscape architect, you are already skilled with site plans and area take-offs; this lesson will focus on applying those skills specifically through the lens of irrigation design.
1. The Foundation: The Landscape Plan
Every professional irrigation design begins with a detailed landscape plan. This plan is your primary source of information, dictating not just what will be planted, but where. Before any pipes are sized or sprinklers are chosen, the layout of the landscape defines the boundaries of your work.
Pro Design Tips For An Irrigation Sprinkler System | Irrigation Design And Drawing
The following video from American Irrigator reinforces this fundamental first step. Notice how the presenter emphasizes that the irrigation design must conform to the landscape design, not the other way around.
Watch the first 2 minutes and 30 seconds of the video. Pay attention to the core message: a good irrigation design is one that fits the landscaping.
As the video highlights, your first task is to study the plan and identify the different areas: lawn, shrub beds, trees, hardscapes, etc. These are the preliminary boundaries of your hydrozones.
2. Delineating Hydrozones on a Plan
Once you've analyzed the plant types and their Kc values (as we did in the last lesson), the next step is to draw these zones on your site plan. A hydrozone is a distinct area, containing plants with similar water needs, that will be irrigated by a single control valve.
Low-Volume Landscape Irrigation Design Manual
This section from the Rain Bird Low-Volume Landscape Irrigation Design Manual provides a clear, industry-standard definition of a hydrozone and shows how to document them on a site plan.
On page 14 of the manual, read the section titled 'Hydrozones'. This section provides the formal definition we will work with. Then, review the 'Sample Plot Plan' on page 16 to see how a property is broken down into ten distinct hydrozones.
The key steps to delineating hydrozones on your plan are:
- Obtain a to-scale site plan. This should show property lines, the house footprint, driveways, patios, and all proposed planting areas.
- Color-code or label plant groupings. Using the analysis from our previous lesson, mark all areas based on their assigned Kc value. For example, shade all cool-season turf (Kc=0.8) in green, all shrub beds (Kc=0.5) in blue, etc.
- Apply the zoning rules.
- Different Kc values? Create separate zones. A lawn (Kc=0.6) must be on a different valve than a shrub bed (Kc=0.5).
- Mixed plantings? If a single area contains plants with different water needs (e.g., shrubs and flowers), you must either create separate zones for them or accept that you will be watering the entire area based on the plant with the highest Kc, which is inefficient.
- Sun vs. Shade? A lawn area that is in full sun should be zoned separately from a lawn area in deep shade, even if they are the same grass type.
- Soil or Slope Changes? Areas with significantly different soil types (e.g., sandy vs. clay) or steep slopes should be separated.
Below are two examples of what a finished hydrozone plan looks like. The first is a simple, color-coded plan, and the second is a more formal architectural drawing.
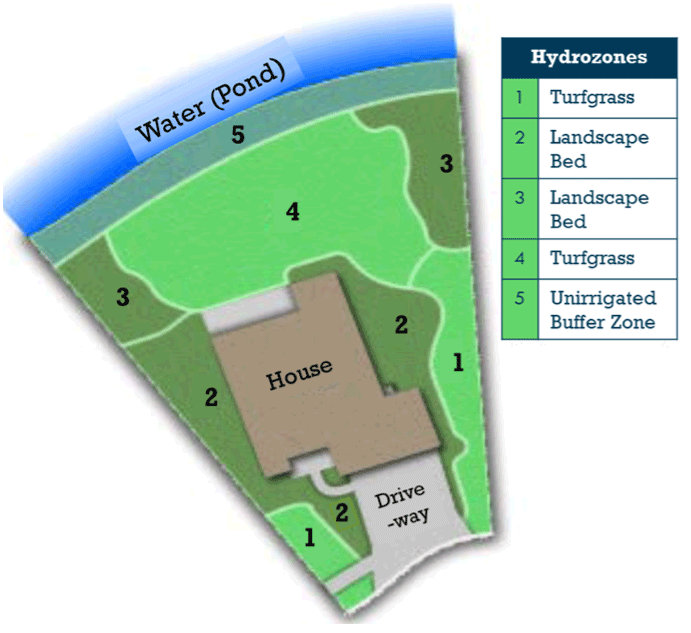

3. Calculating Hydrozone Area (m²)
With your zones clearly defined on the plan, you now need to calculate the area of each one in square meters (m²). This value is essential for determining how much water a zone requires and for subsequent hydraulic calculations.
While you are already familiar with performing area take-offs, the irregular shapes of landscape beds often require a specific approach.
CHEAT SHEET FOR CALCUATING SQUARE FOOTAGE ( ...
The 'CHEAT SHEET FOR CALCUATING SQUARE FOOTAGE' provides a simple but powerful strategy for tackling any shape you'll encounter.
Read the first sentence at the top of the cheat sheet ('Break an area into manageable pieces...'). Then, review section 5, 'Group plants into hydrozones,' which reiterates the color-coding concept we just discussed.
The core principle is to decompose complex shapes into simple, measurable geometric forms like squares, rectangles, triangles, and circles.
Area Formulas Quick Reference:
- Rectangle: Area = Length × Width
- Triangle: Area = 0.5 × Base × Height
- Circle: Area = (where )
- Trapezoid (for angled beds): Area =
Dealing with Irregular Curves:
For free-form shapes like kidney-bean-shaped pools or curving pathways, you can use the Offset Method.
- Draw a straight baseline through the longest axis of the shape.
- At regular intervals (e.g., every 1 meter), measure the width of the shape perpendicular to your baseline.
- Average all the width measurements.
- Multiply the average width by the length of your baseline.
- Area Average Width × Baseline Length
This approximation is usually accurate enough for irrigation design.
Worked Example
Let's apply this to a simple backyard plan.
A simple site plan showing a lawn, a shrub bed, and a flower bed.
Planting Plan:
- Area A: Cool-season turfgrass.
- Area B: Mixed woody shrubs.
- Area C: Annual flowers.
Step 1: Define Hydrozones
Based on our Kc values from the previous lesson:
- Zone 1 (Shrubs): Area B. Kc = 0.5.
- Zone 2 (Lawn): Area A. Kc = 0.8.
- Zone 3 (Flowers): Area C. Kc = 0.8.
- Note: Even though the lawn and flowers have the same Kc, the flowers will likely be irrigated with drip irrigation and the lawn with sprinklers. Different irrigation methods must be on different zones.
Step 2: Calculate Areas
-
Zone 1 (Shrubs - Area B): This is a simple rectangle.
- Area = Length × Width = 15 m × 3 m = 45 m²
-
Zone 2 (Lawn - Area A): This area is a large rectangle with the flower bed (Area C) removed from it. First, we find the area of the large rectangle.
- Total Rectangle Area = 15 m × 10 m = 150 m²
- We need to subtract the area of the flower bed. Let's calculate that next.
-
Zone 3 (Flowers - Area C): This is a semi-circle. The formula for a full circle is , so for a semi-circle it's . The diameter is 4 m, so the radius is 2 m.
- Area = = = 6.28 m²
- We'll round this to 6.3 m²
-
Final Calculation for Zone 2 (Lawn): Now we subtract the flower bed from the total rectangle.
- Area = 150 m² - 6.3 m² = 143.7 m²
Summary of Areas:
- Zone 1 (Shrubs): 45.0 m²
- Zone 2 (Lawn): 143.7 m²
- Zone 3 (Flowers): 6.3 m²
Test your understanding!
You have a corner lot. The main area is a right-angled triangle of warm-season turfgrass (Bermuda). The two sides forming the right angle are 20 meters and 30 meters long. A circular tree well with a 4-meter diameter is placed within this lawn for a large, established oak tree.
- How many hydrozones are required for this area and why?
- What is the total area (m²) of the turfgrass that needs to be irrigated?
Show answer
-
One hydrozone is required. According to the "Tree-in-Lawn" rule from our previous lesson, an established tree within a turf area is watered by the turf's irrigation. Since the turf (Kc=0.6) has a higher water need than the tree (Kc=0.5), we only need one zone designed for the turf.
-
The area of the turf is the total area of the triangle minus the area of the tree well.
- Triangle Area: 0.5 × Base × Height = 0.5 × 30 m × 20 m = 300 m²
- Tree Well Area: This is a circle with a 4m diameter, meaning a 2m radius.
Area = = 3.14159 × (2 m)² = 12.57 m² - Total Turf Area: 300 m² - 12.57 m² = 287.43 m²
Conclusion
You have now completed the foundational site analysis for any irrigation project. By combining the analytical skills from the last lesson with the practical drawing and calculation skills from this one, you are able to produce a clear, accurate, and defensible hydrozone plan.
Key Takeaways:
- An irrigation design starts with and is dictated by the landscape plan.
- Hydrozones are drawn directly onto the site plan based on plant type (Kc), sun exposure, soil, and irrigation method.
- Complex landscape shapes are made manageable by breaking them down into basic geometric forms (rectangles, triangles, circles) to calculate their area.
- The area (m²) of each hydrozone is a critical piece of data that you will carry forward into the next stage of design.
Next Steps
In our next lesson, we will begin Module 2 by calculating the actual water needs of our plants. You've defined the who (plant type/Kc) and the where (hydrozone area in m²). Next, you'll learn about Reference Evapotranspiration (ET₀)—the "weather" component of our equation—and use it to calculate the total daily water volume (in Liters) required for each zone.