Hello! Welcome back to our course on irrigation design.
In our last lesson, we established the fundamental importance of filters and pressure regulators for any successful drip irrigation system. We learned why these components are essential—to protect emitters from clogging and over-pressurization.
Today, we move from the "why" to the "how." The goal of this lesson is to learn how to select the specific filter and pressure regulator for a drip zone you are designing. You will learn to use technical specifications and data tables to make informed choices, ensuring your design is not just theoretical but practical and reliable. This is a core skill for any irrigation designer.
To do this, we will rely on two key pieces of information you already know how to determine:
- The specific requirements of your chosen emitter (from the manufacturer).
- The total flow rate of your irrigation zone (which you learned to calculate in a previous lesson).
Let's begin.
1. Specifying the Correct Filter
Selecting a filter involves three steps: determining the required filtration level (mesh), choosing the filter type, and verifying its flow capacity.
Step 1: Determine the Required Filtration Level (Mesh)
The required level of filtration is dictated entirely by the drip emitter you've chosen. Emitters with smaller internal water passages require finer filtration (a higher mesh number) to prevent clogging. This information is provided by the emitter manufacturer.
For a comprehensive guide, we can refer to a standard irrigation design manual.
The 'Trickle Irrigation Manual' from the B.C. Ministry of Agriculture provides an excellent reference table for determining minimum filtration requirements.
Please open this document and find Table 10.3: Minimum Filtration Requirements for Various Emitter Types (it's on page 154 of the PDF). You don't need to memorize it, but familiarize yourself with its structure. See how different emitters, like 'T-Tape' or 'Netafim PC Drippers', have a recommended 'Screen Mesh' listed. For example, many common drippers require 200 mesh filtration.
As a rule of thumb, most drip irrigation systems require 120 to 200 mesh filtration. Always verify this with the specific product's technical data sheet if available.
Step 2: Choose the Filter Type (Screen vs. Disc)
As we reviewed in the last lesson, the choice between a screen and disc filter depends on your water source:
- Screen Filters: The most common choice for residential and commercial projects using municipal (city) water. They are excellent at removing inorganic particles like sand, rust, and sediment.
- Disc Filters: More effective for water with high organic content, such as from ponds, lakes, or canals. The 3D filtration path is better at trapping algae and slime.
For the villa projects we are focusing on, which typically use a municipal water supply, a Y-type screen filter is the standard and most cost-effective choice.
Step 3: Verify the Flow Capacity
Every filter is designed to handle a specific range of flow rates. It's crucial that your zone's total flow rate falls within the filter's operating range.
- Too much flow: If the flow rate exceeds the filter's maximum capacity, it will cause a significant drop in pressure (known as head loss) and can even damage the filter screen.
- Too little flow: This is less of a concern for filters than for other components, but it's always best to size components appropriately.
You will find the flow capacity listed in the manufacturer's specifications, usually in Liters per Hour (L/h) or Gallons per Minute (GPM).
Let's see some real-world examples of filters and their specifications.
How To Select Drip Irrigation Filters [drip irrigation training]
This video from Pro Irrigation Training shows several common filter types and discusses their specifications.
Watch the segment from 06:10 to 10:09. The presenter discusses a typical 'Y' filter. Notice how he mentions its mesh size (150 mesh), maximum operating pressure, and—most importantly—the pressure loss at different flow rates (e.g., 10 GPM vs. 15 GPM). This demonstrates that flow rate directly impacts performance.
2. Specifying the Correct Pressure Regulator
Similar to selecting a filter, specifying a pressure regulator involves checking the required outlet pressure and verifying the flow rate range.
Step 1: Determine the Required Outlet Pressure
This is also determined by your chosen emitter. Most drip emitters and driplines operate best at a specific pressure, typically between 1.0 and 2.5 bar (15-35 PSI). Operating above this pressure causes misting and potential damage, while operating below it reduces the emitter's flow rate and watering radius.
Pressure regulators are sold with a fixed outlet pressure rating (e.g., 20 PSI, 30 PSI). You should choose the regulator that most closely matches the emitter's recommended operating pressure.
Step 2: Verify the Flow Rate Range
This is one of the most common mistakes made by beginners. Every pressure regulator has a minimum and maximum flow rate required for it to function correctly.
If your zone's flow rate is below the regulator's minimum, the internal mechanism won't activate properly, and it will fail to regulate the pressure. If the flow is above the maximum, it won't be able to handle the volume and will either fail or cause excessive pressure loss.
Let's look at a manufacturer's product table to understand this.
Low-Volume Landscape Irrigation Design Manual
The 'Low-Volume Landscape Irrigation Design Manual' from Rain Bird provides a perfect example of a pressure regulator selection table.
Read the section titled 'High Pressure' (page 71 of the PDF). Pay close attention to the paragraph that begins 'Like the valve, pressure regulators need to be matched to the flow rate.' Then, examine Table 9-7: Rain Bird Pressure Regulators on the next page. Notice how each model has a specific 'Flow Range' in GPM. The 'Label Color' (Red for low flow, Yellow for medium flow) is a practical aid used by this manufacturer.
As you saw in the manual, selecting a regulator isn't just about the pressure; it's about matching its flow range to your zone's calculated flow rate. A low-flow drip zone for a small flowerbed might only have a flow of 100 L/h (~0.4 GPM), requiring a specific low-flow regulator. A large zone of dripline for a hedge might have a flow of 1200 L/h (~5.3 GPM), which would need a different model.
3. A Practical Example
Let's put this all together with a scenario for a villa garden.
Design Brief:
- You are designing a drip zone for a series of planted beds containing 80 shrubs.
- You have selected a 4 L/h point-source dripper for each shrub.
- The dripper manufacturer specifies a minimum 150-mesh filtration and an optimal operating pressure of 1.4 bar (~20 PSI).
- The water source is clean municipal water.
Your Specification Process:
-
Calculate Total Zone Flow:
- 80 emitters × 4 L/h/emitter = 320 L/h
-
Convert Flow to GPM (for using US product tables):
- 320 L/h ÷ (60 min/hr × 3.785 L/gal) ≈ 1.4 GPM
-
Specify the Filter:
- Type: Screen Filter (since the water is municipal). A 'Y' filter is a standard choice.
- Mesh: 150 mesh, as required by the emitter manufacturer.
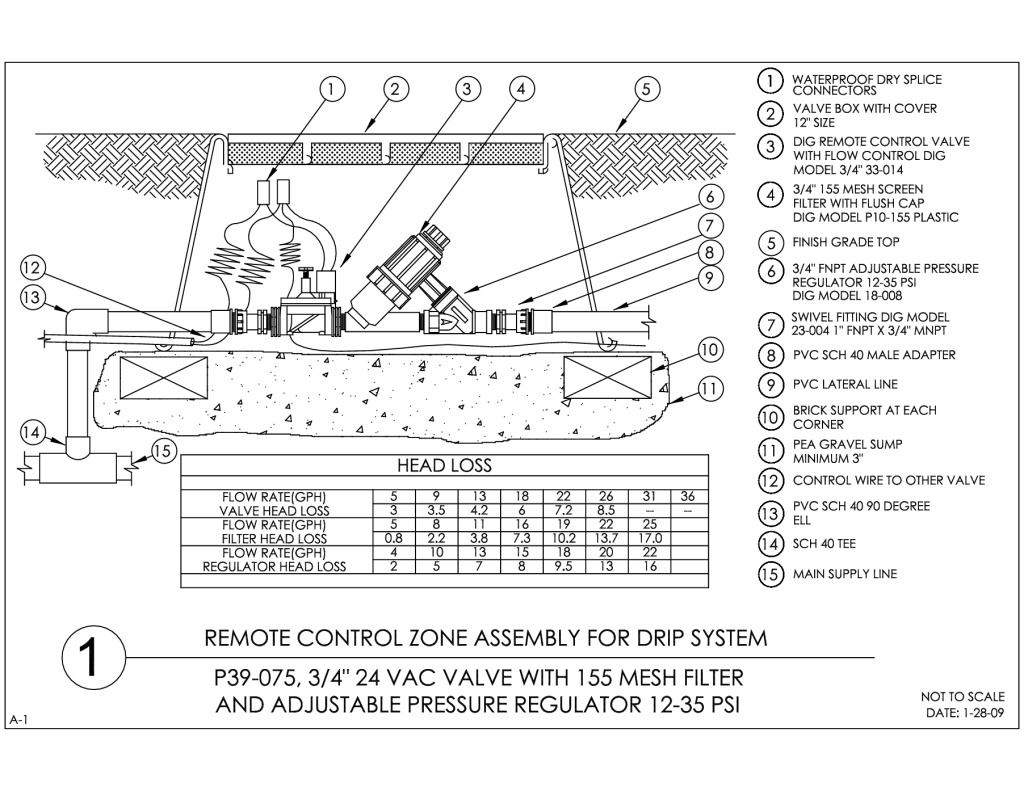
- Flow Capacity: 1.4 GPM is a low flow rate. A standard 3/4" or 1" Y-filter can easily handle this. For example, the filter discussed in the video LINK was rated for flows up to 18 GPM, so it would be more than adequate.
-
Specify the Pressure Regulator:
- Outlet Pressure: 20 PSI, to match the emitter's optimal pressure.
- Flow Range: We need a regulator that includes 1.4 GPM in its operating range. Let's consult the Rain Bird table (Table 9-7 from resource LINK):
- Model
PSI-L30X-075(Low Flow): Range is 0.1 - 5.0 GPM. Our flow of 1.4 GPM fits perfectly. - Model
PSI-M30X-075(Medium Flow): Range is 2.0 - 22.0 GPM. Our flow of 1.4 GPM is too low for this model. It would not regulate the pressure correctly.
- Model
- Conclusion: The correct choice is a low-flow regulator like the
PSI-L30Xmodel.
Final Specification: A control zone kit including a 150-mesh screen filter and a 20 PSI low-flow (0.1-5.0 GPM) pressure regulator.
Test your understanding!
You are designing a different zone for a long hedge using dripline. The total zone flow rate is 2,500 L/h. The dripline manufacturer requires 120-mesh filtration and an operating pressure of 2.1 bar (~30 PSI).
Using the concepts and the Rain Bird table from this lesson, what pressure regulator model would you specify?
Show answer
- Calculate Flow in GPM: 2,500 L/h ÷ (60 * 3.785) ≈ 11.0 GPM.
- Required Pressure: 30 PSI.
- Check the Table: We need a 30 PSI regulator that can handle 11.0 GPM.
- The
PSI-L30X-075(Low Flow) model has a max flow of 5.0 GPM, so it is too small. - The
PSI-M30X-075(Medium Flow) model has a flow range of 2.0 - 22.0 GPM. Our flow of 11.0 GPM falls comfortably within this range.
- The
- Specification: You would specify a 30 PSI medium-flow pressure regulator, such as the Rain Bird
PSI-M30X-075.
Conclusion
You have now learned the practical process for specifying the two most important protective components in a drip system. This moves you from concept to tangible design specifications.
Key Takeaways:
- Filter selection depends on emitter requirements (mesh), water source (type: screen/disc), and total zone flow (capacity).
- Pressure regulator selection depends on emitter requirements (outlet pressure) and, critically, the total zone flow (flow range).
- Always use manufacturers' data sheets and tables to verify your component choices. A component that is incorrectly sized for the flow rate will not perform its function.
In our next module, we will shift our focus from individual components to the network that connects them. The upcoming lesson, "Principles of Hydraulic Design," will introduce you to the fundamental relationship between flow rate, pipe diameter, and friction loss—the building blocks for sizing all the pipes in your irrigation system.