Hello! Welcome to the next step in our drip irrigation design journey.
In the last lesson, we learned how to calculate the total flow rate for a drip zone. You now know how to determine the total water demand, in Liters per Hour, for any group of emitters. This number is the foundation for the hydraulic design of the zone.
Today, we will use that knowledge to understand two of the most critical protective components in any drip system. This lesson covers the function of filters and pressure regulators. By the end of our session, you will be able to describe why these components are non-negotiable for a healthy, long-lasting drip system and explain the fundamental principles of how they work.
This knowledge is essential before we move on to selecting specific models and sizes in our next lesson.
1. Why Drip Systems Need Special Protection
Unlike robust sprinkler systems, drip irrigation relies on components with very small water passages. The emitters that deliver water to the plants have tiny orifices designed to release water at a slow, controlled rate. These small passages are highly susceptible to two main threats: high pressure and debris.
Let's look at each threat and its solution.
2. The Pressure Problem: Too Much of a Good Thing
Municipal water sources, or a pump connected to a well, typically supply water at a pressure between 3 and 6 bar. This is excellent for showers and faucets, but it's far too high for a drip system, which is designed to operate at a much lower pressure, typically 1 to 1.5 bar.
Connecting a drip line directly to a high-pressure source will cause immediate and significant problems.
To see what these problems look like in reality, let's watch a short video from Drip Depot.
Do You Really Need a Pressure Regulator? Understanding Water Pressure & Irrigation Systems
This video, 'Do You Really Need a Pressure Regulator?', clearly demonstrates the consequences of excessive water pressure in a drip system.
Watch the first minute of the video (00:00 - 01:05). Pay close attention to the issues mentioned, such as fittings popping off and inefficient misting. The video also explains the typical pressure difference between a residential source and a drip system's needs.
As the video showed, high pressure can cause:
- Component Failure: Emitters and fittings can be forced out of the tubing.
- Inefficient Watering: Emitters will "mist" or spray instead of dripping, leading to water loss through evaporation and wind drift.
- System Damage: The tubing and emitters themselves can be damaged by the constant stress.
The Solution: The Pressure Regulator
The solution is a pressure regulator (or pressure reducing valve - PRV). Its sole function is to take the high, often fluctuating, inlet pressure from your water source and provide a constant, reduced outlet pressure that is safe for the drip components.
How does it work?
A pressure regulator uses an internal spring and diaphragm mechanism to control the water flow. When high-pressure water enters, it pushes against a diaphragm, which in turn compresses a spring and moves a small valve (a "throttling stem") to partially close the water passage. This restriction reduces the pressure of the water that exits the device. The factory-set spring is calibrated to maintain a specific outlet pressure (e.g., 1.4 bar).

In short, a pressure regulator acts as a guardian for your drip zone, protecting it from the destructive force of high pressure.
Test your understanding!
You visit a project site where a contractor has installed a drip system for a series of flower beds. The client complains that every morning when the system runs, several of the small "spaghetti" tubes pop off the main line, and the emitters at the end are creating a fine fog over the plants instead of dripping.
What is the most likely cause of this problem, and which essential component has likely been omitted from the design?
Show answer
The most likely cause is excessive water pressure. The symptoms described—fittings popping off and emitters misting—are classic signs that the system is operating at a pressure much higher than it was designed for. The essential component that is missing or has failed is the pressure regulator.
3. The Debris Problem: Clogging the Arteries
The second major threat to a drip system is debris in the water. Even water from a municipal source, which appears perfectly clean, can contain small particles of sand, rust, or mineral scale from the main water lines. Water from wells, lakes, or rainwater harvesting tanks will contain even more organic and inorganic matter.
These particles can easily become lodged in the tiny orifices of drip emitters, causing a blockage. A clogged emitter means a dry plant, and a single clogged emitter can go unnoticed until the plant is already suffering.
The Solution: The Filter
The solution is to install a filter at the start of every drip zone. The filter's job is to physically screen the water and trap any particles large enough to clog an emitter before they can enter the system.
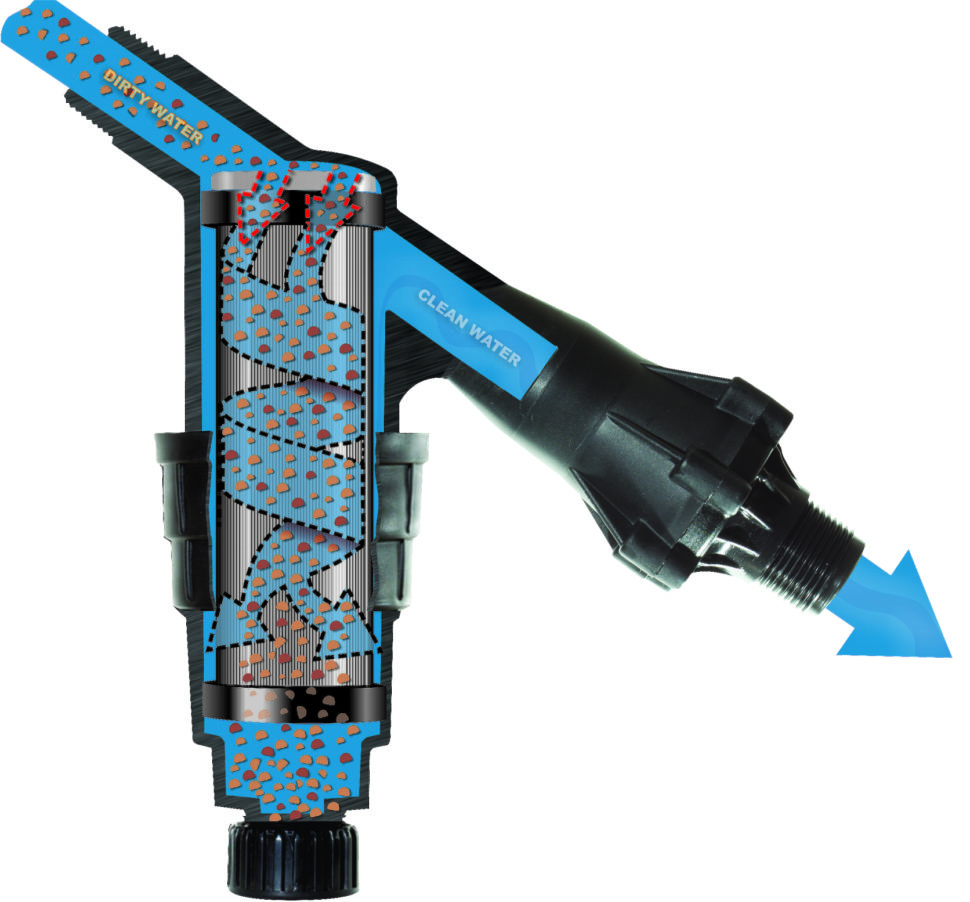
Filter Types and Characteristics
For practical landscape irrigation, you will primarily encounter two types of filters: screen filters and disc filters.
To understand them better, let's explore a few resources.
The Do-It-Yourself Guide to Backyard Drip Irrigation
First, let's read a concise overview from Utah State University's guide. It clearly explains the necessity of filters and introduces the main types.
Read the section titled 'Drip Irrigation - Filters'. Focus on the explanation of why filters are needed, the recommended mesh size (120-200), and the introduction of disk and screen filters.
Now, for a more detailed comparison, let's turn to a practical buying guide.
Irrigation Filter Buying Guide
This 'Irrigation Filter Buying Guide' from Drip Depot provides an excellent breakdown of when to choose a screen versus a disc filter.
Read the section titled 'Ease of Cleaning' which contains the sub-section 'Disc vs. Screen Filters'. This comparison will help you understand which filter type is best suited for different kinds of debris.
As you've read, here is a summary of the key differences:
- Screen Filters: These use a stainless steel or polyester mesh screen. They are excellent at removing hard, inorganic particles like sand and sediment. They are generally simple and easy to clean.
- Disc Filters: These consist of a stack of grooved discs. They provide a deeper filtration path and are more effective at capturing organic matter like algae and slime, which might otherwise get pressed through a simple screen.
Understanding Filtration Level: Mesh and Micron
Filters are rated by their level of filtration, most commonly using mesh size.
- Mesh refers to the number of openings in one linear inch of the screen.
- A higher mesh number means more (and therefore smaller) openings, resulting in finer filtration.
For drip irrigation, a filtration level of 120 to 200 mesh is typically required.
How To Select Drip Irrigation Filters [drip irrigation training]
To solidify your understanding of filter terminology and see some real-world examples, watch this clip from Pro Irrigation Training.
Please watch two segments from this video: From 01:14 to 03:07 to understand the definitions of 'mesh size' and 'micron'. From 14:52 to 15:57 for a brief comparison between screen and disc filters.
4. The Head Assembly: A Zone's Control Center
In a professional design, the filter and pressure regulator are installed together with the zone's control valve. This grouping of components is often referred to as the head assembly or zone control kit.
Typically, the order of components after the water source is:
- Mainline Pipe
- Zone Control Valve (Solenoid Valve)
- Filter
- Pressure Regulator
- Drip Zone Tubing
Some manufacturers offer convenient products that combine the valve, filter, and pressure regulator into a single, pre-assembled unit, which simplifies installation for drip zones.
Conclusion
You now understand the critical protective functions of filters and pressure regulators in a drip irrigation system. These are not optional accessories; they are essential for the system's performance, efficiency, and longevity.
Key Takeaways:
- Pressure Regulators: Reduce high source pressure (3-6 bar) down to a safe operating pressure for drip components (1-1.5 bar). This prevents fittings from popping off, stops inefficient misting, and protects the system from damage.
- Filters: Remove sediment and organic debris from the water to prevent the small orifices of drip emitters from clogging. This ensures every plant gets the water it needs.
- Filter Types: Screen filters are best for inorganic debris like sand, while disc filters are more effective against organic matter like algae.
- Filtration Level: Drip systems require fine filtration, typically 120-200 mesh.
In our next lesson, "Specify the correct filter type and pressure regulator rating for a given drip zone design," we will take the next logical step. You will learn how to use the zone's flow rate (which you already know how to calculate) and pressure requirements to select the exact filter and regulator models needed for your design.