Hello! Welcome back to your system design preparation.
In our last lesson, we focused on back-of-the-envelope calculations, translating abstract requirements into concrete estimates for traffic, storage, and bandwidth. Those numbers aren't just an academic exercise; they are the direct inputs for the next, crucial step in the interview.
Today, we move from the "what" and "how much" to the "how." This lesson addresses the learning outcome: Create a high-level design diagram including major components and APIs. You'll learn to sketch the blueprint of your system and define the "contract"—the API—that governs how clients interact with it. This is the part of the interview where your design starts to become a tangible reality on the whiteboard.
Given your backend engineering background, you're already familiar with many of the components we'll discuss, like application servers, databases, and caches. This lesson will focus on how to organize, diagram, and articulate your choices within the structured, time-constrained environment of a system design interview.
The Big Picture: High-Level Design (HLD)
The first step is to create a high-level design (HLD). Think of this as the architectural blueprint of your system. It's a "bird's-eye view" that shows the main components and how they communicate.
At this stage, your goal is to sketch a system that fulfills the core functional requirements. Resist the urge to dive into complex optimizations immediately. The first priority is to get a complete, working system on the whiteboard.
How to Answer System Design Interview Questions (Complete Guide)
Let's start with a quick overview from Exponent on what this stage entails. Notice the emphasis on laying out fundamental pieces and showing how data flows, without getting bogged down in scalability details just yet.
Watch this brief clip (03:18 - 04:23) for a concise introduction to creating a high-level design.
What Goes into a High-Level Design?
Your HLD diagram should be composed of standard building blocks. As an experienced engineer, you'll recognize these. The key in an interview is to select the right ones for the problem and draw them clearly.
System Design Interview Questions & Prep (from FAANG experts)
The article 'System Design Interview Questions & Prep' provides a great definition of High-Level Design and lists the typical components you'll be working with.
Read the section '1.3.1 High-level design or HLD'. Pay close attention to the list under 'Architecture components.' These are the boxes you'll be drawing on the whiteboard.
A typical HLD will include components like:
- Clients (Mobile, Web)
- Content Delivery Network (CDN)
- Load Balancers
- API Gateway / Application Servers
- Databases (SQL, NoSQL)
- Cache Servers (e.g., Redis, Memcached)
- Message Queues (e.g., Kafka, RabbitMQ)
- Object Storage (e.g., S3)
Here are a couple of examples of what a finished HLD might look like.
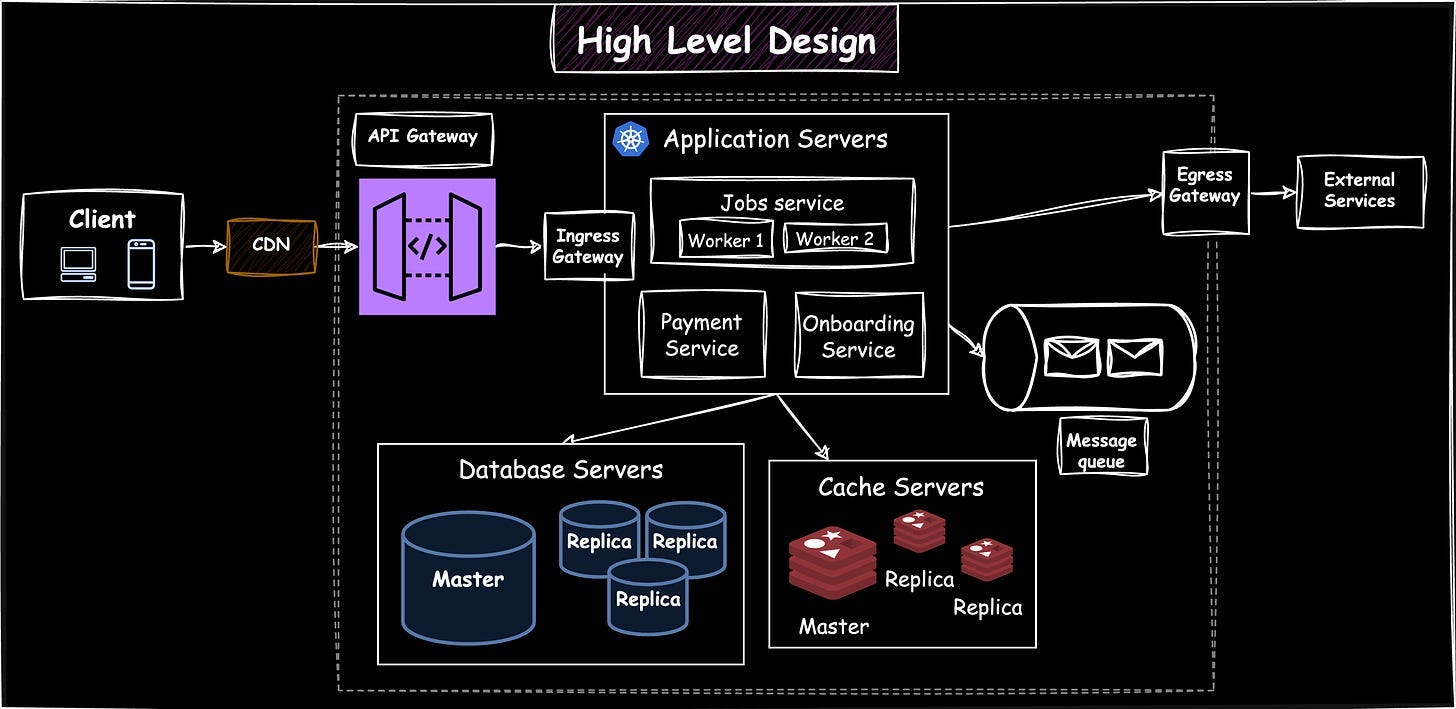
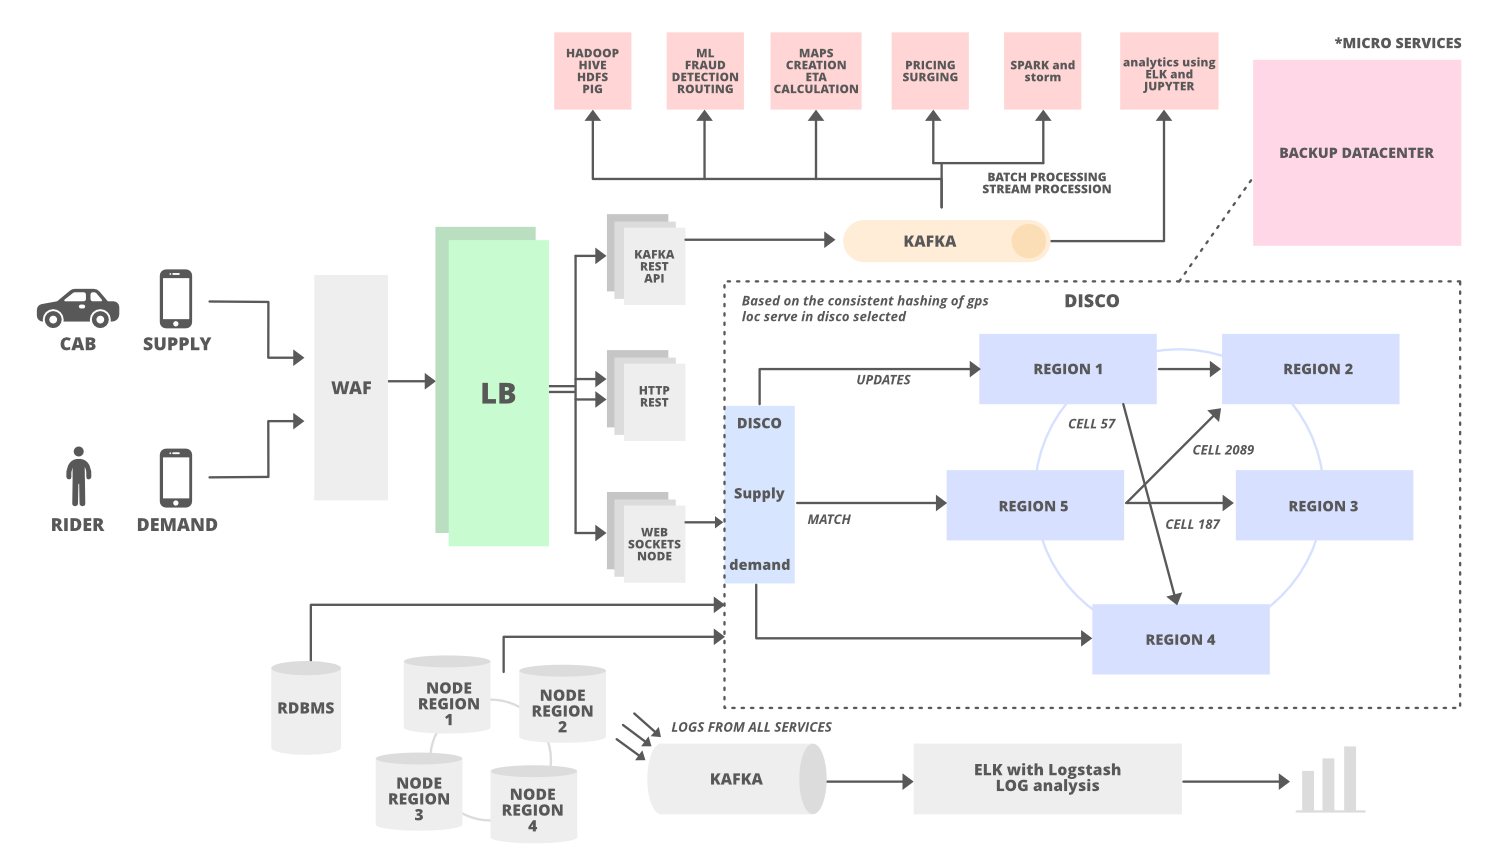
Defining the Contract: API Design
Before you start drawing all those boxes and arrows, it's a best practice to first define your system's API. The API is the contract between the client and your system. Defining it upfront clarifies what the system needs to do and provides a clear guide for your HLD.
In an interview, you should aim to spend no more than 5 minutes on this step. The goal is a "good enough" API, not a perfect one.
API Design in System Design Interviews w/ Meta Staff Engineer
This video from Hello Interview features a former Meta Staff Engineer who explains the role of API design in system design interviews. It's an excellent resource that covers what you need to know without overcomplicating it.
Watch the introduction (00:00 - 02:34) to understand the context, the importance of being concise, and the basic concept of an API in a client-server model.
Choosing an API Protocol
You'll need to choose a protocol for your API. While there are several options, the decision is usually straightforward.
API Design in System Design Interviews w/ Meta Staff Engineer
Let's continue with the same video to quickly cover the main API protocols you should know.
Watch the segment from 02:34 to 03:59. It introduces REST, GraphQL, and RPC, and gives clear guidance on when to choose each. As you'll see, REST is almost always your default choice.
- REST (Representational State Transfer): This is the industry standard for client-server APIs and should be your default choice. It's built on standard HTTP verbs (GET, POST, etc.) and uses URLs to represent resources.
- GraphQL: A good choice if you have diverse clients (e.g., mobile and web) with different data needs. It allows clients to request exactly the data they need, preventing over-fetching.
- RPC (Remote Procedure Call): Best suited for internal, high-performance communication between your microservices. It's more efficient than REST but less flexible for external clients.
Designing RESTful APIs
Since REST is the most common choice, let's focus on its core principles. A well-designed REST API is intuitive and predictable.
The key concepts are:
- Resources: The "nouns" of your system (e.g.,
users,tweets,products). These should be plural and appear in the URL path. - HTTP Verbs: The "actions" you perform on resources (
GET,POST,PUT,PATCH,DELETE). - Inputs: How you provide data to the API (path parameters, query parameters, request body).
- Responses: How the API communicates back (status codes and a response body, usually JSON).
API Design in System Design Interviews w/ Meta Staff Engineer
This is the most critical part of the API design video. It provides a detailed breakdown of how to design REST endpoints correctly.
Watch this detailed section (03:59 - 12:39). Pay close attention to the rules of thumb for resources, HTTP methods, and how to handle inputs (path vs. query vs. body). The guidance on shorthanding responses is also very practical for an interview setting.
For example, designing an API for a simple Twitter-like service:
- Create a tweet:
POST /tweetswith the tweet text in the request body. - Get a specific tweet:
GET /tweets/{tweetId} - Get a user's tweets:
GET /users/{userId}/tweets - Get the user's feed:
GET /feed
Advanced API Topics: Authentication & Pagination
In a senior-level interview, simply defining the endpoints might not be enough. The interviewer might ask follow-up questions about security or handling large datasets.
API Design in System Design Interviews w/ Meta Staff Engineer
Finally, let's cover two common follow-up topics. Being prepared for these shows you're thinking about real-world implementation details.
Watch the final segment on follow-up questions (21:49 - 27:41). Understand the difference between offset and cursor-based pagination, and grasp the core principle of deriving user identity from a secure token (like a JWT) rather than an insecure request body parameter.
- Authentication: Sensitive actions (like creating a tweet) must be authenticated. The user's identity should be derived from a secure token (e.g., a JWT or session token) passed in the request header, not from a
userIdfield in the request body. - Pagination: Endpoints that can return many items (like a user's list of followers) must be paginated.
- Offset-based: Simple to implement (
?page=2&limit=25). Can have issues with frequently changing data. - Cursor-based: More robust. Uses an identifier from the last item seen to fetch the next "page" (
?cursor=last_item_id&limit=25).
- Offset-based: Simple to implement (
Putting It All Together: From API to HLD
Now, let's connect the dots. The framework from Hello Interview suggests a clear path: identify core entities, define the API, and then build the HLD to support that API.
System Design Delivery Framework - Hello Interview
This article from Hello Interview lays out the delivery framework we've been following. It formalizes the process of using your API definition to build your high-level design diagram.
Read the sections 'Core Entities', 'API or System Interface', and 'High Level Design'. This reinforces the structured approach: identify nouns (entities), define the contract (API), and then draw the architecture (HLD).
Let's walk through an example. Imagine we're designing Instagram.
-
Functional Requirements: Upload photos, view a news feed.
-
Core Entities:
User,Photo,Follow. -
API Design (REST):
POST /v1/photos- Upload a photo.GET /v1/feed- Get the user's news feed.POST /v1/users/{followed_user_id}/follow- Follow a user.
-
High-Level Design Diagram: We can now build the diagram by tracing each API call.
POST /v1/photos:- The client sends the request to a Load Balancer.
- The LB forwards it to an Application Server (or a dedicated Media Service).
- The server uploads the actual image file to Object Storage (like S3).
- It then writes the photo's metadata (ID, caption, ownerID, object storage URL) to a Database (e.g., a SQL or NoSQL DB).
GET /v1/feed:- The client calls the
feedendpoint. - The request goes to a Load Balancer, then to a Feed Service.
- The Feed Service determines which users the current user follows (perhaps by querying a
Followstable or service). - It then gathers the latest photo metadata for those users from a Database or a pre-computed Cache (like Redis).
- The service returns a list of photo metadata, including URLs that point to a CDN for fast delivery.
- The client calls the
This systematic process ensures your diagram directly addresses the system's requirements as defined by your API. You can find a similar example detailed in the "Design Instagram" section of the Igotanoffer article (LINK, section 2).
Conclusion
You've now learned how to bridge the gap between abstract requirements and a concrete architectural plan. This is a pivotal moment in any system design interview.
Key Takeaways:
- HLD is the Blueprint: It's a "bird's-eye view" of your system's major components and their interactions. Start simple and get a working system on the board first.
- API is the Contract: Define your API before drawing the HLD. It clarifies the system's responsibilities and guides your architectural choices.
- REST is Your Default: Use plural nouns for resources and standard HTTP verbs for actions. Be prepared to discuss pagination and authentication.
- Trace the Request: Build your HLD by tracing how each API endpoint is served by your components. This ensures your design is purposeful and directly solves the problem.
In our next lesson, we'll cover "Identify key areas for deep dive based on the problem and interviewer cues." Once your high-level design is on the whiteboard, the conversation will shift. You'll need to analyze your own design for potential bottlenecks, discuss trade-offs, and be ready to "zoom in" on specific components. This is where you demonstrate the depth of your technical expertise.