Welcome back! In our last lesson, you successfully created your first local Git repository. You've essentially set up a "time machine" for a project, but so far, it's empty.
Today, we'll learn how to actually use it. The goal of this lesson is to master the two most fundamental commands in a developer's daily workflow: git add and git commit. By the end of this hour, you will be able to take snapshots—or "save points"—of your project's progress. This is the core of version control and a skill you will use every single day as a professional developer.
The Three Areas: Where Your Code Lives
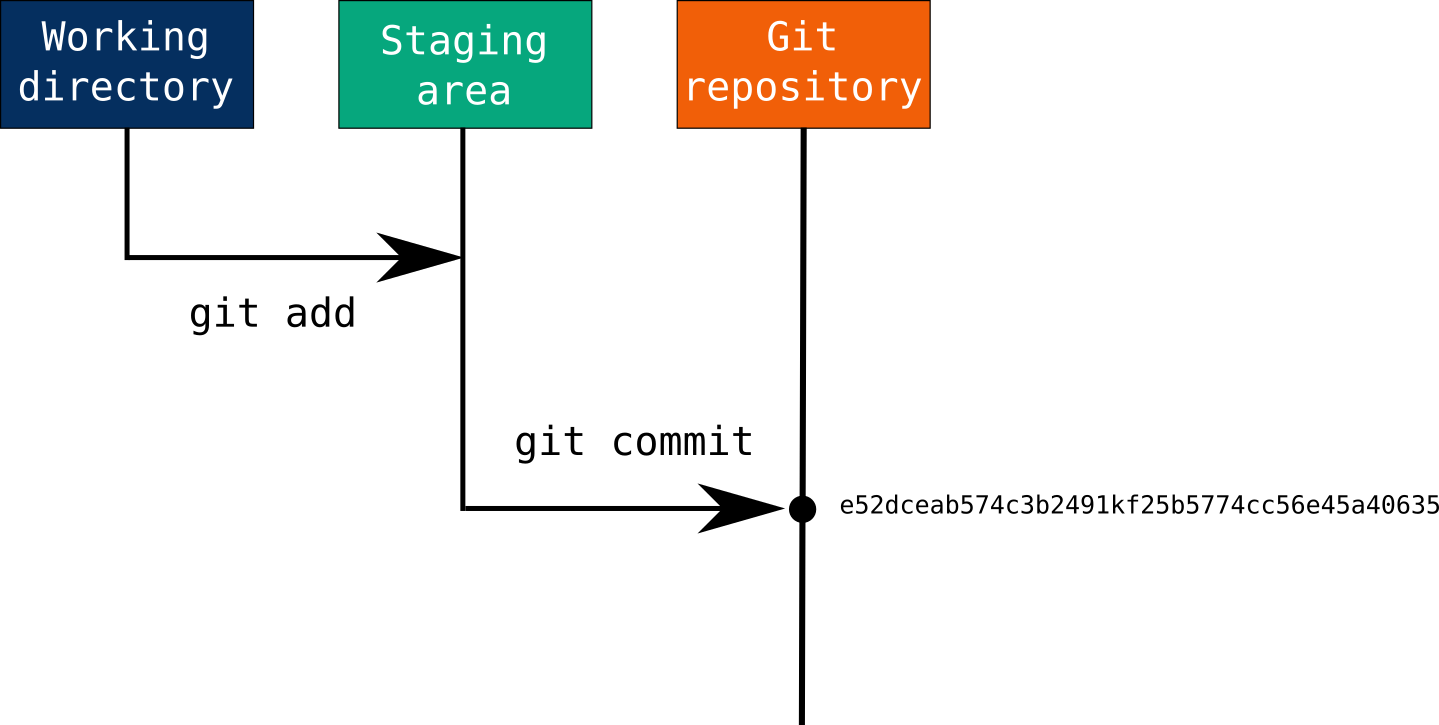
Before we type any commands, it’s crucial to understand a simple but powerful concept: Git manages your files across three distinct areas. Understanding this "three-area model" is the key to using Git effectively and confidently.
Git by example: Interactive guide
To start, let's get a clear mental picture of these three areas. The 'Git by example' guide provides a fantastic, no-nonsense explanation with a helpful diagram.
Read the 'Concepts' section, focusing on the descriptions of the 'Working tree', 'staging area', and 'repo'. Don't worry about the commands in the diagram yet; just focus on what each of the three areas represents.
Let's break that down with a simple analogy:
- Working Directory (or Working Tree): This is your project folder, where you actually edit your files (
index.html,style.css, etc.). Think of this as the main floor of a store where you pick out items. - Staging Area: This is an intermediate area where you place the specific changes you want to save in your next snapshot. It’s like your shopping cart. You decide which items from the store floor you want to put in your cart to buy.
- Repository (.git folder): This is where Git permanently stores your project's history as a series of snapshots, called "commits." This is the final checkout counter. Once you commit, you get a "receipt" (the commit ID), and the snapshot is saved forever.
This two-step process—first adding to a "shopping cart" and then "checking out"—is what makes Git so flexible. It gives you precise control over what gets saved in each snapshot.
Here is a visual summary of that flow:
Hands-On: Your First Commit
Now, let's put this theory into practice. We'll continue with the my-first-repo project you created in the last lesson.
1. Set Up Your Workspace
- Open VS Code.
- Open the integrated terminal (
Terminal > New Terminalor `Ctrl+``). - Navigate into your project folder with the
cdcommand. If you're not already there, type:cd my-first-repo - Now, open this folder in VS Code by typing
code .in the terminal. (The dot means "the current directory"). This will open a new VS Code window with your project folder in the Explorer sidebar.
2. Create Your First File (Working Directory)
-
In the VS Code Explorer sidebar, create a new file named
index.html. -
Add the following basic HTML code to it and save the file:
<!DOCTYPE html>
<html lang="en">
<head>
  <meta charset="UTF-8">
  <title>My First Repo</title>
</head>
<body>
  <h1>Hello, Git!</h1>
</body>
</html>
You've just made a change in your Working Directory.
3. Check the Status
Go back to your terminal and run what will become your most-used Git command:
git status
Git will respond with something like this:
On branch main
No commits yet

Untracked files:
  (use "git add <file>..." to include in what will be committed)
        index.html

nothing added to commit but untracked files present (use "git add" to track)
This tells you that Git sees a new file (index.html) in your working directory, but it isn't tracking it yet.
4. Stage the Change (Move to Staging Area)
Now, let's tell Git we want to include this new file in our next snapshot. We'll use the git add command.
git add index.html
You've just moved the index.html file into the Staging Area. To confirm this, run git status again:
git status
The output has changed:
On branch main
No commits yet

Changes to be committed:
  (use "git rm --cached <file>..." to unstage)
        new file:   index.html
Git now shows the file under "Changes to be committed." It's ready to be saved.
5. Save the Snapshot (Commit to Repository)
Finally, let's create our first permanent snapshot using git commit. The -m flag allows you to include a "commit message" directly from the command line. A good message briefly explains what you changed.
git commit -m "Initial commit: Add index.html"
The output will confirm that your commit was successful.
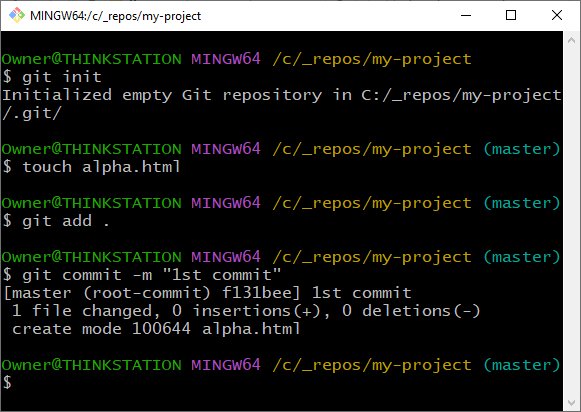
Now, run git status one last time:
git status
The output will be: nothing to commit, working tree clean. This means your Working Directory, Staging Area, and latest Repository snapshot are all in sync. Congratulations, you've successfully tracked your first change!
The Cycle Continues: Tracking More Changes
This modify -> add -> commit cycle is the heartbeat of using Git. Let's do it one more time.
- Modify: In VS Code, change the
<h1>inindex.htmlto say<h1>My First Commit!</h1>. - Check Status: Run
git status. Git will now showmodified: index.htmlunder "Changes not staged for commit." - Stage: Instead of naming the file, you can use a period (
.) to add all modified or new files in the current directory to the staging area. This is a common shortcut.git add . - Commit: Save this new snapshot with a descriptive message.
git commit -m "Update page heading in index.html"
You've just created a second point in your project's history. You can now, in theory, travel back in time to either of these two versions of your project.
To reinforce what you just did, let's look at another resource that tells this story visually.
A Grip On Git — A simple, visual Git tutorial
The interactive tutorial 'A Grip On Git' provides a great visual narrative that mirrors the steps we just took. Seeing it explained in a different way will help solidify the concepts.
Read from the heading 'Now let's say that we've already created two files...' down to just before the line 'Now let's turn to the label dubbed main.' As you read, notice how the diagrams show new commits being created and linked to the previous ones, visually building the project's history.
Conclusion
Fantastic work. Today you've mastered the most fundamental workflow in version control, a skill that is absolutely essential for any developer job. You didn't just learn commands; you learned the underlying model of how Git tracks change, which will prevent a lot of confusion down the road.
Here are the key takeaways:
- Git tracks files across three areas: the Working Directory, the Staging Area, and the Repository.
- The core workflow is a two-step process:
git add <file>orgit add .to move changes from the working directory to the staging area.git commit -m "Your message"to save the staged changes permanently to the repository.
git statusis your best friend. Use it frequently to see the state of your project and understand what to do next.
In our next lesson, we'll bridge the gap between your local machine and the outside world. We'll learn how to create a remote repository on GitHub and push your local commits to it. This is how you'll back up your code, collaborate with others, and—importantly—showcase your work to potential employers.