Hello! Welcome to the third lesson in our journey to becoming a full-stack developer.
In the last lesson, we set up your "digital workshop" by installing and configuring VS Code. You now have a professional code editor, supercharged with extensions that will help you write clean, error-free code more efficiently.
Today, we're adding another essential tool to your toolkit: version control. The goal for this lesson is to learn how to initialize a local Git repository for a new project. This is the first step every professional developer takes when starting a new project. It's like turning on the "save game" feature for your code, ensuring you can always go back to a previous version and never lose your work. This skill is non-negotiable in the industry and fundamental to working on any project, big or small.
What is Version Control?
Before we type any commands, let's clarify what we're dealing with. You'll often hear the terms "Git" and "GitHub" used together, but they are two different things. Understanding the difference is crucial.
Git and GitHub for Absolute Beginners, Hands-On Tutorial
The article 'Git and GitHub for Absolute Beginners' does an excellent job of explaining this distinction in plain English. Let's start there.
Please read 'Section 1: Understanding Git and GitHub in Plain English'. Focus on the 'time machine' analogy for Git and the 'online home' analogy for GitHub.
To summarize the key idea:
- Git is the software on your computer that tracks changes. It's the "time machine" that lets you save snapshots (called "commits") of your project.
- GitHub is a website where you can store your Git projects online, collaborate with others, and showcase your work to potential employers.
Today, our focus is entirely on Git, the tool that runs locally on your machine.
One-Time Setup: Introducing Yourself to Git
Before you can start saving snapshots of your code, you need to tell Git who you are. This is a one-time configuration step on any new machine. Every change you save will be stamped with your name and email, which is vital for tracking who did what, especially in team projects.
To do this, you'll first need a GitHub account, as it's best practice to use the same email for both your local Git setup and your future online repositories.
Git and GitHub for Absolute Beginners, Hands-On Tutorial
The same guide provides a simple, step-by-step walkthrough for this initial setup.
Follow the steps in 'Section 2: First Time Setup'. First, create a GitHub account if you don't have one. Then, open the integrated terminal in VS Code (Terminal > New Terminal) and run the git config commands as shown to set your username and email. Make sure to use the same email you used for your GitHub account.
After running the commands, you can confirm your setup with git config --global --list. If you see your user.name and user.email printed in the terminal, you're all set. You won't have to do this again on this computer.
Creating Your First Git Repository
Now for the main event. A "repository" (or "repo") is just a folder that Git is tracking. The act of telling Git to start tracking a folder is called "initializing a repository."
Let's do this for a new project.
- Open VS Code.
- If you still have a project open, you can close it via
File > Close Folder. - Open the integrated terminal (
Terminal > New Terminalor `Ctrl+``). - We'll create a new directory for our project. Type the following command and press Enter. This command creates a new folder named
my-first-repo:mkdir my-first-repo - Now, navigate into that new directory. All Git commands must be run from within the project folder.
cd my-first-repo
Your terminal prompt should now show that you are inside the my-first-repo folder. This folder is currently just a normal folder. Now, let's turn it into a Git repository.
Git Init: How to Initialize and Set Up a Git Repository
This article from DataCamp gives a concise explanation of the git init command and its purpose.
Read the sections 'What Is Git Init?' and 'Basic usage of git init'. This will clarify what the command does and the steps we are about to take.
As the article explains, running git init creates a hidden .git sub-folder. This folder contains all the information Git needs to track the history of your project. You should never manually edit files in this folder.
Now, in your terminal (which should still be inside the my-first-repo directory), run the command:
git init
You should see a message like Initialized empty Git repository in /path/to/your/my-first-repo/.git/.
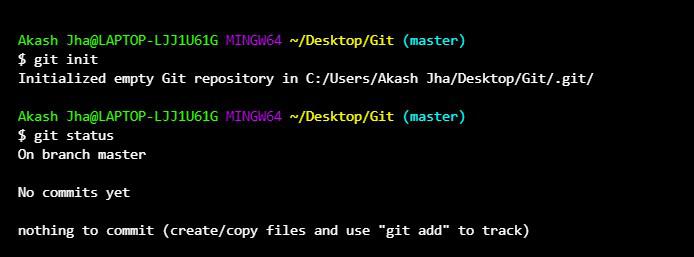
You have successfully created a local Git repository! Git is now officially "watching" this folder for any changes.
To see the status of your new repository, run this command:
git status
The output tells you that you're on the master or main branch and that there are "no commits yet." This is exactly what we expect. Your repository exists, but you haven't saved any snapshots of your work yet.
What If You Make a Mistake?
A common beginner mistake is running git init in the wrong folder (for example, your home directory). If you do this, don't panic. It's easy to undo.
Git Init: How to Initialize and Set Up a Git Repository
The DataCamp article has a quick guide on how to fix this exact issue.
Read the short sections 'Mistakenly initializing in the wrong directory' and the first FAQ 'How do I undo git init...'. This is a valuable troubleshooting skill to have.
The key is simply to delete the hidden .git folder from the directory where you accidentally initialized the repository.
Conclusion
Excellent work today. You've taken a massive step into the world of professional software development. Setting up version control from day one is a critical habit that separates pros from amateurs. It provides a safety net for your work and is the foundation for all collaboration.
Let's review the key takeaways:
- Git is a local version control system—a "time machine" for your code.
- You must configure Git with your name and email using
git configso your work can be identified. - The
git initcommand transforms a regular folder into a Git repository, telling Git to start tracking it. git statusis your go-to command to check the current state of your repository.
In our next lesson, we will build directly on what we did today. Now that we have a repository, we need to learn how to actually save our work. We will cover how to use basic Git commands (add, commit) to track changes in a project, creating our very first snapshot in our new time machine.