Hello! Welcome back to our course on mastering Docker for professional use.
In the previous lesson, we established a clear distinction between Docker Compose for local development and Kubernetes for production orchestration. We highlighted that Kubernetes's power lies in its ability to automate management tasks like scaling and self-healing.
Today, we'll dive into a core mechanism that enables this self-healing: health checks. To be a "good citizen" in a Kubernetes cluster, your application needs to provide signals about its internal state. Your learning outcome for this lesson is to adapt a Docker image to include health check endpoints for Kubernetes liveness and readiness probes. This involves understanding what Kubernetes is asking and modifying your application code to provide the right answers.
What are Kubernetes Health Checks (Probes)?
In our last lesson, we mentioned that Kubernetes can automatically restart a failed container. But how does it know the container has failed? The application process might still be running, but it could be stuck in a deadlock, unable to handle requests.
Kubernetes solves this by periodically "probing" your container to check its health. There are three types of probes, each answering a different question.
Kubernetes Health Checks: Types, Configuration & ...
To start, let's get a clear definition of the three types of probes. The article "Kubernetes Health Checks" from Spacelift provides an excellent overview.
Please read the section titled "Types of Kubernetes probes". Focus on the distinct purpose of liveness, readiness, and startup probes.
Let's summarize the key roles:
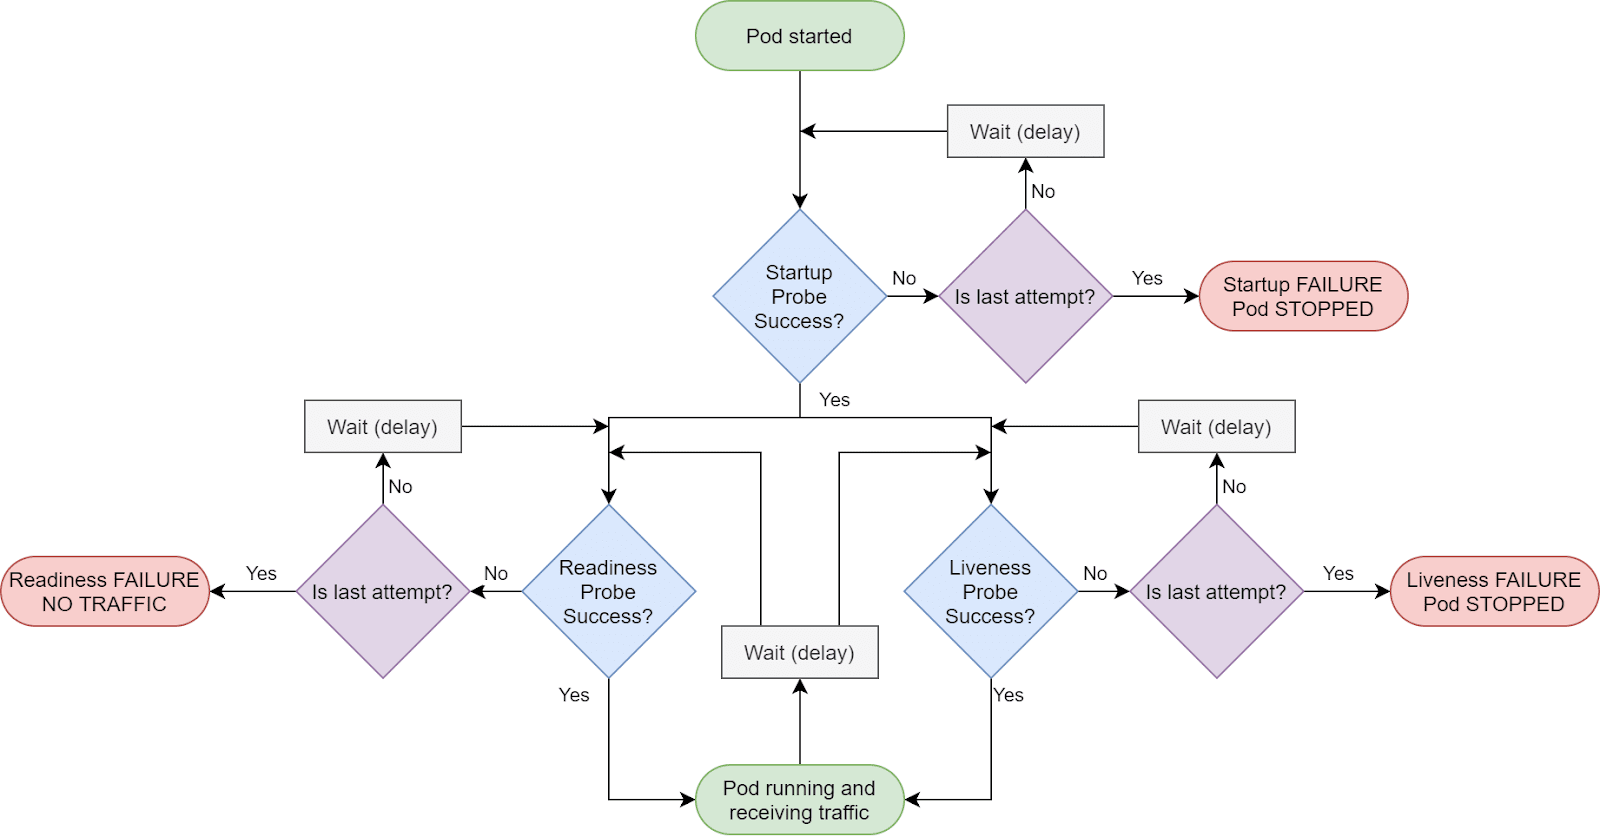
- Liveness Probe: Answers the question, "Are you alive?" If this probe fails, Kubernetes assumes the application is in an unrecoverable state (like a deadlock) and restarts the container.
- Readiness Probe: Answers, "Are you ready to accept traffic?" If this probe fails, Kubernetes knows the container is still alive but temporarily unable to do work (e.g., connecting to a database). It stops sending traffic to the container until the probe succeeds again.
- Startup Probe: Answers, "Have you finished starting up?" This is used for applications with slow start times. It disables the liveness and readiness probes until the application is fully initialized, preventing them from prematurely restarting a container that is just taking a while to launch.
The following flowchart illustrates how these probes work together to manage a container's lifecycle.
Kubernetes Probes vs. Docker's HEALTHCHECK
You might know that you can add a HEALTHCHECK instruction to a Dockerfile. It's important to understand why this is not sufficient for Kubernetes.
Kubernetes Health Checks: Types, Configuration & ...
The same Spacelift article has a section that directly addresses this important distinction.
Please read the section "Understanding Kubernetes probes vs Docker HEALTHCHECK".
The key takeaway is that Kubernetes ignores the Dockerfile HEALTHCHECK instruction. Kubernetes's probe system is far more sophisticated because it distinguishes between different types of failure (liveness vs. readiness) and takes different actions (restart container vs. stop traffic). This granular control is essential for managing complex applications in production.
How to Implement Health Check Endpoints
For Kubernetes to probe your application using the common httpGet method, your application must expose HTTP endpoints that Kubernetes can call. The standard practice is to create dedicated endpoints for this purpose.
A common convention is to create:
/healthz: For the liveness probe./readyz: For the readiness probe.
(The trailing 'z' is a convention to avoid naming collisions with any user-facing endpoints like/healthor/ready).
The logic within these endpoints is critical:
- Liveness (
/healthz): This endpoint should be extremely simple. If the HTTP server is up and can respond, it should return a200 OKstatus. It should not check external dependencies like databases. A failing liveness probe is a death sentence for the container, so you only want it to fail for truly fatal, unrecoverable errors. - Readiness (
/readyz): This is where you check dependencies. Is the database connection available? Can you reach the caching service? Has the initial data been loaded? If everything is good, return200 OK. If a dependency is unavailable, return a non-200 status code (e.g.,503 Service Unavailable). This tells Kubernetes, "I'm alive, but don't send me traffic right now."
Let's see a practical code example.
Kubernetes Probes - Liveness, Readiness & Startup with Code
This video, "Kubernetes Probes - Liveness, Readiness & Startup with Code" by JOMO Developer, provides a great walkthrough of a Node.js application with these endpoints implemented.
Please watch the section from 04:32 to 05:48. Even if you're not a Node.js developer, focus on the logic being implemented for the /startup, /liveness, and /readiness endpoints. Notice how they check different conditions before returning a successful response.
As the video shows, the application's code is the source of truth for its health status. By building these simple endpoints, you give Kubernetes the visibility it needs to manage your application effectively.
Configuring Kubernetes to Use Your Endpoints
Once your application exposes the health endpoints, the final step is to tell Kubernetes about them in your deployment manifest. This is where you define the probes and connect them to the endpoints you just created.
Kubernetes Health Checks: Types, Configuration & ...
Let's return to the Spacelift article to see how to configure the probes in a Kubernetes YAML file.
Please read the following sections: "How to configure and use Kubernetes health check probes": Pay close attention to the action types (exec, httpGet) and the timing options (initialDelaySeconds, periodSeconds, etc.). "Example 1. How to configure a liveness probe..." and "Example 2. How to configure a readiness probe...": Look at the structure of the livenessProbe and readinessProbe blocks in the YAML examples.
Here is a consolidated example of what this looks like in a Kubernetes Deployment manifest for a Python application running on port 8000:
apiVersion: apps/v1
kind: Deployment
metadata:
  name: my-python-app
spec:
  replicas: 3
  template:
    spec:
      containers:
      - name: web
        image: my-python-app:1.0.0
        ports:
        - containerPort: 8000
        livenessProbe:
          httpGet:
            path: /healthz  # Endpoint in your app for liveness
            port: 8000
          initialDelaySeconds: 15 # Wait 15s after start before first probe
          periodSeconds: 20      # Probe every 20s
        readinessProbe:
          httpGet:
            path: /readyz  # Endpoint in your app for readiness
            port: 8000
          initialDelaySeconds: 5  # Wait 5s after start before first probe
          failureThreshold: 3     # Consider it failed after 3 consecutive failures
This configuration tells Kubernetes exactly how to monitor your application, bridging the gap between your application's internal state and Kubernetes's orchestration logic.
Test your understanding!
You are deploying a web service that takes about 45 seconds to start because it needs to load a large machine learning model into memory before it can serve predictions. During this time, the web server is running but any request to the /predict endpoint will fail.
How would you configure the liveness and readiness probes for this service? Which endpoints would you create in your application code, and what would their logic be?
Show answer
This is a classic use case for differentiating between liveness and readiness.
-
Liveness Probe:
- Endpoint: Create a
/healthzendpoint. - Logic: This endpoint should do nothing but return
200 OK. Its only job is to confirm that the web server process itself is running and responsive. It should not check if the model is loaded. - K8s Config: The
livenessProbewould point to/healthz. This ensures Kubernetes doesn't restart the container just because the model is still loading.
- Endpoint: Create a
-
Readiness Probe:
- Endpoint: Create a
/readyzendpoint. - Logic: This endpoint must check if the ML model has been successfully loaded into memory. It should return
200 OKonly after the model is ready. Before that, it should return a503 Service Unavailablestatus. - K8s Config: The
readinessProbewould point to/readyz. This tells Kubernetes not to add the container to the service's load balancer pool (i.e., not to send it any traffic) until the model is loaded and the container is truly ready to serve prediction requests. Using aninitialDelaySecondsof around 45-60 seconds would also be a good idea to give the app time to start without logging initial probe failures. AstartupProbecould also be used here for an even more robust solution.
- Endpoint: Create a
Conclusion
Congratulations! You have just learned one of the most important patterns for building production-ready, cloud-native applications. By instrumenting your application with health endpoints, you enable Kubernetes to perform its orchestration magic, leading to more resilient and reliable systems.
Key Takeaways:
- You adapt a Docker image for Kubernetes by adding HTTP endpoints to your application code (e.g.,
/healthz,/readyz). - Liveness probes (
/healthz) are for fatal, unrecoverable errors and trigger container restarts. Their logic should be simple. - Readiness probes (
/readyz) are for temporary issues (like dependencies being unavailable) and control traffic flow. Their logic can be more complex. - The Dockerfile
HEALTHCHECKinstruction is ignored by Kubernetes; you must configure probes in your Kubernetes manifests.
In our next lesson, we will continue preparing our application for orchestration. We will refactor a Docker Compose application to use orchestrator-friendly patterns for configuration, moving away from hardcoded values and toward a more flexible and portable setup.