Hello! Welcome back to our series on mastering Docker.
In the last lesson, we delved into the internals of Docker objects using docker inspect and got our first look at image layers with docker history. You learned how to dissect an image to understand its composition and even locate its file layers on the host system. That analytical foundation is the perfect launchpad for today's topic.
This lesson directly addresses the learning outcome: Analyze and optimize image size using tools like 'docker history' or Dive. We'll move from inspecting layers to actively optimizing them. As a DevOps engineer, you know that smaller images lead to faster deployments, reduced storage costs, and a smaller attack surface—all critical metrics in a professional CI/CD and orchestration environment.
By the end of this 60-minute lesson, you will be able to diagnose image bloat and apply a suite of powerful techniques to create lean, production-ready container images.
1. Analyzing Image Bloat
Before we can optimize, we need to identify where the excess size is coming from. In our last lesson, you used docker history for a high-level overview. Let's revisit it with a focus on optimization.
Using docker history
The docker history command gives you a quick, chronological view of the layers in an image and their sizes. It's the first tool to reach for when you suspect an image is larger than it should be.
Let's look at an example from the "Optimizing the image size" article.
This article from the 'Devops with Docker' course by the University of Helsinki provides excellent, practical examples. We'll start with its demonstration of using docker history to identify large layers.
Read the first part of the article, from the beginning down to the first docker image history command output. Notice how a single RUN command created a layer of 763MB. This is the kind of red flag we are looking for.
While docker history shows you which layer is big, it doesn't tell you what inside that layer is taking up space. For that, we need a more powerful tool.
Introducing Dive: A Visual Layer Explorer
Dive is a terminal-based UI tool for exploring a Docker image, layer by layer. It shows the contents of each layer and, most importantly, calculates "wasted space"—files that are added in one layer and removed in a later one, or files that are simply inefficient.
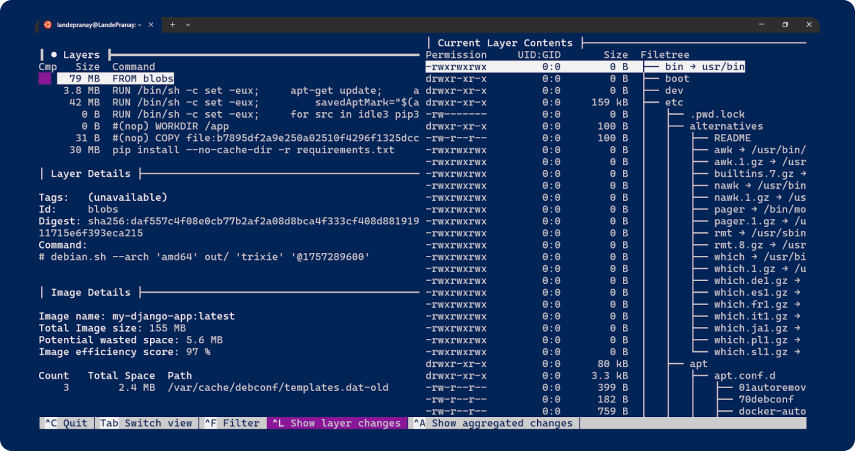
Dive is an essential tool for any serious image optimization work. The following video gives a brief but clear introduction.
Docker Image BEST Practices - From 1.2GB to 10MB
Let's watch a short segment from the 'Docker Image BEST Practices' video that introduces Dive and another optimization tool, Slim.
Watch from 06:29 to 07:12. Focus on how Dive allows you to look at individual layers and find ways to optimize your builds.
To use Dive, you'll need to install it first. If you have Go installed, you can use:
go install github.com/wagoodman/dive@latest
Alternatively, you can download the appropriate release for your system from the Dive GitHub page.
Once installed, you can analyze any image with a simple command:
dive <your-image-name>
You can navigate between layers with Ctrl+U/Ctrl+D and toggle between file views with Tab.
2. Core Optimization Techniques
Now that you can diagnose bloat, let's learn how to fix it. We'll cover the most impactful techniques, starting with the one you identified as a learning gap.
Technique 1: Implement Multi-Stage Builds
This is the single most effective technique for reducing image size, especially for compiled languages or applications with a build step (like modern frontends). The core idea is to use one stage with all the build tools and dependencies to create your application artifact, and a second, minimal stage to run it.
Let's look at a detailed text explanation and then a video demonstration.
The 'Devops with Docker' course provides a clear, step-by-step guide to creating a multi-stage build. It uses a Jekyll static site as an example, showing a dramatic size reduction from 1.57GB to just 35.3MB.
Read the section 'Multi-stage builds'. Pay close attention to the FROM ... AS build-stage syntax and the COPY --from=build-stage command, which are the key mechanics of this technique.
To see this in action, the following video demonstrates the concept with a Golang application, which is a great example of a compiled binary that benefits immensely from this pattern.
3 ways to reduce the size of your docker images
This video from Raghav Dua provides a fantastic, practical walkthrough of converting a single-stage build to a multi-stage one. The example is highly relevant to your CS background.
Watch from 00:27 to 08:41. The presenter clearly explains the 'dead weight' of build dependencies and shows how to create a lean final image by copying only the compiled binary.
Technique 2: Choose the Right Base Image
The foundation of your image matters. Starting with a large base image like ubuntu:latest (often ~100MB+) means you're already carrying significant weight before you add anything.
Here are your main options, from largest to smallest:
- Full OS (
ubuntu,debian): Includes a full suite of system libraries and tools. Good for compatibility, but large. - Minimal Distro (
alpine): A tiny Linux distribution (around 5-8MB). It usesmuslinstead of the more commonglibc, which can sometimes cause compatibility issues with pre-compiled binaries, but it's an excellent choice for most applications. - Distroless: Google's "distroless" images contain only your application and its runtime dependencies. They don't even have a shell or package manager, making them very secure and small.
scratch: An empty image. It's the ultimate in minimalism, suitable for self-contained, statically linked binaries (like those written in Go).
The video below gives an excellent overview of these choices.
Docker Image BEST Practices - From 1.2GB to 10MB
Let's return to the 'Docker Image BEST Practices' video. It does a great job of explaining the benefits and trade-offs of using minimal base images like Alpine and Distroless.
Watch from 00:35 to 01:56. Note the significant size reduction achieved just by switching from node:latest to node:alpine.
Technique 3: Consolidate and Clean Up Layers
Every RUN, COPY, and ADD instruction creates a new layer. Because layers are immutable, if you add a file in one layer and delete it in another, the file is still present in the image's storage, just hidden from the final container.
Therefore, you should:
- Chain
RUNcommands using&&to perform multiple actions in a single layer. - Clean up artifacts in the same
RUNcommand that created them. This is especially important for package manager caches.
For example, a bad practice:
RUN apt-get update
RUN apt-get install -y curl
RUN rm -rf /var/lib/apt/lists/*
This creates three layers, and the cleanup in the third layer does not reduce the size of the second layer.
A good practice:
RUN apt-get update && \
    apt-get install -y curl && \
    rm -rf /var/lib/apt/lists/*
This performs all operations in a single layer. The final layer committed to the image will not contain the apt cache. The mooc.fi article (LINK) you reviewed earlier also demonstrates this principle effectively in its first sections.
Technique 4: Use a .dockerignore file
Just like a .gitignore file, a .dockerignore file prevents files and directories from being sent to the Docker daemon as part of the build context. This is crucial for excluding things like:
node_modulesfolders (you should install them inside the container).gitdirectories- Local logs, environment files (
.env), and other sensitive data
This not only reduces image size but also speeds up the build process by reducing the amount of data transferred to the daemon.
Test your understanding!
You are tasked with containerizing a Python web application. You analyze the initial Dockerfile with Dive and find it has an efficiency score of 75% due to 200MB of "wasted space". The final image is 900MB.
The Dive output shows that the Python compiler (gcc, build-essential) and package manager cache (/root/.cache/pip) are present in the final image, even though they are only needed to install dependencies.
Which single optimization technique would provide the most significant reduction in image size and resolve the issues identified by Dive?
Show answer
Implementing a multi-stage build would be the most effective technique.
You could use a first stage (FROM python:3.9 as builder) to install gcc and build-essential, install all the Python packages from requirements.txt, and then create a second stage (FROM python:3.9-slim) that copies only the installed Python packages from the first stage. This approach leaves the build tools (gcc) and the package cache behind, directly addressing the wasted space Dive identified and drastically reducing the final image size.
Conclusion
You now have a powerful set of tools and techniques to analyze and shrink your Docker images. By applying these methods, you can build containers that are not only smaller and faster but also more secure.
Key Takeaways:
- Analyze First: Use
docker historyfor a quick look anddivefor a deep, file-level analysis of image layers and wasted space. - Prioritize Multi-Stage Builds: This is the most powerful technique for applications with a build step, ensuring your final image contains only runtime necessities.
- Choose Minimal Base Images: Start small by using
alpine,distroless, or evenscratchinstead of full OS images. - Combine and Clean: Chain
RUNcommands with&&and clean up temporary files and caches within the same layer to prevent layer bloat. - Ignore Unnecessary Files: Use a
.dockerignorefile to keep your build context clean and small.
In our next lesson, we will shift our focus from the static image to the dynamic container. You will learn to monitor real-time container resource usage with 'docker stats', allowing you to observe the CPU, memory, and network I/O of your running applications.