Hello! Welcome to our first lesson in the "Performance Tuning and Optimization" module.
In our previous lesson, we honed our reactive troubleshooting skills, learning to use docker inspect and docker events to diagnose problems. Now, we shift our focus from being reactive to being proactive. A core part of a DevOps engineer's role is to build systems that are efficient, secure, and fast from the ground up. One of the most impactful optimizations you can make is to reduce the size of your Docker images.
Today, we will focus on exactly that. By the end of this lesson, you will be able to reduce your final image size by selecting minimal base images like Alpine or distroless. We'll explore why this is crucial not just for performance but also for security, and you'll learn the essential technique of multi-stage builds to make it all possible.
The Problem: Why Are My Images So Big?
When you first start with Docker, it's common to use official base images like node:20 or python:3.11. While convenient, these images are often built on standard Linux distributions like Debian. They come packed with a full operating system, including a shell, package managers (apt), and a vast library of tools that are great for development but unnecessary for running your application in production.
This "extra baggage" leads to several problems:
- Slower Deployments: Larger images take longer to pull from a registry and start.
- Higher Costs: They consume more storage in your registry and on your hosts.
- Larger Attack Surface: Every extra library and binary is a potential security vulnerability.
To see just how dramatic the size difference can be, take a look at the following resource.
How to Reduce Docker Image Size (Alpine, Distroless ...)
The article 'How to Reduce Docker Image Size' from OneUptime starts with a fantastic visual comparison of common base image sizes. This will immediately show you the scale of the problem we're solving.
Focus on the 'Image Size Comparison' chart at the beginning of the article. Notice the huge difference between a standard image like python:3.11 (1.0 GB) and its alpine variant (50 MB).
A Spectrum of Minimalist Images
The solution is to use a base image that contains only what your application absolutely needs to run. There's a spectrum of options, each with different trade-offs.
1. Alpine Linux: The Lightweight Generalist
Alpine is a minimal Linux distribution based on musl libc and BusyBox. It's a popular choice because it provides a drastic size reduction while still giving you a shell and a package manager (apk), making it easy to work with.
This short video gives a great introduction to why choosing a minimal base image like Alpine is a best practice.
Docker Image BEST Practices - From 1.2GB to 10MB
The video 'Docker Image BEST Practices' by Better Stack quickly explains the value of switching to a more minimal base image.
Watch from 00:35 to 02:04. The video highlights how a simple change from node:latest to node:alpine can reduce image size by 80%.
The key advantage of Alpine is its balance. It's tiny, but if you need to install a few small packages or exec into the container for debugging, you still can. The main caveat is potential incompatibility with software compiled against the more common glibc, though this is rare for most applications.
2. Distroless Images: Security by Subtraction
"Distroless" images, championed by Google, take minimalism a step further. They contain only your application and its runtime dependencies.
- No shell (
/bin/sh) - No package manager (
apt,apk) - No other utilities (
ls,curl,wget)
This philosophy drastically reduces the attack surface. An attacker who gains access to your container finds themselves in an empty room with no tools to use for further exploits.
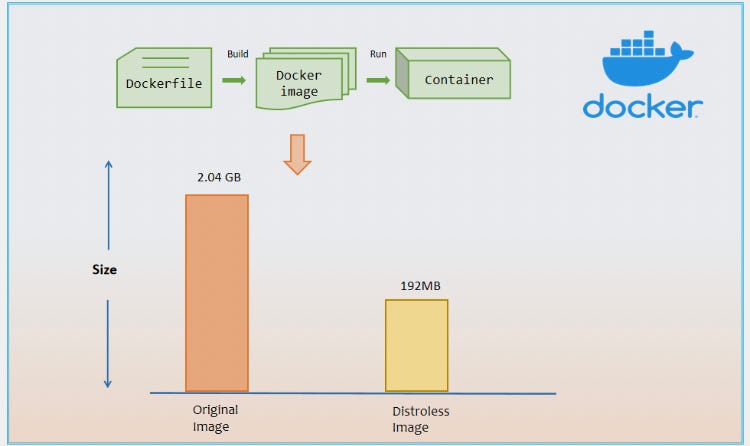
3. Scratch: The Blank Slate
scratch is an empty, "zero-byte" base image. It's the absolute minimum you can start with. It's perfect for applications written in languages like Go or Rust that can be compiled into a single, statically linked binary with zero operating system dependencies. You simply copy your binary into the scratch image and run it.
For a deeper dive into these options, the oneuptime.com article provides excellent examples.
How to Reduce Docker Image Size (Alpine, Distroless ...)
Let's return to the OneUptime article to see how to use Alpine, Distroless, and Scratch in practice.
Read the sections 'Alpine Linux', 'Distroless Images', and 'Scratch Images'. Pay attention to the Dockerfile examples for Node.js, Python, and Go. Note the different base images used in the FROM instruction for each approach.
The Key Technique: Multi-Stage Builds
You might be wondering: "If distroless and scratch images are empty, how do I install dependencies or compile my code?" The answer is multi-stage builds. This technique is fundamental to modern Dockerfile authoring and directly addresses the gap in your Docker knowledge you mentioned.
The idea is simple: you use multiple FROM statements in a single Dockerfile.
- Stage 1 (The "Builder"): You start with a full-featured base image (e.g.,
golang:1.21ornode:20). In this stage, you install all your build tools, download dependencies, and compile your application. - Final Stage (The "Runtime"): You start a new stage with a minimal base image (e.g.,
alpine,gcr.io/distroless/static, orscratch). Then, you use a specialCOPY --from=<builder_stage_name>instruction to copy only the compiled application binary or necessary production files from the builder stage into your final, clean image.

The following video provides an outstanding, practical demonstration of this entire process, showing a mind-blowing reduction in image size.
Day-26 | Multi Stage Docker Builds | Reduce Image Size by 800 % | Distroless Container Images | #k8s
This video by Abhishek Veeramalla is one of the best demonstrations of combining multi-stage builds with distroless images. It perfectly illustrates the concepts we've discussed.
Please watch from 01:35 to 29:39. The presenter explains the problem with single-stage builds, introduces the multi-stage concept, defines distroless images, and then performs a hands-on demo with a Go application, reducing the image from 861 MB to just 1.83 MB using scratch. This is a must-watch.
Test your understanding!
Imagine you have a Python application. You need gcc and other build tools to install some dependencies from requirements.txt via pip. However, your final application only needs the Python interpreter and the installed packages to run.
How would you structure a multi-stage Dockerfile to create a minimal final image? Describe the two stages and what happens in each.
Show answer
-
Builder Stage:
- Start
FROM python:3.11 as builder. This image contains Python,pip, and a full OS. RUN apt-get update && apt-get install -y gcc. Install the necessary build tools.COPY requirements.txt .RUN pip install -r requirements.txt. Install the Python packages.COPY . .Copy the application source code.
- Start
-
Final Stage:
- Start
FROM python:3.11-slimor a distroless Python image likegcr.io/distroless/python3-debian12. COPY --from=builder /path/to/installed/packages /path/to/final/packages. Copy the installed Python packages from the builder stage.COPY --from=builder /app /app. Copy the application source code from the builder stage.- Set the
CMDto run the application.
- Start
This ensures the final image has the Python runtime and dependencies but not gcc or the entire apt package cache.
Conclusion: A Secure and Efficient Foundation
You've now seen how to dramatically reduce Docker image sizes, a critical skill for any DevOps professional. By moving beyond default base images and embracing a spectrum of minimalist options, you can build faster, cheaper, and more secure containerized services.
Key Takeaways:
- Standard base images are large because they contain a full OS with development tools.
- There is a spectrum of minimal images: Alpine (small, with a shell/PM), Distroless (runtime-only, no shell, for security), and Scratch (empty, for static binaries).
- Multi-stage builds are the essential technique that enables you to use minimal runtime images by separating the build environment from the production environment.
- Smaller images lead to faster deployments, lower costs, and a significantly reduced security attack surface.
In our next lesson, we will continue our journey into performance optimization by learning how to identify resource contention between containers using monitoring tools. This will help you ensure that your efficiently-built containers also run efficiently together on a shared host.