Hello! Welcome back to our module on "Advanced Networking and Data Persistence."
In our last lesson, we explored the main Docker network drivers—bridge, host, and overlay—and established that user-defined bridge networks are the superior choice for single-host applications due to their better isolation and built-in service discovery.
Today, we'll move from theory to practice. Our goal is to create custom bridge networks to isolate containerized applications. This is a fundamental skill in your DevOps toolkit, as it allows you to build clean, secure, and predictable multi-service environments, whether for local development or production deployments.
Why Bother with Custom Bridge Networks?
Before we start creating networks, let's solidify our understanding of why they are a best practice. The default bridge network that Docker provides is convenient, but it has significant limitations that make it unsuitable for production.
The official Docker documentation provides the most authoritative explanation of the differences between the default and user-defined bridge networks. This section clearly lays out the advantages we'll be leveraging today.
Please read the section titled 'Differences between user-defined bridges and the default bridge'. Focus on the first three points: DNS resolution, better isolation, and the ability to connect/disconnect containers on the fly.
As the documentation highlights, the two most critical benefits are:
- Automatic DNS Resolution: Containers on a user-defined network can find and communicate with each other using their names. For example, your
apicontainer can connect to yourdatabasecontainer simply by using the hostnamedatabase. This eliminates the need for hard-coding IP addresses, which are ephemeral and unreliable. - Better Isolation: By default, any container started without a specific network is attached to the default
bridgenetwork. This means unrelated applications could potentially communicate with and interfere with each other. Creating a custom network for your application stack ensures it lives in its own isolated environment, a core principle of secure system design.
The diagram below perfectly illustrates this concept of isolation.
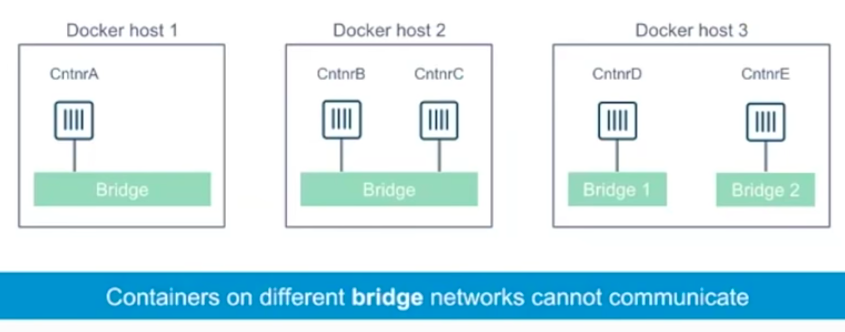
Hands-On: Creating and Using a Custom Bridge Network
Now, let's get our hands dirty. We'll walk through the process of creating a network, attaching containers to it, and verifying the isolation and DNS resolution we just discussed.
The following video provides an excellent, step-by-step demonstration of this entire workflow.
Docker Networking Tutorial (Bridge - None - Host - IPvlan - Macvlan - Overlay)
Anton Putra's 'Docker Networking Tutorial' gives a very clear, practical demonstration of creating a user-defined network and contrasting its behavior with the default bridge.
Watch the segment from 07:37 to 08:55. Pay close attention to these commands and their outcomes: docker network create my-bridge-net: How a new network is created. docker run --network my-bridge-net ...: How a container is attached to this network. curl myapp-v2: How one container can resolve and communicate with another by its name.
Let's break down that process and try it ourselves.
Step 1: Create and Inspect the Network
First, create a new bridge network. Let's call it app-network.
docker network create app-network
You can verify that your network was created and see its configuration details using docker network inspect.
docker network inspect app-network
Notice the "Driver": "bridge" and the subnet that Docker has automatically assigned to your network. Any container connected to this network will get an IP address from this subnet.
Step 2: Run Containers on the Custom Network
Now, let's launch two simple nginx containers, but attach them to our new app-network using the --network flag. We'll name them web-1 and web-2.
docker run -d --name web-1 --network app-network nginx:alpine
docker run -d --name web-2 --network app-network nginx:alpine
Step 3: Verify Communication via DNS
Let's test if web-1 can communicate with web-2 using its name. We'll use docker exec to run a ping command from inside the web-1 container.
docker exec web-1 ping web-2
You should see a successful ping, with packets being transmitted and received. This confirms that Docker's internal DNS is working on our custom network!
Step 4: Verify Isolation
To prove that our network is isolated, let's start a third container, web-3, but this time, we'll let it join the default bridge network by not specifying a --network flag.
docker run -d --name web-3 nginx:alpine
Now, from inside web-1 (which is on app-network), let's try to ping web-3.
docker exec web-1 ping web-3
This command will fail with an error like ping: bad address 'web-3'. This is exactly what we want! It proves that containers on app-network are isolated from those on the default bridge network.
Test your understanding!
You've successfully pinged web-2 from web-1 by name, but web-3 was unreachable by name. Why could you not just get the IP address of web-3 (using docker inspect web-3) and ping that IP address from web-1?
Show answer
Even if you used the IP address, the ping would still fail. This is because web-1 and web-3 are on completely separate, isolated networks. The custom bridge driver configures the host's networking rules (iptables on Linux) to prevent traffic between different bridge networks by default. This network-level isolation is a key security feature.
Managing Networks in Docker Compose
While using the Docker CLI is great for understanding the mechanics, in your role as a DevOps Engineer, you'll most often define your application stack declaratively using Docker Compose. Fortunately, creating and using custom networks is just as simple.
You define your services as usual, but you also add a top-level networks key to define your custom network. Then, under each service, you specify which networks it should connect to.
How to Bridge Networks in Docker Compose (`docker-compose.yml`)
The article 'How to Bridge Networks in Docker Compose' provides a minimal, practical example of setting up a backend service and a database on a shared custom network.
Review the section 'Setup: A Minimal Example', focusing on the docker-compose.yml file. Notice the top-level networks block and how both the db and app services are connected to the backend network.
Here's what that looks like in practice. Consider this docker-compose.yml:
version: '3.9'

services:
  api:
    image: python:3.9-slim
    command: ["sleep", "infinity"]
    networks:
      - app-net # Connects this service to the 'app-net' network

  database:
    image: postgres:15-alpine
    environment:
      - POSTGRES_PASSWORD=mysecretpassword
    networks:
      - app-net # Connects this service to the same 'app-net' network

networks:
  app-net:
    driver: bridge # Defines the network and specifies the bridge driver
When you run docker-compose up, Docker Compose will:
- First, create a bridge network named
<projectname>_app-net. - Then, start the
apianddatabasecontainers. - Attach both containers to the
<projectname>_app-netnetwork.
Now, from within the api container, you could connect to the PostgreSQL database using the hostname database, because they share a network. This is the standard, professional way to structure multi-service applications.
Conclusion
In this lesson, we put theory into practice by creating and managing custom bridge networks to achieve application isolation and service discovery.
Key Takeaways:
- You can create a custom bridge network using
docker network create <network-name>. - Containers are attached to a network at runtime with the
--networkflag. - User-defined bridge networks provide superior isolation and enable automatic DNS resolution between containers using their names.
- In Docker Compose, you can declaratively define your application's network topology using a top-level
networkskey and connecting services to it. This is the preferred method for managing multi-service applications.
In our next lesson, we will explore a more advanced networking scenario. We'll learn how to connect a single container to multiple networks for targeted communication, which is useful for situations like exposing a frontend on one network while having it communicate with a backend on a separate, more secure network.