Introduction
In our last lesson, you learned how to summarize large datasets using the Group By feature, turning detailed rows into powerful aggregate summaries. Every time you performed an action—from filtering a column to grouping data—Power Query was dutifully recording your instructions in the background. Today, we'll pull back the curtain to look at the language it uses to do this: the Power Query M language.
This lesson will introduce you to the code that powers your transformations. You will learn what the M language is, where to view it, and how to understand its basic structure. You don't need to become a programmer overnight, but understanding the fundamentals of M is a crucial step toward becoming a Power Query expert, enabling you to troubleshoot issues and eventually build more complex and customized data transformations.
1. From Clicks to Code: Unveiling the M Language
Every button you click in the Power Query Editor generates a line of code in a language officially called the Power Query Formula Language, but more commonly known as "M". Think of the user-friendly interface as a translator: you point and click, and it writes the corresponding M code for you.
Why is this important? While the interface is powerful, it doesn't cover every possible scenario. Sometimes you may need to make a small tweak to a step that isn't possible through the UI, or you might want to understand exactly how a complex transformation is working.
There are two main places you can see this M code:
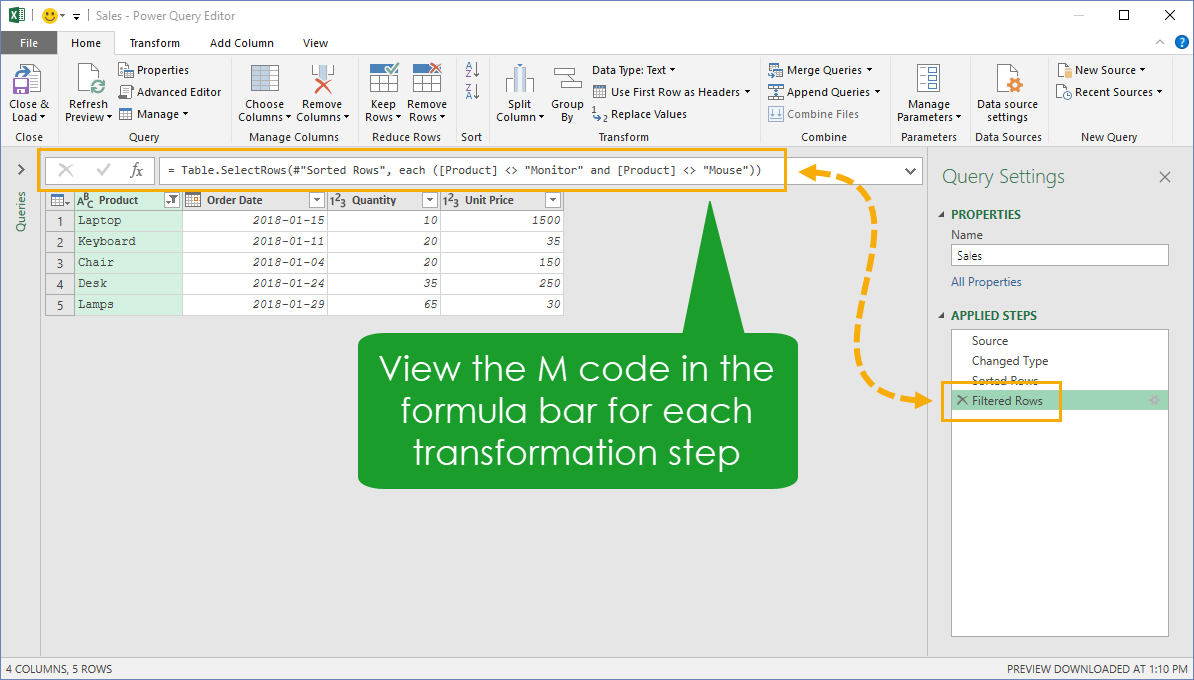
- The Formula Bar: Just like in Excel, the Power Query Editor has a formula bar. When you select a step in the Applied Steps pane, the formula bar shows the M code for that specific step. If you don't see it, you can enable it from the View tab.
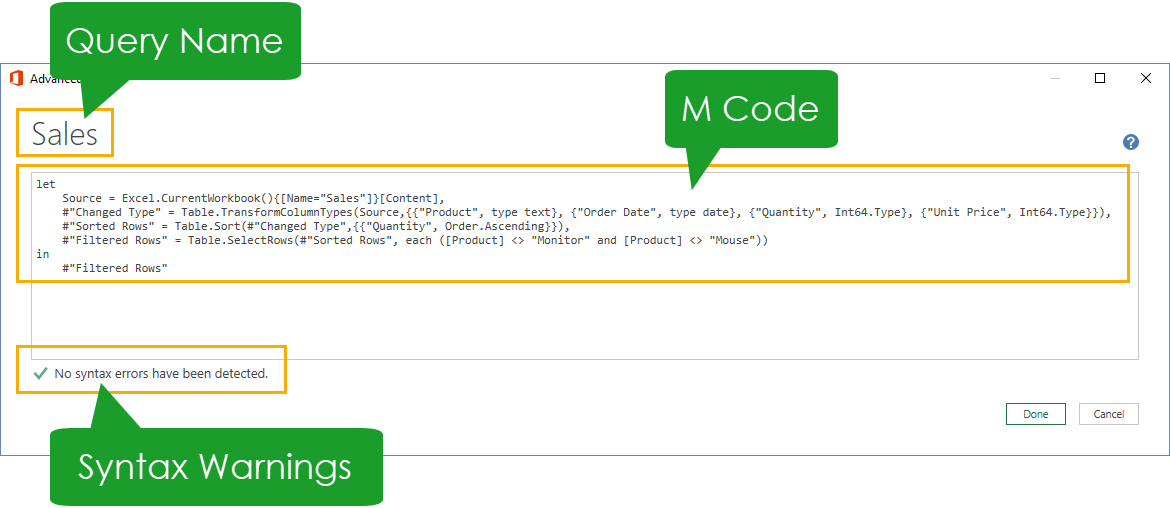
- The Advanced Editor: This window shows you the entire M script for your query from start to finish. You can access it from both the Home and View tabs.
To get a better sense of how M relates to Excel formulas, let's watch a short clip that draws a helpful comparison.
PowerQuery M code explanation (for Excel newcomers)
This video from Exceed Learning provides an excellent conceptual introduction to M by comparing it to something you're already familiar with: Excel formulas.
Watch the first section of the video from the beginning until the main comparison. The key idea is that M is a functional language, just like Excel's formula language. However, while a standard Excel formula returns a single value (a "scalar"), an M function can return a single value, a list, a record, or even an entire table. This is what makes it so powerful for data transformation.
2. The Anatomy of an M Script
Now that you know where to find the M code, let's dissect its structure. At first glance, it might look intimidating, but M scripts follow a consistent and logical pattern. The best way to learn this is to see it broken down step-by-step.
Getting Started with the Power Query Advanced Editor & M CODE for Beginners
The video "Getting Started with the Power Query Advanced Editor" from Miss Microsoft offers a clear and practical walkthrough of the essential components of M code.
We will watch this video in a few parts to break down the concepts. First, watch the segment from the core structure. This introduces the two fundamental parts of every M script: the let expression and the in expression. Next, watch from variable naming. This part covers how steps are named and the syntax used when a step name includes spaces (e.g., #"Changed Type"). Finally, review the different types of brackets used in M by watching from the bracket types.
Let's consolidate what you just saw. Every M script is built around a let...in block.
-
let: This section contains the sequence of transformation steps. Each step is assigned to a variable. A crucial concept is that each step typically uses the variable from the previous step as its input. This creates a chain of transformations, which is exactly what you see in the "Applied Steps" pane.- For example, the step
#"Filtered Rows" = Table.SelectRows(#"Sorted Rows", ...)takes the output of the#"Sorted Rows"step and applies a filter to it. - Step names (variables) that contain spaces must be enclosed in double quotes with a hash symbol at the front:
#"My Step Name". - Each line in the
letblock, except the very last one, must end with a comma.
- For example, the step
-
in: This final part of the script simply states which variable from theletblock should be the final output of the query. Most of the time, this is the last step in the sequence, but you can change it to output the result of an earlier step, which is a great technique for debugging.
The video also highlighted the different brackets, which are essential for reading and writing M code:
()Parentheses: Used for function arguments, likeText.Proper("hello").[]Square Brackets: Used to access items, like a column from a table (MyTable[Column1]) or a field from a record.{}Curly Brackets: Used to create lists, like{1, 2, 3}or{"A", "B", "C"}.
3. Putting it all Together: A Practical Example
Let's look at a complete, practical example of how Power Query builds an M script from user actions. The following reading from Microsoft Support provides a table that explicitly maps each transformation step to its corresponding M formula.
Create Power Query formulas in Excel
This official Microsoft documentation provides a clear walkthrough of a data transformation task and the M code it generates.
First, quickly read the introductory text in the section Procedure walk-through to understand the scenario (cleaning up a table of soccer championships). Then, focus on the table at the end of that section, which starts with Query step table. This table is the key part of the reading. Notice how each Query step in the left column (e.g., "Removed Other Columns", "Filtered Rows") directly corresponds to a variable name in the Formula column. You can see how each formula refers to the step that came before it, creating the sequential transformation flow we discussed. Finally, review the section advanced formula example. This demonstrates how you can write a multi-step query directly in the Advanced Editor using the let...in structure.
By seeing this direct mapping, it should be clear that the "Applied Steps" pane in the Power Query Editor is simply a user-friendly, visual representation of the M code script running behind the scenes.
Conclusion
In this lesson, you've taken your first look under the hood of Power Query at the M language. While you've been writing M code all along with every click, you now have the foundational knowledge to understand what's happening.
Key Takeaways:
- The M language is the code that Power Query generates for every transformation step.
- You can view the code for a single step in the Formula Bar or the entire script for a query in the Advanced Editor.
- M scripts are built on a
let...instructure. Theletblock defines a sequence of steps (variables), and theinblock specifies the final output. - Each step in a query typically builds upon the result of the previous one, forming a chain of operations.
- A basic understanding of M is invaluable for troubleshooting, making minor adjustments to code, and performing advanced transformations that aren't possible through the user interface alone.
You have now journeyed through the entire data transformation process in Power Query, from connecting to data sources to cleaning, reshaping, and summarizing it. In our next and final lesson for this module, we will complete the workflow by learning how to load your clean, transformed data back into Excel.