Welcome to the first lesson of Module 3. In the previous module, we concentrated on making your formulas powerful, robust, and readable, culminating in our session on Named Ranges. Now, we shift our focus from calculation to preparation. Before you can analyze data, build charts, or create reports for a client, the raw data must be properly organized.
This lesson introduces the most fundamental data preparation skill: sorting. You'll learn how to rearrange your data tables based on the contents of one or more columns. This simple action is often the first step in making sense of a large dataset, allowing you to see patterns, identify top performers, or group related items. Our goal is to master both single-column sorting and the more powerful technique of applying multiple sorting criteria.
Sorting by a Single Column
The most straightforward way to organize your data is to sort it based on the values in a single column. Excel makes this easy with "quick sort" commands that can arrange data alphabetically, numerically, or chronologically.
When you sort, Excel is smart enough to keep all the information in a row together. If you sort a list of employees by last name, each employee's first name, ID number, and salary will move with their last name, maintaining the integrity of your records.
Let's watch a quick demonstration of these basic sorting operations.
This video from LearnFree provides a concise overview of single-column sorting.
Watch the first minute of the video, from the beginning. Notice how you can sort from either the Home or Data tab and how Excel automatically reorders the entire table, not just the column you selected.
Excel intelligently adapts the sorting options based on the data type in the column:
- Text: Sort A to Z (ascending) or Z to A (descending).
- Numbers: Sort Smallest to Largest (ascending) or Largest to Smallest (descending).
- Dates/Times: Sort Oldest to Newest (ascending) or Newest to Oldest (descending).
A Critical Step: Ensuring Data Integrity
Before you click that sort button, it's vital to be aware of a common pitfall. Excel determines the data range to sort by looking for contiguous blocks of data. If you have other information in adjacent rows or columns without a blank row or column separating it, Excel might include it in the sort, scrambling your data.
As a freelancer, maintaining data integrity is paramount. A simple mistake here can corrupt a client's file. The following video demonstrates this problem and provides a simple, effective technique to avoid it.
Sorting in Excel - Basics and Beyond
This segment from the "Technology for Teachers and Students" channel explains how to correctly isolate your data for sorting.
Please watch from this section. Pay close attention to two key takeaways: The importance of using blank rows and columns to separate your main dataset from other notes or tables. The Ctrl+A shortcut, which selects the entire contiguous data region. This is an excellent way to quickly verify what Excel considers to be your "table" before you sort.
Multi-Level Sorting: Adding Layers of Organization
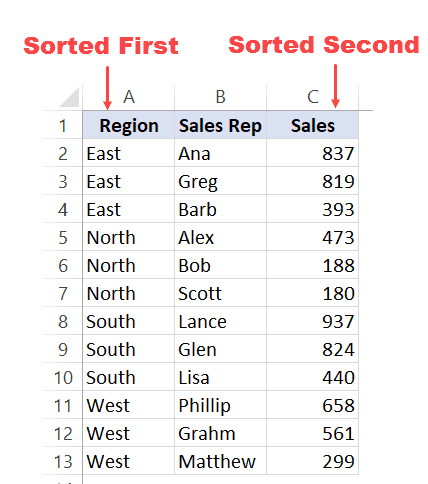
Often, sorting by a single column isn't enough. You might want to see sales data grouped by region, and then within each region, see the sales reps ordered alphabetically. Or, you might want to see employees grouped by department, and then ordered by hire date. This requires multi-level sorting.
To do this, we use the Custom Sort dialog box, which gives you full control over the sorting process.

Let's see how to use this powerful feature.
Sorting in Excel - Basics and Beyond
This next part of the video provides a detailed walkthrough of the Custom Sort dialog.
Watch from this section on custom sorting. Focus on how to: Access the Custom Sort dialog from the Data tab. Set the first sort level (e.g., by Team). Click Add Level to create a secondary sort criterion (e.g., by Player Name or Points Per Game). Define the order for each level (A to Z, Largest to Smallest, etc.). Then, continue watching the brief but critical segment that follows, from "My data has headers". Understanding this checkbox is essential to prevent your column titles from being sorted along with your data.
When you apply a multi-level sort, Excel first organizes the entire table based on the first criterion. Then, for all the rows that have the same value in that first column, it applies the second criterion, and so on. The result is a highly organized dataset.
For a detailed text-based guide on this process, you can refer to Microsoft's official documentation.
Sort data in a range or table in Excel
This resource from Microsoft Support provides step-by-step instructions for multi-level sorting.
Read the section titled "Sort by more than one column". It serves as a great written reference for the steps shown in the video, detailing how to add, copy, and delete sort levels.
Pro Tip: Preserving the Original Order
Sorting is a destructive action—it permanently reorders your data. Once you save and close the file, there's no "unsort" button. What if your client asks to see the data in its original sequence? A professional freelancer anticipates this need.
The best practice is to add a "helper column" to your dataset before you perform any sorting.
Sort Data | Excel Practice Online
This article from Excel Practice Online explains a simple and effective trick to safeguard your original data order.
Read the short section under the heading "Restoring original sorting order". By adding a column with a simple sequence of numbers (1, 2, 3, ...), you create a permanent key that allows you to restore the original order at any time by simply sorting on that helper column from smallest to largest.
This simple habit can be a lifesaver and demonstrates a level of foresight that clients appreciate. In keeping with your preference for hands-on learning, the same resource provides a downloadable practice file. I encourage you to use it to test the single and multi-level sorting techniques we've discussed. You can find the link under the "Practice Excel Sort" heading in the article.
Conclusion
You've now taken your first and most important step in data preparation. Organizing your data effectively is the foundation upon which all further analysis is built.
Here are the key takeaways from this lesson:
- Single-column sorting is done via the A-Z/Z-A buttons on the
Datatab and intelligently adapts to text, numbers, and dates. - Always ensure your data is in a contiguous range, separated from other information by blank rows or columns, to prevent sorting errors. Use
Ctrl+Ato verify the range. - Multi-level sorting is achieved using the Custom Sort dialog, where you can add multiple criteria to create a highly organized table.
- The "My data has headers" checkbox is crucial for preventing column titles from being mixed in with your data.
- For professional work, always add a helper column with a numerical sequence to preserve the original order of the data before you begin sorting.
In our next lesson, we will explore filtering. While sorting rearranges all of your data, filtering allows you to temporarily hide rows you aren't interested in, letting you focus on specific subsets of your information.