Welcome to our next lesson. In the previous session, we focused on making your formulas more robust by handling errors with IFERROR and IFNA. Now, we'll take another significant step toward building professional, client-ready spreadsheets. We'll tackle a common issue: formulas that are powerful but difficult to understand, like =SUM(Sheet1!$C$2:$C$53).
This lesson introduces Named Ranges, a fundamental feature in Excel that replaces cryptic cell references with intuitive, human-readable names. Instead of deciphering C2:C53, you and your clients will see formulas like =SUM(Quarter1_Sales). Mastering named ranges will dramatically improve the clarity, readability, and long-term maintenance of your work, a cornerstone of creating high-quality freelance deliverables.
Our goal is to learn how to create and manage these named ranges effectively, turning your complex spreadsheets into clean, self-documenting models.
What Are Named Ranges and Why Are They Essential?
A named range is simply a descriptive label assigned to a single cell, a range of cells, or even a constant value. This label can then be used in formulas, making them instantly understandable.
Imagine sending a financial summary to a client. Which of these formulas do you think they would prefer to see?
=AVERAGE(B4:B13)=AVERAGE(Salesdollars)
The second option is self-explanatory. This is the core benefit of named ranges.
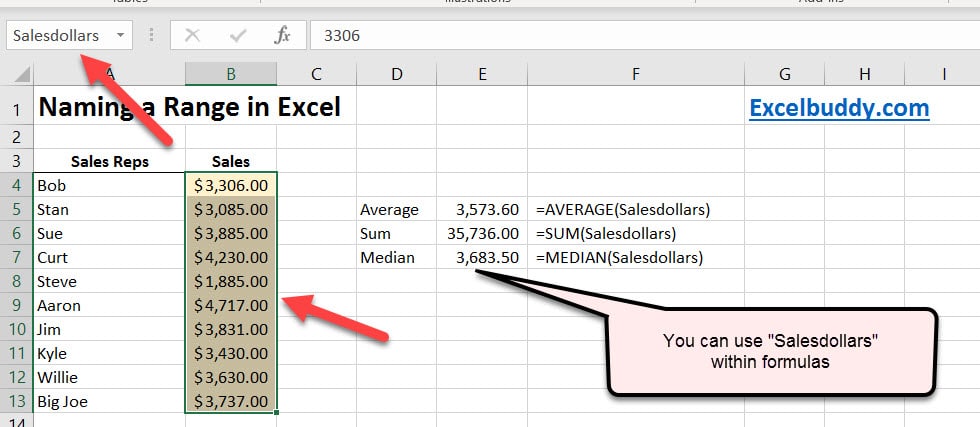
For a freelancer, the benefits go beyond simple readability:
- Easier Maintenance: If your sales data expands from 100 rows to 1000, you don't need to hunt down and edit every formula that uses it. You simply update the named range's definition once in a central location, and all formulas using that name update automatically.
- Improved Readability: As we've seen, names like
Tax_RateorCustomer_Listmake formulas self-documenting. This is crucial when a client, or you six months from now, needs to understand the logic. - Faster Navigation: Excel's Name Box doubles as a navigation tool. You can instantly jump to any named range in your workbook, which is a huge time-saver in large, multi-sheet models.
Creating Named Ranges: Three Core Methods
Let's dive into the practical side of creating named ranges. There are three main ways to do this, each suited to different situations.
1. The Name Box: Quick and Simple
The fastest way to name a single cell or a simple range is by using the Name Box, located to the left of the formula bar.
Top Tips for Using Named Ranges in Excel
This first clip from the TeachExcel channel demonstrates the most direct way to create a named range.
Watch this short segment from the beginning of the video. Notice how you select the cell, type the desired name directly into the Name Box, and press Enter. It's a quick, two-step process for simple cases.
2. Create from Selection: The Time-Saver
When you have well-structured data with headers, this feature is a game-changer. It can create dozens of named ranges in a few clicks.
Top Tips for Using Named Ranges in Excel
Continuing with the same video, let's see how to automatically generate names from your data's headers.
Watch the next part of the video, from this section. The key is to select your data including the header row or column, then use the "Create from Selection" tool. Excel intelligently uses the header text to name the corresponding data ranges.
3. Define Name: The Control Center
For maximum control, you'll use the "Define Name" dialog. This method allows you to set the scope of the name (more on that later), add comments for documentation, and create named constants.
Naming Rules
Before we proceed, it's critical to understand that Excel has strict rules for what constitutes a valid name. Getting these wrong will result in an error.
How to Name a Range in Excel: 3 Methods to Know
This article from DataCamp provides a clear, comprehensive list of the rules you must follow when creating names.
Please read the section titled "Rules for Naming Ranges". Pay close attention to what is and isn't allowed, especially the rules about spaces, special characters, and conflicts with cell references (e.g., you can't name a range "Q1" or "TAX2025").
Named Constants
A particularly powerful feature available through the "Define Name" dialog is the ability to create named constants. Instead of referring to a cell, the name refers to a hard-coded value. For example, you can create a name called Global_Tax_Rate that refers to the value 0.08. This is invaluable for financial modeling, where key assumptions (like tax rates or growth factors) can be defined in one place and used throughout the workbook.
Top Tips for Using Named Ranges in Excel
This clip demonstrates how to create and use a named constant.
Watch this segment from the video. Note how the name Theft_Percentage_Of_Sales is defined to equal the value 0.07, not a cell reference. This makes the final formula, Total_Sales * Theft_Percentage_Of_Sales, perfectly clear and easy to maintain.
Managing Your Named Ranges
As your workbook grows, you'll need a central place to view, edit, and delete your named ranges. This is the Name Manager.

You can access it from the Formulas tab or by pressing Ctrl+F3.
Top Tips for Using Named Ranges in Excel
Let's see the Name Manager in action.
Watch this part of the video from this section. It gives you a tour of the interface, showing how you can edit a name's reference, delete obsolete names, and use the filter to audit your workbook.
A Critical Concept: Scope (Workbook vs. Worksheet)
When you create a name using "Define Name" or the Name Manager, you must define its scope. This determines where the name can be used.
- Workbook Scope (Global): The name is recognized on all sheets in the workbook. This is the default and is best for values or ranges shared across your entire model (e.g.,
Customer_List,Global_Tax_Rate). - Worksheet Scope (Local): The name is only recognized on the specific worksheet where it was created. This is useful when you want to use the same name on multiple sheets, but have it refer to different data on each. For example, you could have a
Monthly_Totalname on your "Jan", "Feb", and "Mar" sheets, each referring to the total on its respective sheet.
Understanding scope is crucial for avoiding errors in complex workbooks.
SECRET Excel Named Range Shortcuts to Save Time
This video from MyOnlineTrainingHub provides an excellent, clear explanation of scope.
Please watch from this point. The video clearly demonstrates the difference between workbook and worksheet scope, how to create a local name, and how Excel prioritizes a local name over a global one if they share the same identifier.
Best Practices for Professional Use
Simply using named ranges is good; using them effectively is what makes you a pro. Here are some best practices that are especially important for freelancers building tools for others.
How to Name a Range in Excel: 3 Methods to Know
This section of the DataCamp article consolidates several key habits for professional-grade spreadsheet development.
Please read the entire section "Best Practices for Naming Ranges". Internalize these habits: Use clear, descriptive names. Be consistent with your naming conventions (e.g., PascalCase or using_underscores). Document your names with comments in the Name Manager. Periodically clean up unused or broken names.
Finally, remember that named ranges are also excellent navigation tools. The TeachExcel video demonstrates this and two other useful tricks: using hyperlinks for navigation dashboards and applying names to formulas you've already written. You can explore these from
Conclusion
In this lesson, we've moved beyond just making formulas work to making them communicate. By replacing cryptic cell addresses with clear, descriptive names, you create spreadsheets that are not only easier to read but also far easier to manage and update.
Here are the key takeaways:
- Named ranges make formulas readable, simplify maintenance, and improve navigation.
- You can create them using the Name Box (quickest), Create from Selection (for structured data), or Define Name (most control).
- The Name Manager (
Ctrl+F3) is your central hub for editing, deleting, and auditing all names. - Scope is a crucial concept: Workbook scope is global, while Worksheet scope is local to a specific sheet.
- Adopting best practices for naming and maintenance is essential for building professional, client-ready workbooks.
This lesson concludes Module 2, where we've covered a powerful set of functions for retrieving data and making your formulas robust and readable. We've gone from basic lookups to advanced error handling and now to professional naming conventions.
In our next lesson, we will begin Module 3: Data Preparation and Cleaning. We'll shift our focus from calculation to manipulation, starting with how to sort and filter data—the first fundamental steps in organizing raw information for analysis.