Welcome back. In our previous lesson, you created a professional, user-facing instruction sheet for your mortgage calculator, making the tool significantly more accessible to a client. That was a crucial step in transforming a functional spreadsheet into a complete product. Now, we'll focus on the final polish before you hit "send."
This lesson covers the essential pre-delivery checks that ensure your workbook is not only user-friendly but also professional and secure. We will learn how to scrub your file of hidden data and personal information, and how to set default views so that the client's first impression is a clean, polished, and focused experience. For a freelancer, these final touches are what separate good work from great work, and they are critical for building a reputation of excellence.
By the end of this lesson, you will be able to prepare any Excel spreadsheet for delivery by cleaning its metadata and setting professional defaults, ensuring your final product is pristine and client-ready.
Part 1: Removing Hidden Data and Personal Information
As you build and edit an Excel file, it accumulates a significant amount of "digital residue." This can include comments you made to yourself, personal information embedded in the file's properties, and even entire hidden worksheets used for calculations. Sending a file with this information to a client can be unprofessional at best and a serious privacy breach at worst.

Excel provides a powerful tool specifically for this purpose: the Document Inspector. It scans your workbook for various types of hidden data and allows you to remove it with a few clicks.
To understand what the Document Inspector does and why it's so important, the following video provides a clear and practical overview.
How to Remove Hidden Data and Personal Information from Excel Workbooks
The video "How to Remove Hidden Data and Personal Information from Excel Workbooks" by Leila Gharani is an excellent guide to using the Document Inspector.
Please watch the following segments: First, understand the problem and the solution by watching the introduction, which explains what hidden data is and what the inspector checks for. Next, see the tool in action. Watch how to run the inspector and view its findings. Finally, learn how to selectively remove the data you want to clean, finalizing the process.
The video demonstrates the core workflow. A crucial first step, which cannot be overstated, is to always save a copy of your workbook before using the Document Inspector. The removal process is permanent and cannot be undone, so you must work on a copy to protect your original file.
For a comprehensive list of everything the Document Inspector can find and remove, the official Microsoft documentation is the best resource.
Remove hidden data and personal information by ...
This support article from Microsoft provides the definitive guide to the Document Inspector in Excel.
First, read the step-by-step guide under the heading Find and remove hidden data. This reinforces the process shown in the video. Then, carefully review the table under the heading What the Document Inspector finds. This table details every category of hidden information, from comments to custom XML data.
By using the Document Inspector, you ensure that the file you deliver contains only the information the client is meant to see.
Part 2: Setting Professional Defaults for a Clean First Impression
Once the file is scrubbed of hidden data, the next step is to control how it looks when the client first opens it. You want to present a clean, focused, and professional "landing page," not a cluttered worksheet that was left over from your development process.
The Landing Page
Your goal is to have the workbook open on the Instructions sheet, with the cursor at cell A1, and a comfortable zoom level (e.g., 100%). This provides a welcoming and guided entry point for the user. Before you save the file for the last time, simply navigate to the Instructions sheet, click cell A1, set your desired zoom, and then save.
Cleaning the Interface
To create a dashboard-like feel and focus the user's attention on the content, you can hide some of Excel's standard interface elements.
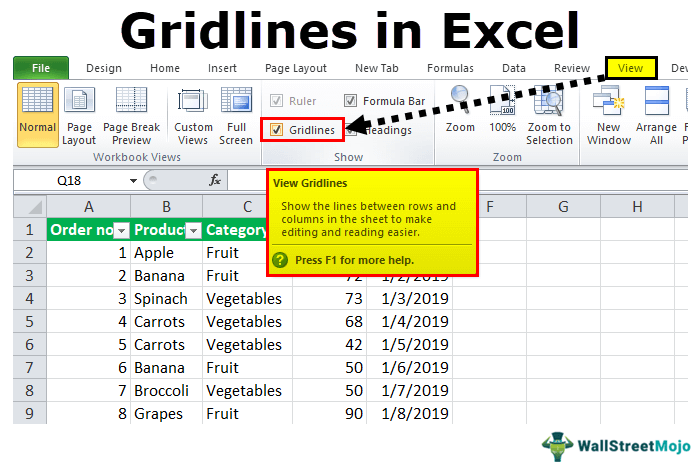
Hiding gridlines, headings (the A, B, C... and 1, 2, 3...), and the formula bar can transform a spreadsheet from a "work-in-progress" into a polished "application."
6 essential steps I take before screen-sharing my Excel ...
This article from How-To Geek, while framed for screen-sharing, offers excellent advice for preparing a file for delivery.
Read the section Cleaning the interface. It explains the rationale and shows exactly which checkboxes to use in the View tab to create a clean, report-like appearance.
Hiding Development Clutter
During development, it's common to have temporary notes, draft charts, or placeholder shapes on your worksheets. While useful for you, they look like clutter to a client. Instead of deleting them, you can simply hide them using the Selection Pane.
The Selection Pane lists every object on your sheet (shapes, charts, text boxes) and lets you toggle their visibility with a single click.
How to Remove Hidden Data and Personal Information from Excel Workbooks
The Leila Gharani video we watched earlier also contains an excellent demonstration of the Selection Pane.
Watch the segment from this section to see how to find and hide invisible objects. This ensures no stray development artifacts are left visible.
Using the Selection Pane's "Hide All" button is a quick way to "sweep the desk" before delivery, ensuring the client only sees the finished product.
Part 3: Your Pre-Delivery Checklist
Let's consolidate these steps into a practical, hands-on checklist. You will now apply this process to the mortgage calculator workbook you've been developing.
-
Save a Copy: Open your mortgage calculator file and immediately save it under a new name, such as
Mortgage_Calculator_Client_v1.0.xlsx. All subsequent steps will be performed on this copy. -
Run the Document Inspector:
- Go to
File > Info > Check for Issues > Inspect Document. - Check all the boxes and click
Inspect. - Review the findings. For a client deliverable, you will typically want to
Remove Allfor:- Comments and Annotations
- Document Properties and Personal Information
- Any hidden rows, columns, or worksheets that are not essential for the tool's function.
- Click
Close.
- Go to
-
Set the Opening View:
- Navigate to your Instructions worksheet.
- Select cell A1.
- Set the Zoom to a level that is easy to read (e.g., 100%).
-
Clean the Interface:
- Go to the View tab.
- In the "Show" group, uncheck the boxes for Gridlines, Formula Bar, and Headings. Do this for both your
InstructionsandCalculatorsheets.
-
Hide Distractions:
- On each sheet, go to
Home > Find & Select > Selection Pane. - Review the list of objects. If you have any temporary notes, shapes, or draft charts, click the "eye" icon next to them to make them invisible.
- On each sheet, go to
-
Final Save:
- Perform a final
Saveon the file.
- Perform a final
Your workbook is now professionally cleaned, polished, and ready for delivery.
Conclusion
In this lesson, you've learned the final, crucial steps of professionalizing an Excel deliverable. By cleaning hidden data with the Document Inspector and setting a clean, focused default view, you protect both your client's privacy and your own professional reputation. These small details are often what distinguish a standard freelancer from an expert.
Key Takeaways:
- Always work on a copy when cleaning a file, as the Document Inspector's changes are irreversible.
- The Document Inspector is your primary tool for scrubbing a workbook of hidden metadata and personal information.
- A professional deliverable should open to a clean "landing page"—typically an instruction sheet—at a comfortable zoom level.
- Hiding interface elements like gridlines, headings, and the formula bar creates a more polished, application-like experience.
- The Selection Pane allows you to quickly hide any development-related clutter before sending the file.
In our next and final lesson, you will undertake a capstone project. You will integrate the full range of skills you've acquired—from formulas and Power Query to PivotTables and VBA—to build a comprehensive, client-ready solution from start to finish.