Welcome back to the course. In our last lesson, you transformed the mortgage calculator from a functional spreadsheet into a robust, "bulletproof" tool by implementing data validation and cell protection. It's now resistant to user error, a key quality for any professional deliverable. However, a powerful tool is only effective if your client knows how to use it.
This lesson bridges the gap between a finished tool and a happy client. We'll focus on creating clear, professional, user-facing documentation. Instead of fielding constant questions, you can provide a comprehensive guide that empowers the user and showcases your attention to detail. We will add a dedicated "Instructions" worksheet to the mortgage calculator, making it a truly complete and client-ready solution.
By the end of our time today, you'll be able to design and build a dedicated instruction sheet that clearly explains how to use your Excel tools, enhancing their value and saving you valuable support time.
Why Good Documentation is Non-Negotiable
Before we start building, let's establish why this step is so crucial for a freelancer. A well-documented tool:
- Reduces Support Overhead: It answers questions before they are asked, freeing you up to work on new projects.
- Builds Client Confidence: It demonstrates professionalism and a commitment to user experience, justifying your rates.
- Acts as a Reference (for You!): Months from now, when a client asks for an update, you'll be grateful for a clear guide to your own logic.
Think of documentation as part of the product itself. An undocumented tool is an unfinished tool.
Part 1: Anatomy of a Great Instruction Sheet
A great instruction sheet is clear, concise, and anticipates the user's needs. It should be the first thing a user sees when they open the workbook. Let's look at the essential components.
Do's & Don'ts of Excel Spreadsheet Design (with Examples)
The video "Do's & Don'ts of Excel Spreadsheet Design" by Leila Gharani offers a succinct overview of why an instruction sheet is vital.
Watch the clip from this section. The key takeaway is to define everything. What might be obvious to you, the creator, is rarely obvious to a new user.
Based on best practices, a strong instruction sheet, often called a "Welcome Sheet," should contain several key elements:
- Purpose: A brief, high-level summary. What problem does this tool solve?
- How to Use: Step-by-step instructions for the user.
- Input Guide: Clearly identify the cells the user needs to fill in. It's common to use a specific background color for input cells and explain this in the documentation.
- Legend/Key: Explain any color-coding, special formatting, or abbreviations used in the tool.
- Navigation: Provide easy ways to get to the main parts of the tool.
- Contact & Version Info: Let the user know who built the tool, how to contact you for support, and which version of the tool they are using.
The following resource provides a thorough breakdown of these and other documentation practices.
Documenting Excel Models Best Practices
This article from Wall Street Oasis is aimed at financial modelers, but the principles are universal for any professional Excel tool.
Focus on the section on instruction sheets. Also, read the brief follow-up section, "Why document?", which reinforces the value of this process for both others and your future self.
Here is a simple example of a project tracker that uses a color-coded legend at the bottom. This is a basic but effective form of documentation integrated directly into the sheet.
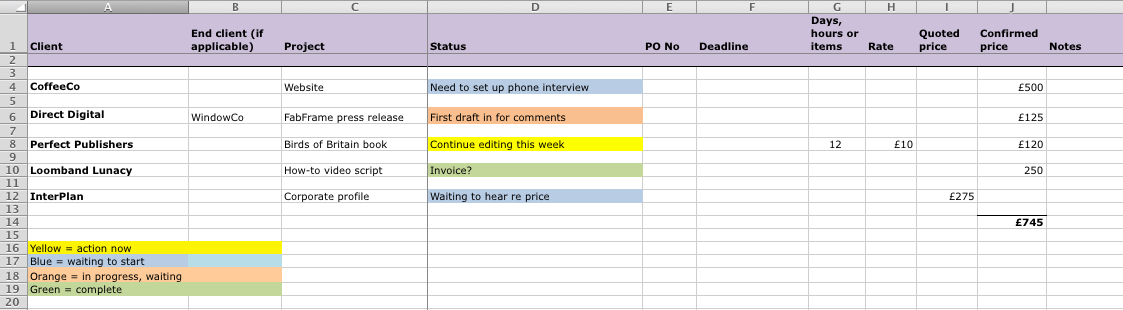
For our mortgage calculator, we will create a more comprehensive, dedicated sheet.
Part 2: Building Your Instruction Sheet
Let's apply these principles to the mortgage calculator you've been developing.
1. Create the New Sheet:
- Open your mortgage calculator file.
- Add a new worksheet. Right-click the new sheet tab, select "Rename," and call it Instructions.
- Drag the "Instructions" tab so it is the very first sheet in the workbook.
2. Structure the Content:
On the "Instructions" sheet, lay out the sections we just discussed. Use bolding, cell merging, and background colors to create a clean, organized layout. Your sheet might look something like this:
- A1: Mortgage Calculator
- A3:B3 (Merged): Purpose of this Tool
- A4: This tool calculates your monthly mortgage payment and generates a full amortization schedule. It also allows you to compare different loan scenarios and see the impact of extra payments.
- A6:B6 (Merged): How to Use
- A7: 1. Navigate to the 'Calculator' sheet.
- A8: 2. Enter your loan details into the yellow input cells.
- A9: 3. Select a scenario from the drop-down menu to see how it affects your payments and total interest.
- A11:B11 (Merged): Legend
- A12: Yellow Cells: User inputs. All other cells are locked.
- A14:B14 (Merged): Version & Contact
- A15: Version 1.0. For questions, contact [Your Name/Email].
3. Add Navigation with Hyperlinks:
You need to make it easy for the user to move between the instructions and the calculator itself. We'll use hyperlinks for this.
Documenting Excel Models Best Practices
The Wall Street Oasis article also explains how to create a navigable table of contents using hyperlinks.
Read the sections on Hyperlinks and Table of contents. This will guide you through the process of linking between worksheets.
Let's apply this:
- On your Instructions sheet, select the cell that says "Navigate to the 'Calculator' sheet."
- Press
Ctrl+Kto open the Insert Hyperlink dialog. - On the left, click "Place in This Document."
- Select the 'Calculator' sheet from the list and enter
A1for the "Cell Reference." Click OK. - Now, on your Calculator sheet, find a suitable spot (perhaps in cell
A1) and type "Back to Instructions." - Select that cell, press
Ctrl+K, and create a hyperlink that points back to cellA1of the Instructions sheet.
You have now created a basic, navigable documentation system. For many projects, this is perfectly sufficient. But for a premium tool, we can do even better.
Part 3: Advanced Interactivity for Premium Tools
To make your tool feel more like a polished application, you can create a tab-based navigation system within a single worksheet. Instead of having a long, scrolling page of instructions, the user can click on tabs like "Getting Started" or "Input Guide" to reveal different sections of content.
This technique gives your tool a highly professional and modern feel. The following video demonstrates two ways to achieve this: a straightforward method using hyperlinks and a more advanced, dynamic method using a bit of VBA.
Create Clickable Tabs Inside an Excel Sheet
The video "Create Clickable Tabs Inside an Excel Sheet" by Kenji Explains is a masterclass in building a sleek user interface. It aligns perfectly with your goal of building professional tools and your interest in VBA.
This video is dense with techniques, so we will walk through its concepts. The Concept (Setup): The core idea is to create shapes that look like tabs. A dedicated cell will hold the name of the "active" tab. The content displayed on the sheet will change based on the value in this cell. The Dynamic Content (FILTER Function): The video uses the FILTER function to show different rows of data. For our instruction sheet, you could use IF statements or XLOOKUP to pull different blocks of text from a hidden "Content" area on your sheet. The VBA Method (VBA Automation): This is the most elegant solution. A small VBA macro is assigned to each tab shape. When a user clicks a shape: The macro writes the corresponding tab name (e.g., "Getting Started") into our dedicated "active tab" cell. The content on the sheet updates automatically (thanks to the formulas from step 2). The macro also changes the color of the clicked tab, providing clear visual feedback. The video explains how to name shapes and assign macros to them. While the code might seem complex, the video explains its logic clearly. This is an excellent, practical introduction to event-driven VBA. The Non-VBA Alternative (Hyperlink Method): If you want to avoid VBA, the end of the video shows a simpler method. It involves creating separate worksheets for each "tab" and using hyperlinks on the shapes to jump between them. This mimics the look and feel without requiring macros.
For your mortgage calculator, try implementing a simple version of this on your "Instructions" sheet. Create two tabs: "How to Use" and "Legend." Use the non-VBA hyperlink method first. Once you are comfortable with it, challenge yourself by trying the VBA method to make it a truly dynamic interface.
Conclusion
You have now added the final layer of professionalism to your mortgage calculator. A well-crafted instruction sheet separates an amateur spreadsheet from a professional, client-ready tool. It respects the user's time, prevents confusion, and ultimately reflects the quality of your work.
Key Takeaways:
- Documentation is essential: It's a core feature of any professional tool, not an afterthought.
- A good instruction sheet is structured: It should clearly state the tool's purpose, provide step-by-step instructions, and define any special formatting or terms.
- Navigation is key: Use hyperlinks to allow users to move effortlessly between the instructions and the tool itself.
- Interactivity elevates your work: Advanced techniques like intra-sheet tab systems can create a premium user experience and set your freelance work apart.
In our next lesson, we will perform the final pre-delivery checks. You will learn how to prepare a spreadsheet for a client by cleaning metadata, setting professional defaults, and ensuring the file opens exactly as you intend.