Hello! Last time, we built the core engine for learning in a neural network: the backpropagation algorithm. You now understand how to calculate the analytical gradients of the loss function with respect to every weight and bias in a deep MLP. This is a huge step!
However, backpropagation involves many matrix operations, transpositions, and applications of the chain rule. It's notoriously easy to introduce a subtle bug—a mistake in indexing, a wrong matrix dimension, or a faulty gradient calculation—that doesn't crash the code but silently prevents your network from learning effectively. Debugging this can be incredibly frustrating.
Today, we'll build a powerful diagnostic tool to save ourselves from this headache. Our learning outcome is to implement a gradient checking function to verify the correctness of your backpropagation implementation. This function will serve as a "unit test" for our backprop code, giving us high confidence that our implementation is mathematically sound before we proceed.
1. The Problem: Silent Bugs in Backpropagation
As you've seen in your own projects, some bugs are obvious—they throw errors and crash your program. Other, more "nefarious" bugs, simply lead to incorrect results. A bug in backpropagation is often of the second kind. Your network might seem to train, with the loss decreasing slightly or fluctuating, but it never achieves good performance.
To understand why this is a common issue and why we need a solution, let's look at a video that frames the problem perfectly.
Neural Networks Demystified [Part 5: Numerical Gradient Checking]
The video 'Neural Networks Demystified [Part 5: Numerical Gradient Checking]' by Welch Labs provides excellent motivation for why we need to be extra careful with our gradient implementations.
Watch the first minute (00:00 to 00:58) to understand why a buggy gradient is such a difficult problem to diagnose and why a dedicated test is necessary.
Gradient checking solves this by comparing the gradients calculated by backpropagation (the "analytical" gradients) with a numerical approximation of the gradients. If they match, our backprop code is correct.
2. The Solution: Numerical Gradient Approximation
How can we approximate a gradient without calculus? We can go back to the fundamental definition of a derivative. A derivative is simply the slope of a function at a point. We can approximate this slope by taking a very small step, ε (epsilon), and measuring the change in the function's output.
A simple way to do this is the one-sided formula: . However, a more accurate and robust approximation uses a two-sided difference:
This formula calculates the slope of the line connecting the points on the function at and , which is a much better approximation of the tangent at , especially for curved functions.
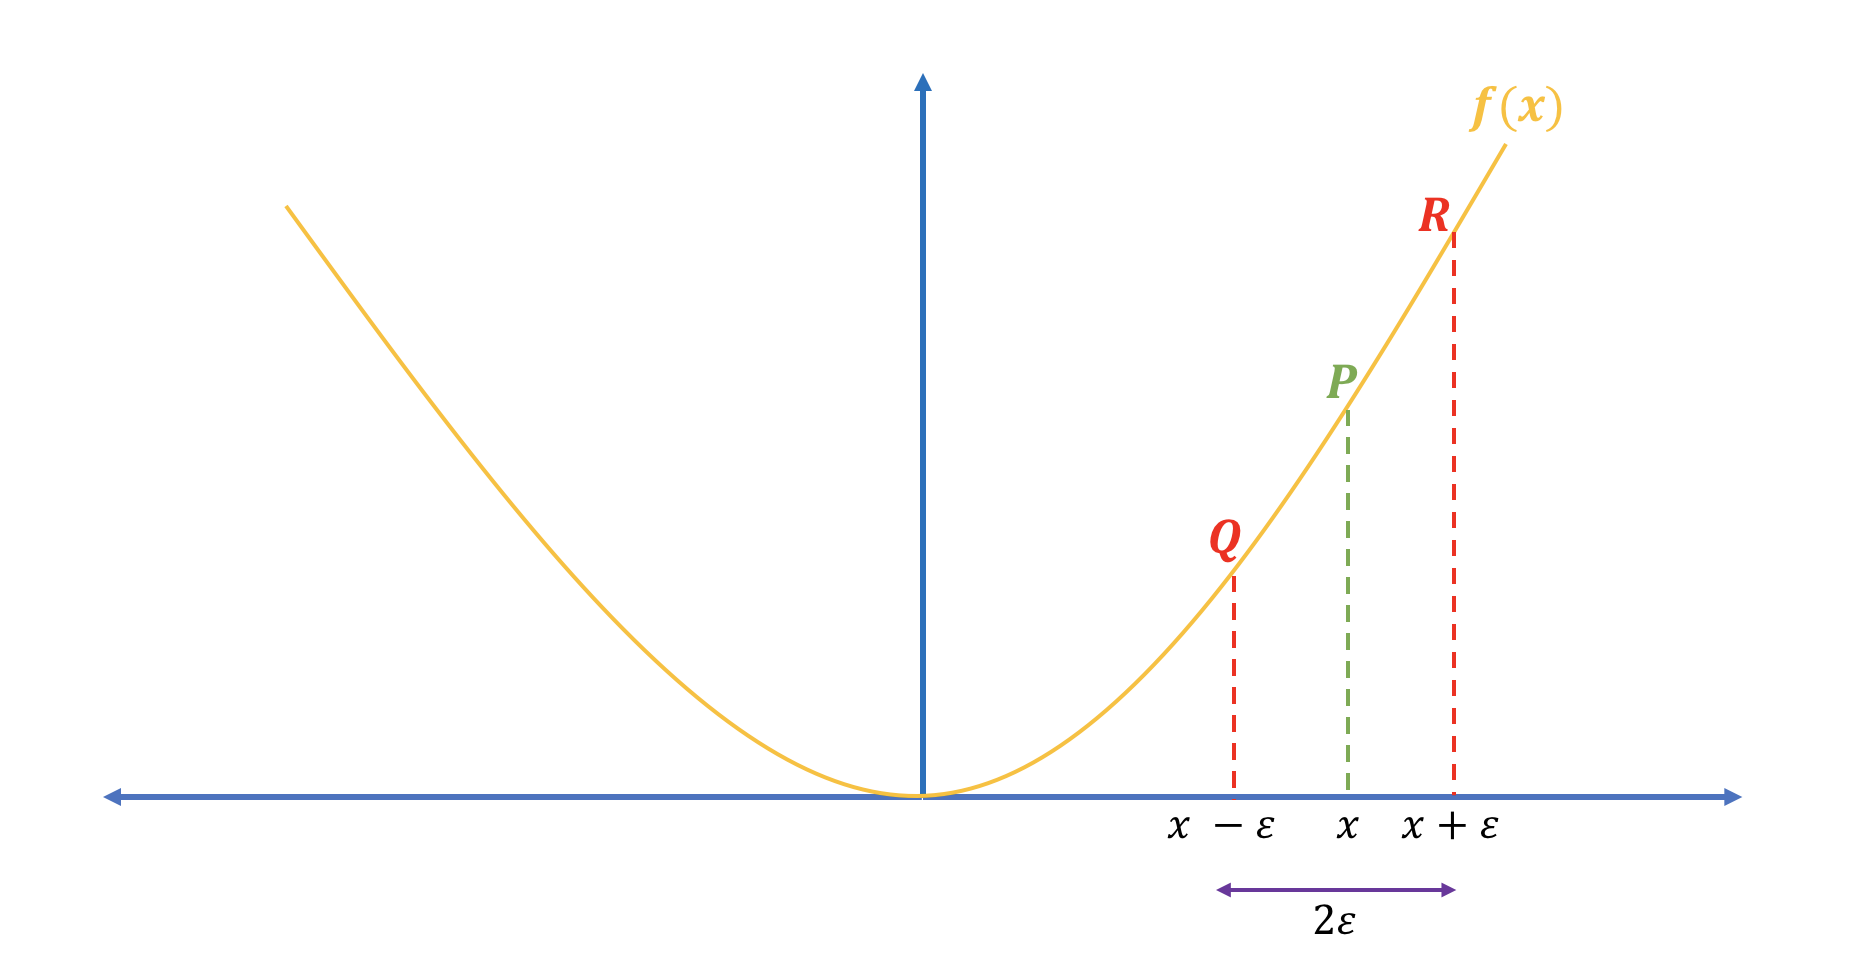
Our neural network's cost function, , is just a very complex function of all its parameters (all the W's and b's). We can apply this exact principle to check the gradient for each and every parameter.
3. The Gradient Checking Algorithm
The overall strategy is to treat all the network's parameters as one giant vector. Let's call this vector θ. Our cost function is . Our backpropagation algorithm gives us dθ, the analytical gradient of with respect to θ.
To check this, we will compute a numerical gradient, dθ_approx, one element at a time:
- For each parameter
θ_iin our network:
a. Calculate the cost when we slightly increase that single parameter: . Let's call thiscost_plus.
b. Calculate the cost when we slightly decrease it: . Let's call thiscost_minus.
c. The numerical gradient for this specific parameter is:dθ_approx[i] = (cost_plus - cost_minus) / (2 * ε). - Compare: After looping through all parameters, we will have two full gradient vectors:
dθ(from backprop) anddθ_approx(from our numerical process). We then compute a measure of difference between them to see if they are close enough.
This process is computationally very expensive because it requires two forward passes through the entire network for every single parameter. This is why it's only used as a debugging tool, not during actual training.
Let's watch a detailed explanation of this process.
The video 'Gradient Checking' by Andrew Ng (DeepLearning.AI) provides a clear, step-by-step walkthrough of the algorithm and the final comparison metric.
Watch from 00:11 to 04:36. Pay attention to three key concepts: Reshaping (00:11 - 01:49): The idea of taking all parameter matrices (W1, b1, etc.) and unrolling them into one giant vector, theta. Numerical Calculation (01:49 - 03:38): The loop that iterates through each element of theta to compute the numerical gradient using the two-sided formula. Comparison (03:38 - 04:36): The formula used to calculate the final difference between the numerical and analytical gradient vectors.
4. Implementing Gradient Checking from Scratch
Now for the part you prefer: implementing this in code. While the vectorized approach of unrolling parameters into a single theta vector is elegant, a more direct (and perhaps easier to debug) method uses nested loops to iterate through each parameter in its original matrix/vector shape.
Let's study a clear, from-scratch implementation that does exactly this.
Gradient Checking Code Example
The blog post 'How to implement a neural network (4/5)' by Peter Roelants provides a fantastic, self-contained Python script for gradient checking. We will focus on this code block.
Focus on the code cell labeled In [7]:. Read through the code and its comments. Notice the nested loops that iterate through each parameter matrix (p_idx), and then through each element of that matrix (row, col). This is where the perturbation, forward passes, and numerical gradient calculation happen.
Let's break down the logic of that code, which you will integrate into your own MLP project.
Here's the pseudocode for a gradient_check function:
def gradient_check(parameters, gradients, X, Y, epsilon=1e-7):
    """
    Checks if the backpropagation-computed gradients are correct.

    Args:
        parameters (dict): A dictionary of the network's parameters (e.g., {"W1": W1, "b1": b1, ...})
        gradients (dict): A dictionary of the backprop gradients (e.g., {"dW1": dW1, "db1": db1, ...})
        X (np.array): Input data.
        Y (np.array): True labels.
        epsilon (float): A very small number for perturbation.

    Returns:
        float: The relative difference between numerical and analytical gradients.
    """

    # Unroll parameters and gradients into vectors for easier comparison later
    params_vector = unroll(parameters)
    grad_vector = unroll(gradients)
    num_parameters = params_vector.shape[0]
    grad_approx_vector = np.zeros((num_parameters, 1))

    # Iterate through each parameter
    for i in range(num_parameters):
        # --- Calculate grad_approx[i] ---

        # 1. Perturb the i-th parameter by +epsilon
        params_plus = np.copy(params_vector)
        params_plus[i][0] += epsilon
        params_plus_dict = roll_up(params_plus, network_architecture) # Convert back to dict

        # 2. Run forward prop and get cost
        # Note: Your forward_prop function needs to accept the parameter dictionary
        cost_plus = calculate_cost(forward_prop(X, params_plus_dict), Y)

        # 3. Perturb the i-th parameter by -epsilon
        params_minus = np.copy(params_vector)
        params_minus[i][0] -= epsilon
        params_minus_dict = roll_up(params_minus, network_architecture)

        # 4. Run forward prop and get cost
        cost_minus = calculate_cost(forward_prop(X, params_minus_dict), Y)

        # 5. Compute the numerical gradient for this parameter
        grad_approx_vector[i] = (cost_plus - cost_minus) / (2 * epsilon)

    # --- Compare grad_approx_vector with grad_vector ---
    numerator = np.linalg.norm(grad_vector - grad_approx_vector)
    denominator = np.linalg.norm(grad_vector) + np.linalg.norm(grad_approx_vector)
    difference = numerator / denominator

    return difference

# You would need to implement helper functions 'unroll' and 'roll_up'
# to convert between the dictionary of parameters and the single vector.
Test your understanding!
Why is it critical to use np.copy() when creating params_plus and params_minus inside the loop? What would happen if you just did params_plus = params_vector?
Show answer
In Python (and NumPy), assignment like params_plus = params_vector does not create a new object. It makes params_plus a reference to the same object in memory as params_vector.
If you did this, modifying params_plus[i][0] += epsilon would also modify the original params_vector. In the next iteration of the loop, you would be perturbing an already perturbed vector, and your calculations would be completely wrong.
Using np.copy() creates a brand new, independent copy of the array in memory, ensuring that your perturbations are always relative to the original, unchanged parameter vector.
5. Interpreting the Results
After all that computation, you get a single number: the difference. How do you interpret it? As Andrew Ng explained, here are some good rules of thumb:
- Difference < 10⁻⁷: Great! Your backpropagation implementation is very likely correct.
- Difference ≈ 10⁻⁵: This is a grey area. It might be okay, but you should double-check your code. This can sometimes happen due to using
float32precision instead offloat64. - Difference > 10⁻³: You almost certainly have a bug in your backpropagation code.
If you find a large difference, the real debugging begins. You can print the numerical and analytical gradients for each parameter to find the exact weight or bias where the calculation first goes wrong. This often points directly to the bug in your backprop formulas for that specific layer.
Conclusion
You now have a powerful tool for ensuring your neural network's learning mechanism is bug-free. Implementing gradient checking is a rite of passage for anyone building neural networks from scratch. It forces a deep understanding of the relationship between the forward pass (cost) and the backward pass (gradients).
Key Takeaways:
- Purpose: Gradient checking is a debugging tool to verify the correctness of your backpropagation implementation.
- Mechanism: It compares the analytical gradients from backprop with numerical approximations calculated using the two-sided finite difference formula.
- Cost: The process is extremely computationally expensive and should only be used for debugging, never during the actual training loop.
- Implementation: You iterate through every single parameter, perturbing it by
±ε, running two forward passes to get the new costs, and calculating the numerical gradient. - Evaluation: The final relative difference score tells you if your implementation is correct (score < 10⁻⁷) or buggy (score > 10⁻³).
Preview of the Next Lesson:
Our MLP now has all the essential components: parameter initialization, a forward pass, a backward pass, and a way to verify the gradients. The next logical step is to put them all together. In our next lesson, you will integrate the forward pass, backpropagation, and parameter updates into a complete training loop, finally enabling our network to learn from data.