Hello! Welcome to your next lesson on advanced Git workflows.
In our last lesson, you learned how to use git stash to temporarily save your work. This skill is crucial for managing context switches, which is a common occurrence in structured development workflows. Today, we will explore one of the most famous of these workflows.
The learning outcome for this lesson is to apply the GitFlow workflow for managing versioned releases and applying hotfixes. GitFlow is a highly structured branching model that brings order and predictability to projects, especially those with scheduled release cycles. We'll break down its key branches and walk through the specific processes for preparing a new software release and patching an existing one.
1. What is GitFlow?
As projects grow, managing new features, bug fixes, and releases can become chaotic if everyone commits to the same branch. GitFlow, proposed by Vincent Driessen, solves this by assigning specific roles and strict rules to different types of branches.
At its core, GitFlow uses two main, long-lived branches:
main(ormaster): This branch represents the official, production-ready release history. It should always be stable and deployable. Commits tomainare typically tagged with version numbers (e.g.,v1.0,v1.1).develop: This is the primary integration branch where all new features are merged. It contains the latest development changes for the next release. While it should be stable, it's a "work-in-progress" version of the next release, unlike the rock-solidmainbranch.
To understand the model and its various branches, let's look at the primary resources for this lesson.
Gitflow Workflow | Atlassian Git Tutorial
The Atlassian Git Tutorial provides a great high-level introduction to the Gitflow workflow and its core concepts.
Please read the sections 'What is Gitflow?' and 'How it works', focusing on the distinction between the main and develop branches.
To support these main branches, GitFlow uses several types of temporary, supporting branches.
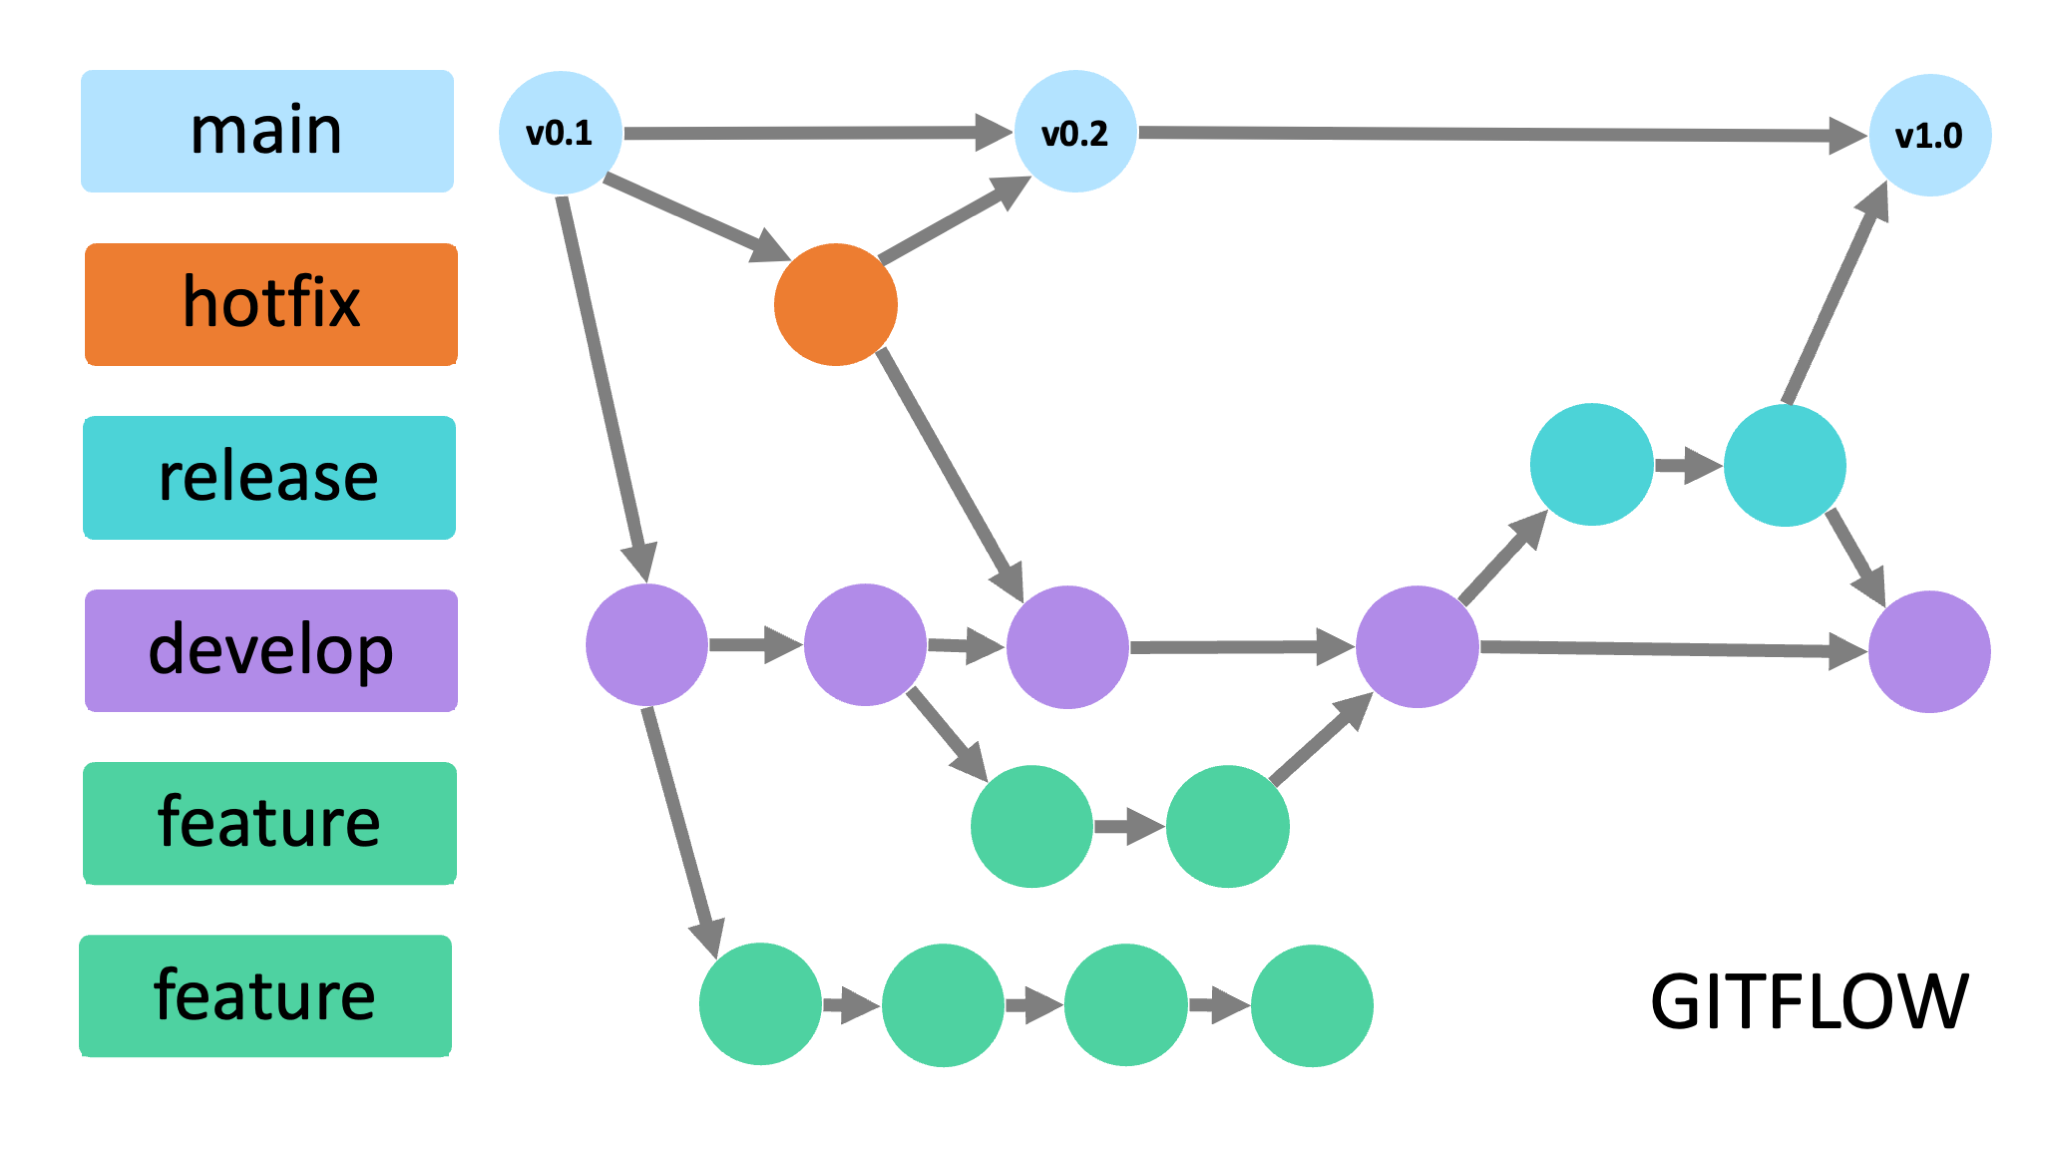
2. The Supporting Branches: Feature, Release, and Hotfix
The real power of GitFlow comes from its supporting branches, each with a clear purpose and lifecycle.
GitFlow Tutorial: Branching for Features, Releases, and ...
The 'GitFlow Tutorial' from DataCamp provides a concise breakdown of each supporting branch type.
Read the 'What is GitFlow?' section. Pay close attention to the descriptions of feature/*, release/*, and hotfix/* branches and their purposes.
Here is a summary of the supporting branches:
-
Feature Branches (
feature/*):- Purpose: To develop a new feature.
- Branches from:
develop. - Merges back into:
develop. - Rule: Never interact directly with
main.
-
Release Branches (
release/*):- Purpose: To prepare a new production release. This is where you do final bug fixes, bump version numbers, and write release notes. Creating a release branch allows the
developbranch to remain open for new features for the next release. - Branches from:
develop. - Merges back into:
mainanddevelop. - Rule: Once created, no new features are added to it.
- Purpose: To prepare a new production release. This is where you do final bug fixes, bump version numbers, and write release notes. Creating a release branch allows the
-
Hotfix Branches (
hotfix/*):- Purpose: To fix a critical bug in the live production version. This allows you to patch production immediately without interfering with the ongoing development in the
developbranch. - Branches from:
main. - Merges back into:
mainanddevelop. - Rule: Must be used for urgent fixes only.
- Purpose: To fix a critical bug in the live production version. This allows you to patch production immediately without interfering with the ongoing development in the
3. The git-flow Command-Line Tool
While GitFlow is a conceptual model you can follow using standard Git commands, a popular extension called git-flow automates the process. It simplifies creating and finishing the different branch types, reducing the risk of errors.
For the rest of this lesson, we will use the git-flow commands as they make the workflow explicit.
GitFlow Tutorial: Branching for Features, Releases, and ...
Let's review how to set up the git-flow extension. While you can perform the workflow manually, this tool enforces the conventions and simplifies the commands.
Read the 'Setting Up GitFlow' section. You can install the tool if you wish, but the key part to understand is the git flow init command, which sets up the branch naming conventions in your repository.
Running git flow init in your repository will prompt you to confirm the names for your branches, establishing the structure for the workflow.
4. Applying the Workflow: Managing Releases
Let's walk through the process of preparing and finishing a new versioned release.
Step 1: Start the Release
When you decide that the develop branch has enough features for a new release (e.g., version 1.1.0), you start a release branch.
# This command creates a new branch 'release/1.1.0' from 'develop'
git flow release start 1.1.0
At this point, your team can work on this branch to fix minor bugs, update documentation, and prepare everything for launch. Meanwhile, other developers can continue merging new features for version 1.2.0 into the develop branch.
Step 2: Finish the Release
Once the release branch is stable and ready, you finish it. This is where the magic happens.
# This command automates several crucial steps
git flow release finish 1.1.0
The finish command performs the following actions for you:
- Merges the
release/1.1.0branch intomain. - Creates a Git tag on the
mainbranch with the release name (1.1.0). - Merges the
release/1.1.0branch back intodevelopto ensure any bug fixes made during the release are included in future development. - Deletes the
release/1.1.0branch.
Finally, you need to push your changes and the new tag to the remote repository.
# Push the main and develop branches, along with all tags
git push origin main
git push origin develop
git push --tags
This structured process ensures that releases are carefully managed and that your main branch history is a clean, tagged record of production updates.
GitFlow Tutorial: Branching for Features, Releases, and ...
To see these commands in context, let's review the detailed explanation of the release process.
Read the subsections 'Creating release branches' and 'Finishing release branches'. Focus on the automated steps that git flow release finish performs.
5. Applying the Workflow: Applying Hotfixes
Now, imagine a critical bug is discovered in your production release, v1.1.0. The develop branch has already moved on with new features that are not ready for release. You need to fix the bug now. This is the exact scenario for a hotfix.
Step 1: Start the Hotfix
You create a hotfix branch directly from the main branch. This is the key difference from a release branch.
# This creates a new branch 'hotfix/1.1.1' from 'main'
git flow hotfix start 1.1.1
Now you can fix the bug on this isolated branch without touching any of the new, unstable code in develop.
Step 2: Finish the Hotfix
After committing the fix, you finish the hotfix.
# This automates the merge and tagging process
git flow hotfix finish 1.1.1
This command:
- Merges the
hotfix/1.1.1branch intomain. - Tags the
mainbranch with the new version (1.1.1). - Merges the
hotfix/1.1.1branch back intodevelopto ensure the fix is not lost. - Deletes the
hotfix/1.1.1branch.
Just like with a release, you must push your changes to the remote.
git push origin main
git push origin develop
git push --tags
This ensures that your production code is immediately patched, and the fix is also incorporated into the ongoing development line.
Test your understanding!
A user reports a critical security vulnerability in version v2.5.0 of your application, which is the current version on the main branch. Your develop branch contains unfinished features for the upcoming v2.6.0 release.
What is the correct first git flow command to run to begin addressing this issue, and why is it the right choice?
Show answer
The correct command is:git flow hotfix start 2.5.1
This is the right choice because:
- The issue is a critical bug in production, which is the exact purpose of a hotfix.
- The
hotfixcommand creates a branch frommain, ensuring you are only working with the stable, production code and not the new, unfinished features from thedevelopbranch. - A release branch (
git flow release start) would be incorrect as it would be based ondevelopand would pull in the unwanted new features.
6. A Note on Modern DevOps and CI/CD
GitFlow provides excellent structure, particularly for projects with distinct, versioned releases. However, it's worth noting that in many modern DevOps environments practicing continuous integration and continuous delivery (CI/CD), a simpler model called Trunk-Based Development is often preferred. In that model, developers merge small, frequent changes into a single main branch ("the trunk").
As you advance in your DevOps career, you will encounter both. Understanding GitFlow is essential as it is still widely used and provides a fantastic mental model for managing complex branching. The Atlassian article (LINK) you read earlier mentions this context in its introduction.
Conclusion
Today, you've learned how to apply the GitFlow workflow, a robust branching model for managing complex projects. By separating development, release preparation, and urgent fixes into different branches, GitFlow brings predictability and stability to your version control process.
Key Takeaways:
- GitFlow is built around two long-lived branches:
mainfor stable production code anddevelopfor integrating new features. - Release branches are forked from
developto prepare a new release. When finished, they are merged into bothmainanddevelop. - Hotfix branches are forked from
mainto patch critical production bugs. When finished, they are also merged into bothmainanddevelop. - The
git-flowcommand-line tool automates many of the steps, making the workflow easier and less error-prone.
In the next lesson, we will move on to a mini-project where you will apply what you've learned. You will plan a simple project, implement a feature using the workflow we discussed today, and learn about Git best practices like atomic commits.