Hello! Welcome to your next lesson in the "Advanced Git and Collaborative Workflows" module.
In our last session, we explored how to resolve divergent branches using git merge and git rebase. A common theme was the need to integrate changes from a main branch while you're still working on a feature. This raises a critical question: what do you do with your half-finished work when you need to switch contexts? Making an incomplete commit just to switch branches clutters your history and isn't a professional practice.
Today, you'll learn the elegant solution to this problem. The learning outcome for this lesson is to use 'git stash' to temporarily save uncommitted work while switching contexts. git stash is a powerful utility that acts as a temporary storage area, allowing you to quickly clean your working directory, handle an urgent task, and then seamlessly return to your work.
1. What is git stash and Why is it Essential?
Imagine you're deep into coding a new feature. You've modified several files, but your work isn't complete enough for a commit. Suddenly, a critical bug is reported, and you need to switch to the main branch immediately to create a hotfix. git stash is designed for exactly this moment.
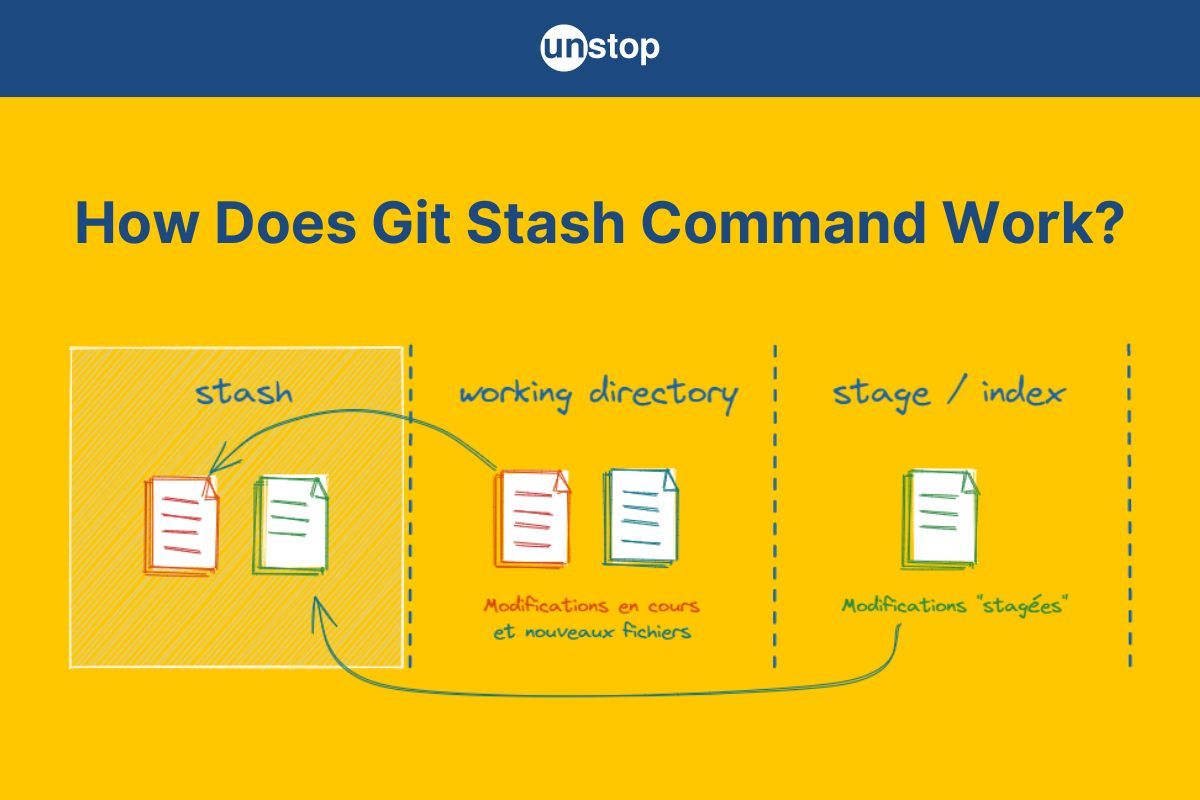
git stash takes your uncommitted changes (both staged and unstaged), saves them in a temporary storage area, and reverts your working directory back to the last commit (HEAD). This gives you a "clean" state, allowing you to switch branches without any issues.
Let's start by understanding the scenarios where git stash is invaluable.
A Complete Guide to Temporarily Saving Your Work With Git Stash
The article 'A Complete Guide to Temporarily Saving Your Work With Git Stash' by Hamza Sehouli clearly outlines the core function and common use cases for stashing.
Please read the sections 'What is Git Stash?', 'Why Use Git Stash?', and 'How Git Stash Works'. Focus on how it uses a stack-like structure to save your work and cleans your directory.
As you read, the key idea is that stashing provides a clean separation between your work-in-progress and the committed history of the repository.
2. The Standard git stash Workflow
The most common use of git stash follows a simple, powerful pattern. Let's walk through a realistic scenario, which is also a great practical exercise.
This workflow demonstrates exactly how to switch contexts, which is the core of today's learning outcome.
A Complete Guide to Temporarily Saving Your Work With Git Stash
The same article provides an excellent step-by-step walkthrough of a typical scenario where a developer uses git stash.
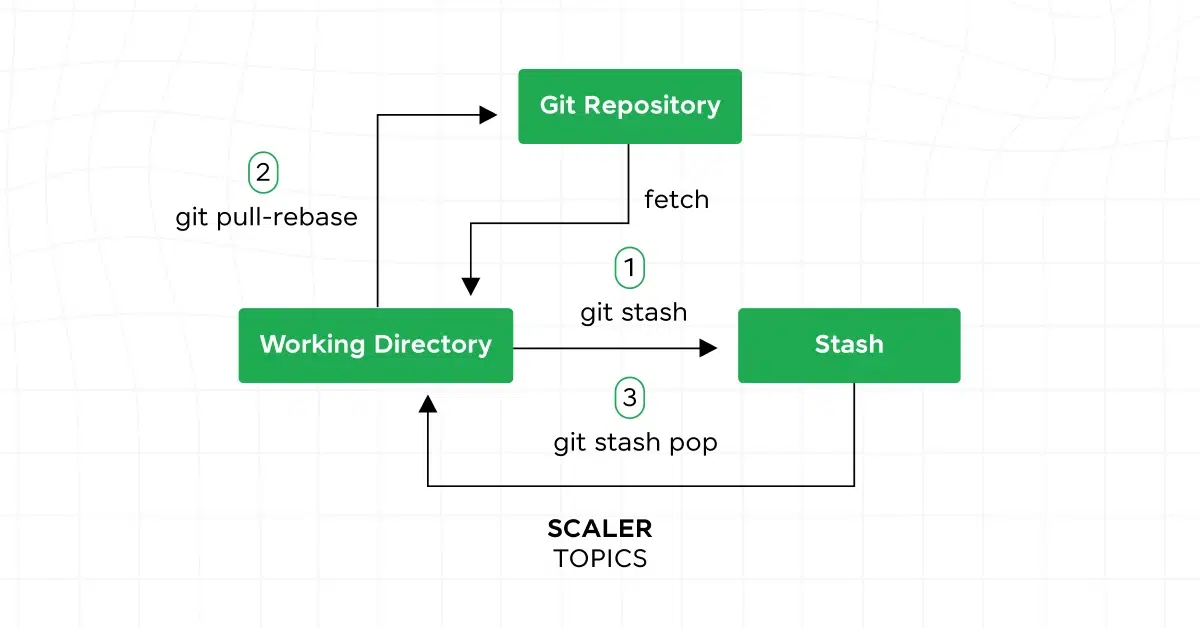
Read the section 'Regular Workflow with Git Stash'. This walks you through a full cycle: stashing changes on a feature branch, switching to main for a bug fix, and then returning to the feature branch to continue work.
Let's break down the key commands from that workflow:
git stash: This is the main command. It takes your uncommitted changes and "stashes" them away. Your working directory becomes clean.git stash list: Shows you all the stashes you've created. Git stores them in a stack, with the most recent one beingstash@{0}.git stash pop: This command does two things: it takes the most recent stash (stash@{0}) and applies its changes back to your working directory, and then it removes that stash from the stack.
A crucial distinction to understand is the difference between pop and apply.
The article 'Git Stash for Newbies' by Meghan Harris offers a great explanation of the difference between applying and popping a stash.
Please read the section 'git stash apply -vs- git stash pop'. The analogy of 'copy and paste' versus 'moving' is particularly helpful.
git stash apply: "Copies" the changes from the stash back to your working directory but leaves the stash in your list. This is useful if you want to apply the same changes to multiple branches.git stash pop: "Moves" the changes from the stash back to your working directory and removes the stash from your list. This is the most common command, used when you are done with the stash.
3. Managing Multiple Stashes
As you work, you might create several stashes. Managing them effectively is key to staying organized. Here's a rundown of the essential commands for managing your stash list.
The following resource provides a fantastic set of real-world scenarios for each command.
Let's explore the different commands for managing stashes using the practical examples from 'Git Stash for Newbies'. This will help solidify your understanding of each command's purpose.
First, review the table in the 'A Rundown of git stash Commands' section. Then, read through the examples in the 'Stashes in the Wild' section to see how commands like list, show, pop <index>, drop, and clear are used in practice. (Note: The examples in the article sometimes have an extra 'git' at the end of the command; please ignore that typo. For example, git stash pop 2 git should be git stash pop stash@{2}).
Here is a summary of the most important management commands:
| Command | Description |
|---|---|
git stash or git stash push |
Save your current uncommitted changes to a new stash. |
git stash list |
Display all the stashes in your repository. |
git stash show stash@{n} |
Show a summary of the changes stored in a specific stash. |
git stash apply stash@{n} |
Apply a specific stash to your working directory, but keep it in the list. |
git stash pop stash@{n} |
Apply a specific stash and remove it from the list. |
git stash drop stash@{n} |
Permanently delete a specific stash from the list. |
git stash clear |
Permanently delete all stashes in the repository. |
git stash branch <new-branch-name> stash@{n} |
Create a new branch from the commit the stash was based on, and apply the stash to it. This is great for turning a "quick fix" stash into a proper feature branch. |
Note: If you omit stash@{n}, Git assumes you mean the most recent stash, stash@{0}.
4. Stashing Best Practices
To use git stash effectively and avoid confusion, keep these professional practices in mind:
- Always add a message: Just like with commits, you can add a descriptive message to your stash. This is incredibly helpful when you have multiple stashes. Use
git stash push -m "Your descriptive message here". - Include untracked files when needed: By default,
git stashonly saves modified tracked files. If you have created new files that you also want to save, usegit stash -u(or--include-untracked). - Don't hoard stashes: Stashes are for temporary storage. Once you've popped a stash and committed your work, it has served its purpose. Regularly clean up old, unneeded stashes using
git stash droporgit stash clearto keep your list manageable.
Test your understanding!
You are in the middle of developing a new feature on the feature/user-profile branch. You've modified profile.html and created a new, untracked file named profile.css. Your team lead asks you to immediately review a pull request, which requires you to switch to a different branch.
What is the best single command to save all your work so you can safely switch branches, while also leaving a note for your future self about what the work was for?
Show answer
The best command would be:git stash push -u -m "WIP on user profile page styles"
push: The command to create a new stash.-u: This flag includes the new, untrackedprofile.cssfile in the stash. Without it, the new file would be left in your working directory.-m "...": This adds a descriptive message, making it easy to identify this stash later if you have multiple stashes.
Conclusion
You've now learned how to use one of the most practical tools in a developer's daily Git workflow. git stash provides the flexibility to switch contexts without losing your train of thought or making messy, incomplete commits.
Key Takeaways:
git stashsaves your uncommitted changes to a temporary storage area, giving you a clean working directory.- It's perfect for when you need to quickly switch branches to handle an urgent task.
git stash popapplies the most recent stash and removes it from the list.git stash applyapplies a stash but keeps it in the list for later reuse.- You can manage multiple stashes using commands like
list,show,drop, andclear. - Best practices include adding descriptive messages (
-m) and including untracked files when necessary (-u).
In our next lesson, we will explore the GitFlow workflow, a popular branching strategy for managing versioned releases and hotfixes. You will see how a tool like git stash is an essential part of efficiently executing such a workflow, especially when you need to jump between feature, release, and hotfix branches.