Hello! Welcome to the next lesson in our module on "Advanced Git and Collaborative Workflows."
In the last lesson, we focused on the best practices for documenting your work: conventional branch naming and atomic commits. These skills are crucial for creating a clean and understandable project history. Today, we'll shift our focus from documenting work to planning it. You'll learn how to lay the groundwork for a project directly within GitHub, setting the stage for effective collaboration and development.
This lesson directly addresses the learning outcome: Plan a simple project by creating a repository and defining development tasks using GitHub Issues. This is a core competency in DevOps, as it bridges the gap between an idea and the actionable tasks a development team can work on.
1. The Project's Home: The GitHub Repository
Every project starts with a central place to store code, track changes, and manage work. In the Git and GitHub world, this place is the repository. It's more than just a folder for files; it's the hub for your entire project.
Before you can plan tasks, you need a project to plan for. Let's explore how to set one up correctly.
Planning and tracking work for your team or project
The official GitHub documentation provides a clear guide on the first steps of planning and tracking work. We'll start with the foundational step of creating a repository and communicating its purpose.
Please read the first two sections, 'Creating a repository' and 'Communicating repository information'. Pay attention to the different use cases for repositories and the role of the README.md file.
As you've read, a repository is the container for your project. A well-written README.md file is the front door, welcoming collaborators and explaining what the project is about and how to get started.
2. Defining the Work: An Introduction to GitHub Issues
Once the repository exists, how do you define what needs to be done? You could use a separate project management tool, but one of GitHub's most powerful features is its integrated issue tracker. GitHub Issues are the building blocks of project planning on the platform. They are used to track everything from feature requests and bug reports to general tasks and release checklists.
How to Use GitHub Issues to Manage Project Tasks
This article from AlgoCademy gives a fantastic introduction to what GitHub Issues are and why they are so effective for project management.
Please read the sections 'Understanding GitHub Issues' and 'Setting Up GitHub Issues for Your Project'. Focus on the key benefits, especially the deep integration with code.
The key takeaway is that issues aren't just a to-do list; they are a collaborative space where tasks can be discussed, assigned, and linked directly to the code that implements them.
3. Breaking Down a Project into Actionable Tasks
The real skill in project planning is decomposing a large goal into small, manageable tasks. GitHub Issues are perfectly designed for this. A good issue is specific, actionable, and provides enough context for someone to start working on it.
Let's look at the mechanics and best practices for creating and organizing issues.
Planning and tracking work for your team or project
Now, let's combine the official GitHub documentation with the practical guide from AlgoCademy to see how to create and structure our tasks.
First, read the sections 'Opening issues and breaking down work' and 'Using labels to highlight project goals and status' from the GitHub docs. Focus on the concept of breaking down larger issues using task lists and categorizing them with labels.
As the documentation explains, you can create a high-level issue for a large feature and then use a task list (a checklist in the issue description) to outline the smaller sub-tasks. This is an incredibly powerful way to track progress.
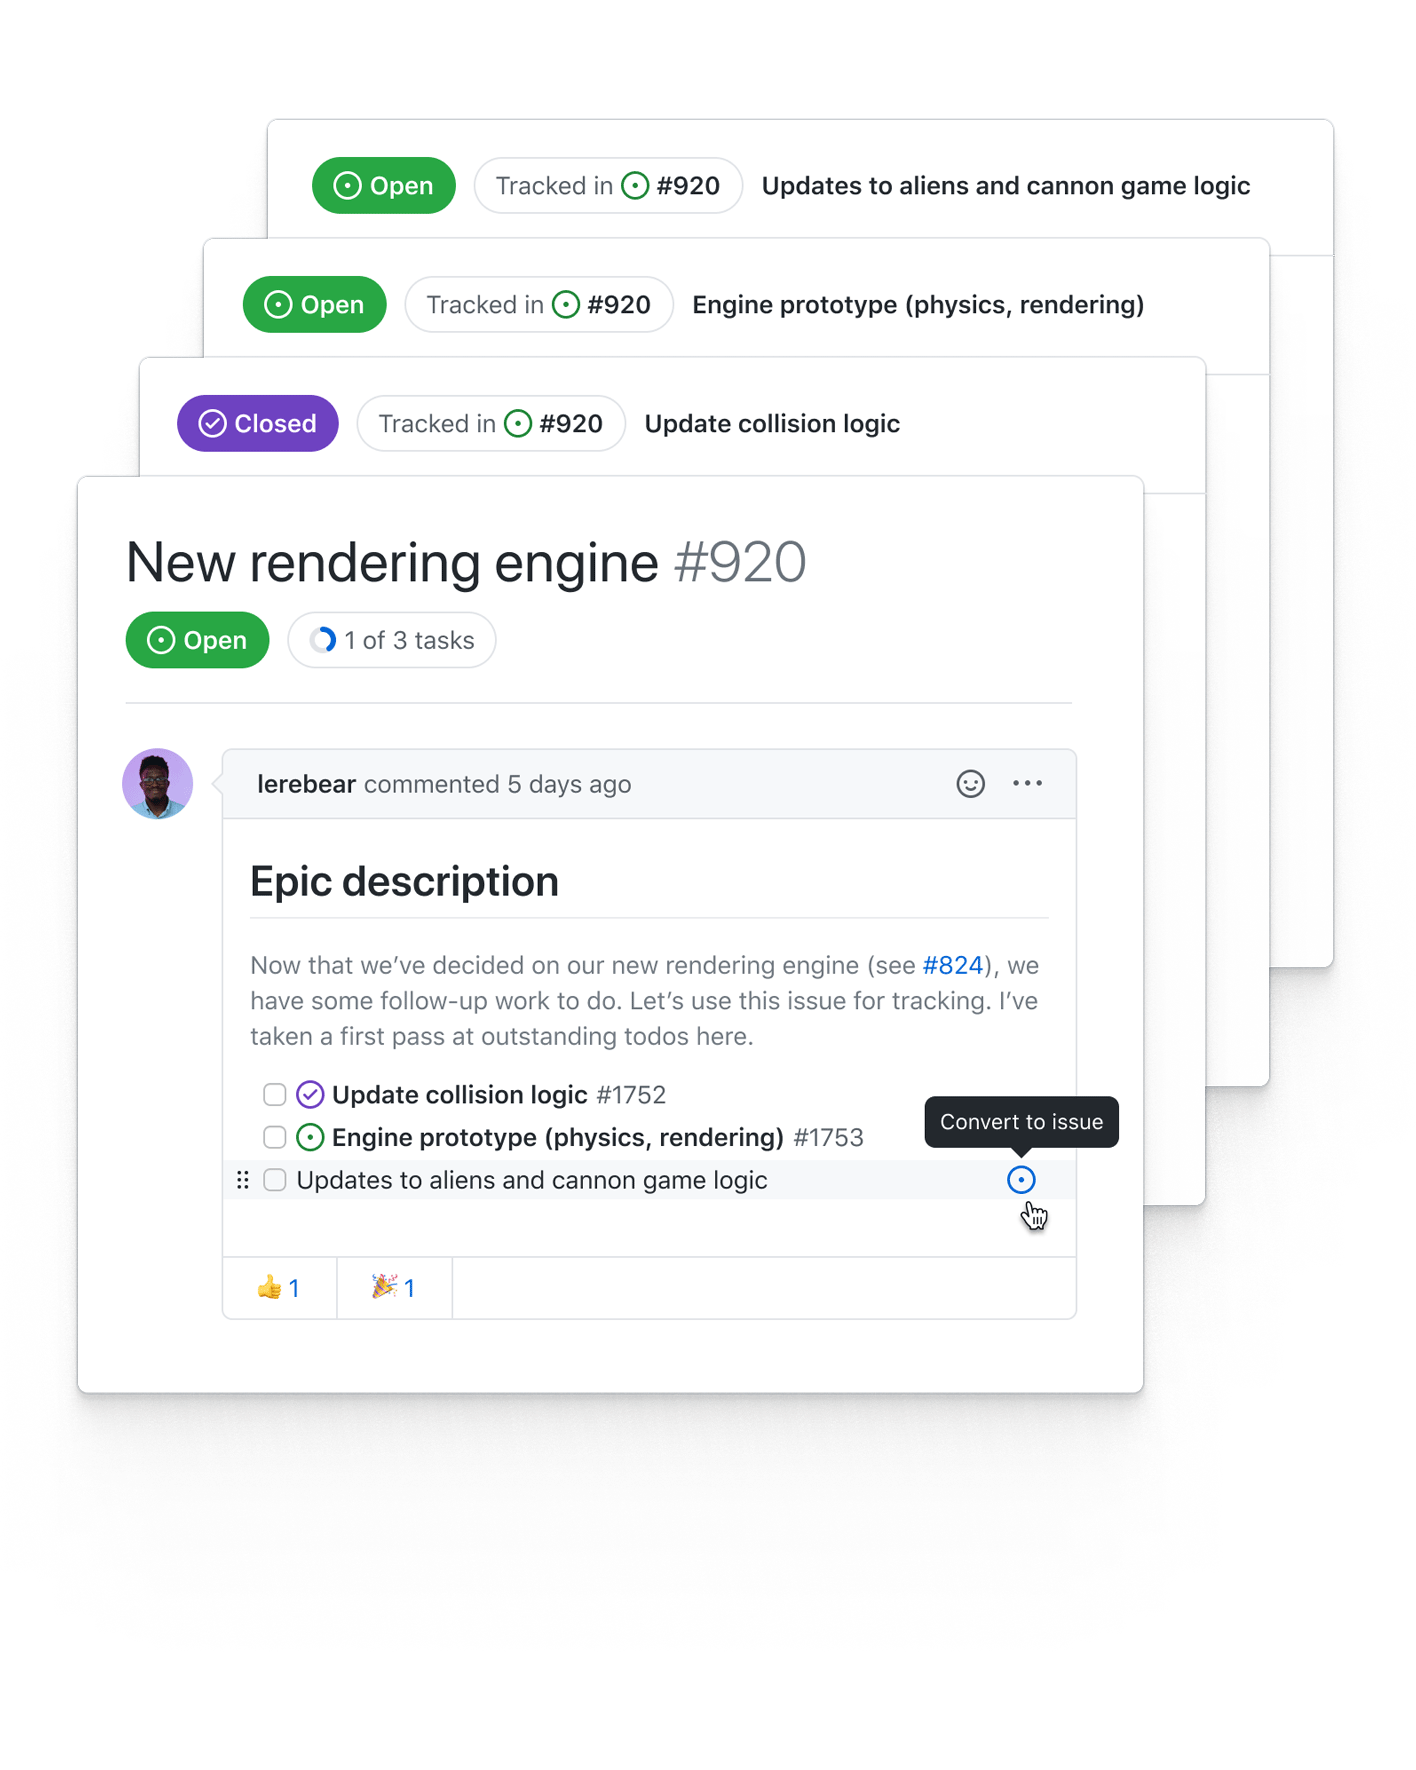
Now, let's see the step-by-step process for creating and managing these issues.
How to Use GitHub Issues to Manage Project Tasks
The AlgoCademy article provides a clear, step-by-step walkthrough of the issue creation process.
Read the section 'Creating and Managing Issues'. This will walk you through creating an issue, assigning it to someone, using labels for categorization, and grouping issues into milestones.
Best Practices for Creating Issues:
- Descriptive Title: The title should be a clear and concise summary of the task.
- Detailed Description: Explain the what and the why. For a bug, include steps to reproduce it. For a feature, describe the user story or the goal.
- Use Labels: Labels are tags that help you categorize and filter issues (e.g.,
bug,feature,documentation,priority:high). - Assign Work: Assign the issue to the person responsible for it to ensure clear ownership.
Test your understanding!
Imagine you are planning a project to build a simple command-line tool that fetches the weather. You need to break down the feature "Get current weather for a specified city" into smaller, actionable tasks.
What GitHub Issues might you create for this feature? What labels would you apply?
Show answer
You could create the following issues:
-
Issue Title:
feat: Create CLI argument parser for city name- Description: The tool needs to accept a city name as a command-line argument. Use a library like
argparsein Python or a similar one for your chosen language. - Labels:
feature,priority:high
- Description: The tool needs to accept a city name as a command-line argument. Use a library like
-
Issue Title:
feat: Implement API call to weather service- Description: Write the function to connect to a free weather API (e.g., OpenWeatherMap) and fetch the weather data for a given city.
- Labels:
feature,needs-api-key
-
Issue Title:
feat: Display formatted weather data to the user- Description: Take the raw JSON response from the API and display it in a clean, human-readable format on the console.
- Labels:
feature,ui
-
Issue Title:
docs: Add usage instructions to README.md- Description: Update the project's README file with instructions on how to install and run the tool.
- Labels:
documentation
This breakdown separates the work into logical, independent chunks.
4. Visualizing Your Plan with Project Boards
While a list of issues is great for tracking individual tasks, it can be hard to see the big picture. This is where GitHub Projects comes in. It allows you to take your issues and organize them on a Kanban-style board or a spreadsheet, giving you a high-level view of your project's status.
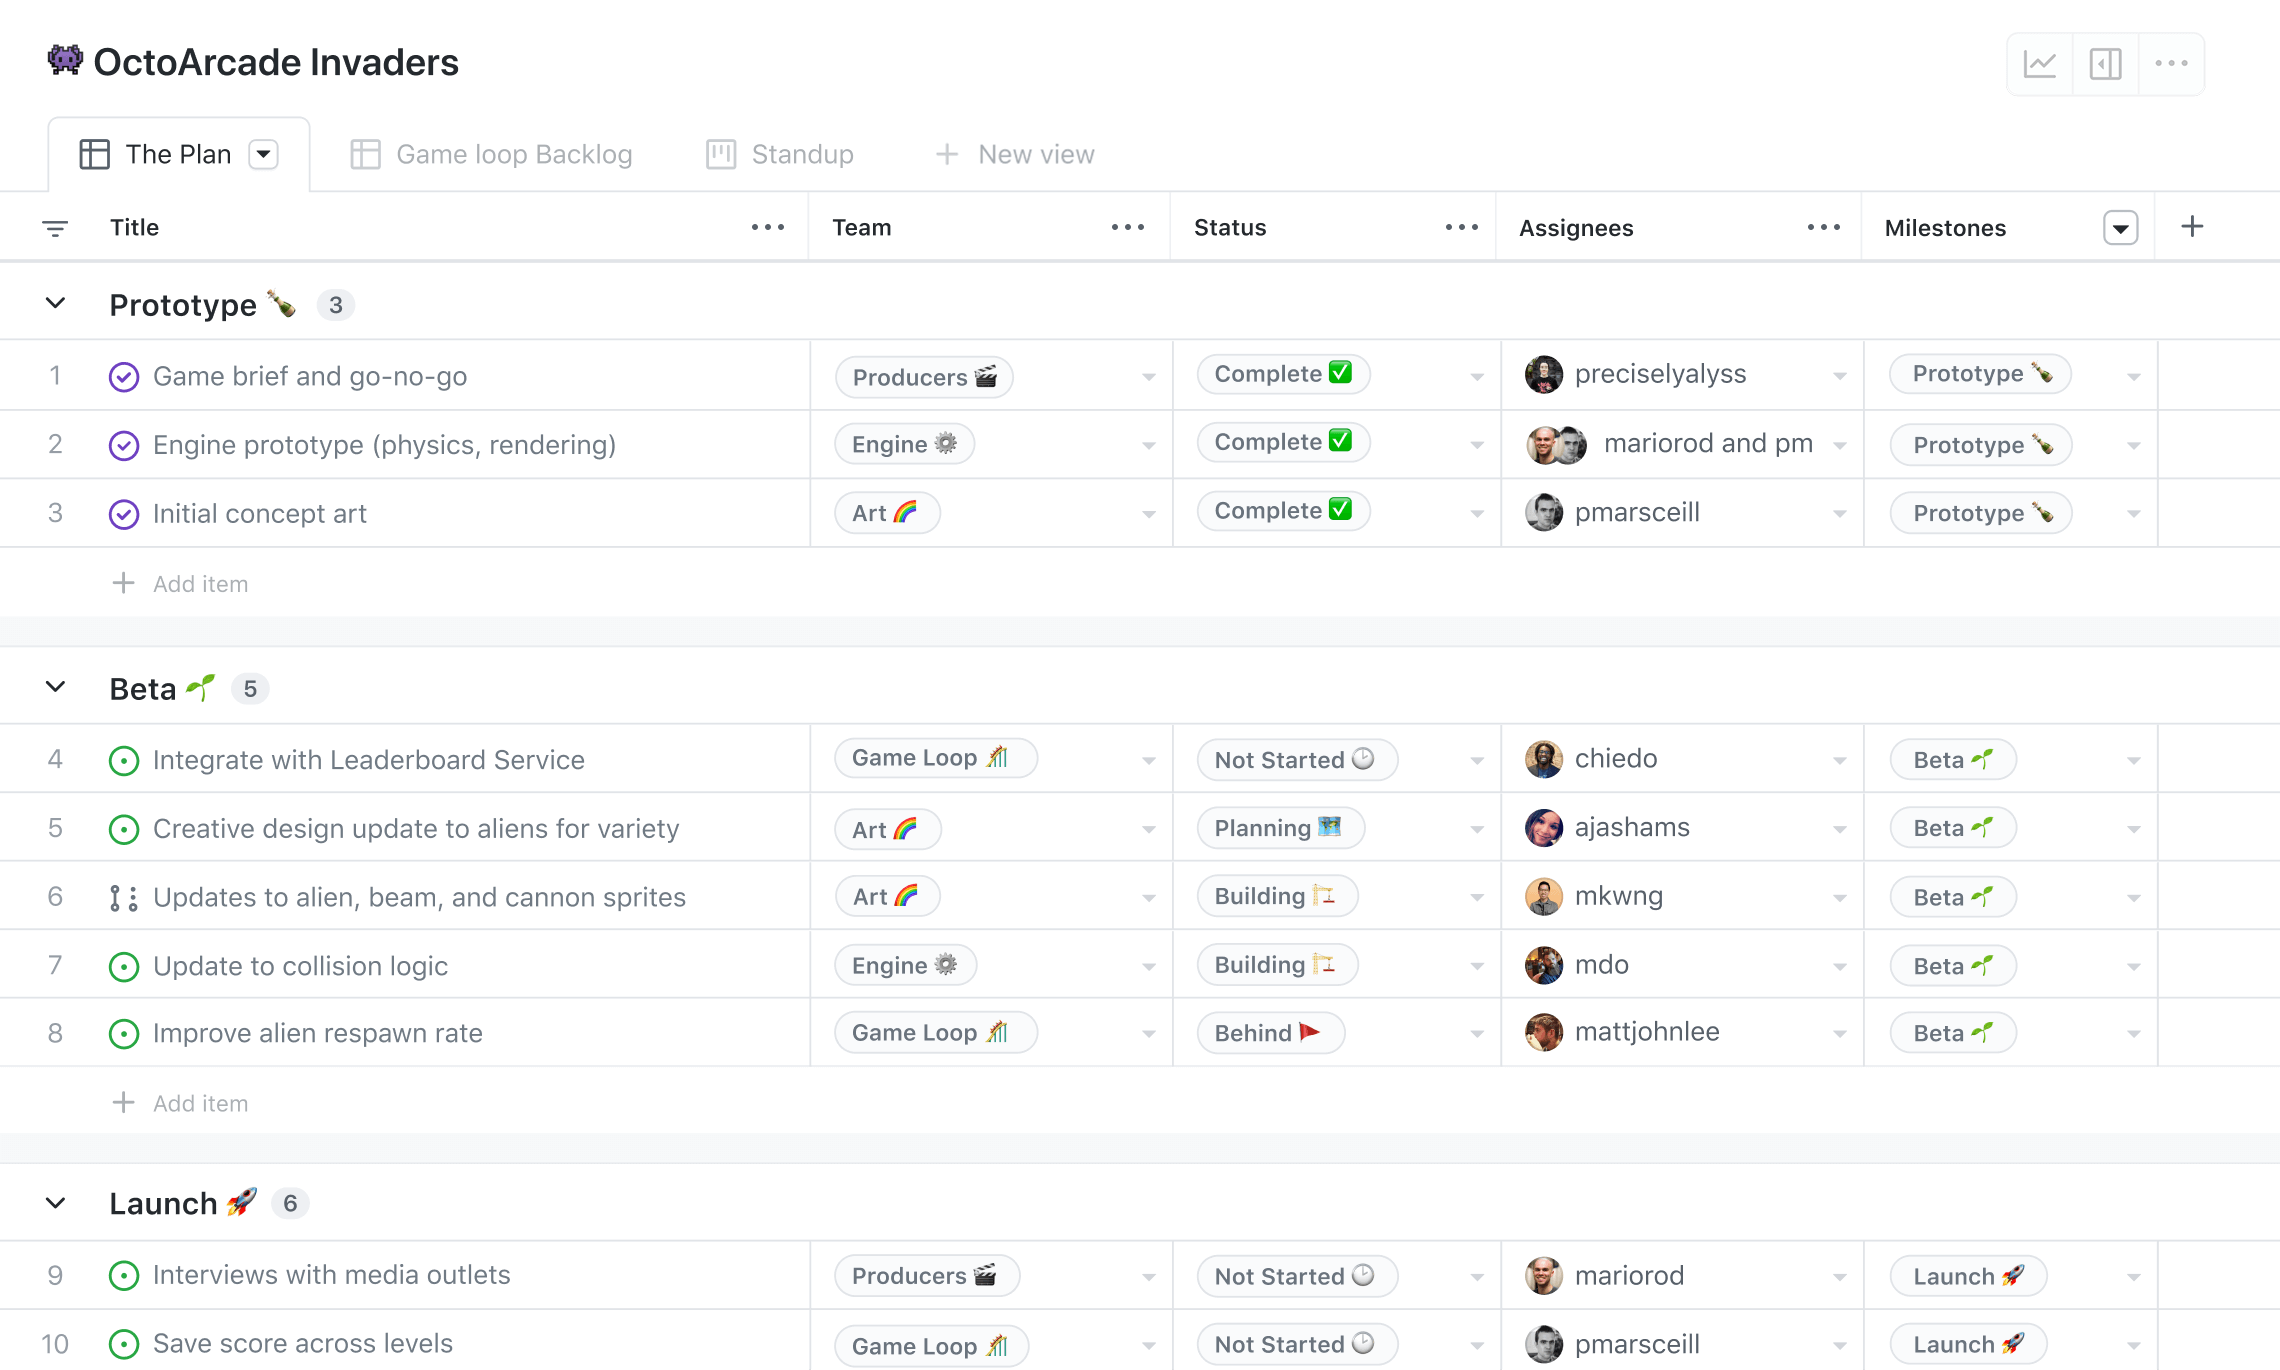
While we won't dive deep into configuring project boards today, it's important to know they exist as the next level of organization for the issues you are creating.
Your Turn: Plan a Simple Project
Now it's time to put this into practice. Your task is to plan a simple personal portfolio website.
-
Create a Repository:
- Go to your GitHub account.
- Create a new public repository named
my-devops-portfolio. - Initialize it with a
README.mdfile. - In the
README.md, write a short description: "A simple portfolio website to showcase my DevOps projects and skills."
-
Create Labels:
- In your new repository, navigate to the "Issues" tab.
- Click on "Labels".
- Create the following labels (you can delete the default ones if you wish):
feature(color: blue) - For new functionality.bug(color: red) - For defects.documentation(color: purple) - ForREADMEupdates or other docs.ui(color: green) - For user interface changes.
-
Define Development Tasks:
-
Navigate to the "Issues" tab and create the following issues. Practice writing clear titles and short descriptions.
-
Issue 1:
- Title:
feat: Create basic HTML structure for homepage - Description: Set up the main
index.htmlfile withheader,main, andfootersections. - Labels:
feature
- Title:
-
Issue 2:
- Title:
ui: Add basic CSS for layout and typography - Description: Create a
style.cssfile to define basic styling for fonts, colors, and the main page layout. - Labels:
ui,feature
- Title:
-
Issue 3:
- Title:
feat: Create 'About Me' section - Description: Add a section to the homepage with a short biography and a profile picture.
- Labels:
feature
- Title:
-
Issue 4:
- Title:
feat: Create 'Projects' section - Description: Add a section to showcase 2-3 of my best projects, with links to their GitHub repos. Use a task list inside this issue to list the specific projects you'll add.
- Labels:
feature
- Title:
-
Issue 5:
- Title:
docs: Update README with setup instructions - Description: Add a section to the
README.mdexplaining how to run the website locally. - Labels:
documentation
- Title:
-
By the end of this exercise, you will have a fully planned-out project backlog, ready for development.
Conclusion
You have now successfully planned a project from scratch within GitHub. You learned how to create a central repository and, most importantly, how to decompose a project into a series of well-defined, actionable tasks using GitHub Issues. This process is fundamental to nearly every collaborative software project and is a skill you will use daily in a DevOps role.
Key Takeaways:
- A repository is the central hub for a project's code and planning.
- GitHub Issues are used to track all units of work, from bugs to features.
- Breaking large goals into small, actionable issues with clear titles, descriptions, and labels is key to effective project management.
- Task lists within issues are excellent for tracking the sub-tasks of a larger feature.
In our next lesson, you will bring this plan to life. We will select one of the issues you just created—feat: Create basic HTML structure for homepage—and implement it using the feature branch workflow you've learned about. This will connect your planning skills with the Git commands and best practices we've covered.