Hello! Welcome to your next lesson in the "Advanced Git and Collaborative Workflows" module.
In our previous session, you did an excellent job planning a simple project by creating a GitHub repository and defining a backlog of tasks using GitHub Issues. This set the stage for the development work. Today, you'll bridge the gap between planning and execution. We'll take one of those issues and bring it to life using a professional, industry-standard workflow.
This lesson directly addresses the learning outcome: Implement a project feature using a feature branch workflow, including creating a pull request for review. This is arguably one of the most important collaborative patterns in modern software development and a cornerstone of DevOps practices.
Recap: Your Project Plan
Remember the my-devops-portfolio project you planned? You have a repository with a README.md and a list of issues, including one titled feat: Create basic HTML structure for homepage. This is our starting point.
1. The Feature Branch Workflow: A Strategy for Safe and Collaborative Development
Before we write any code, let's understand the strategy we'll be using. The Feature Branch Workflow is a simple but powerful concept: all new work happens on a dedicated, temporary branch, rather than directly on the main branch.
Why is this so important?
- Isolation: It keeps your
mainbranch clean, stable, and always in a deployable state. Broken or unfinished code stays contained in the feature branch. - Parallel Development: It allows multiple developers to work on different features simultaneously without interfering with each other.
- Collaboration: It creates a natural point for discussion and code review through Pull Requests, which we'll explore shortly.
This diagram illustrates the core idea: features are developed on separate branches that diverge from main and are later merged back in.
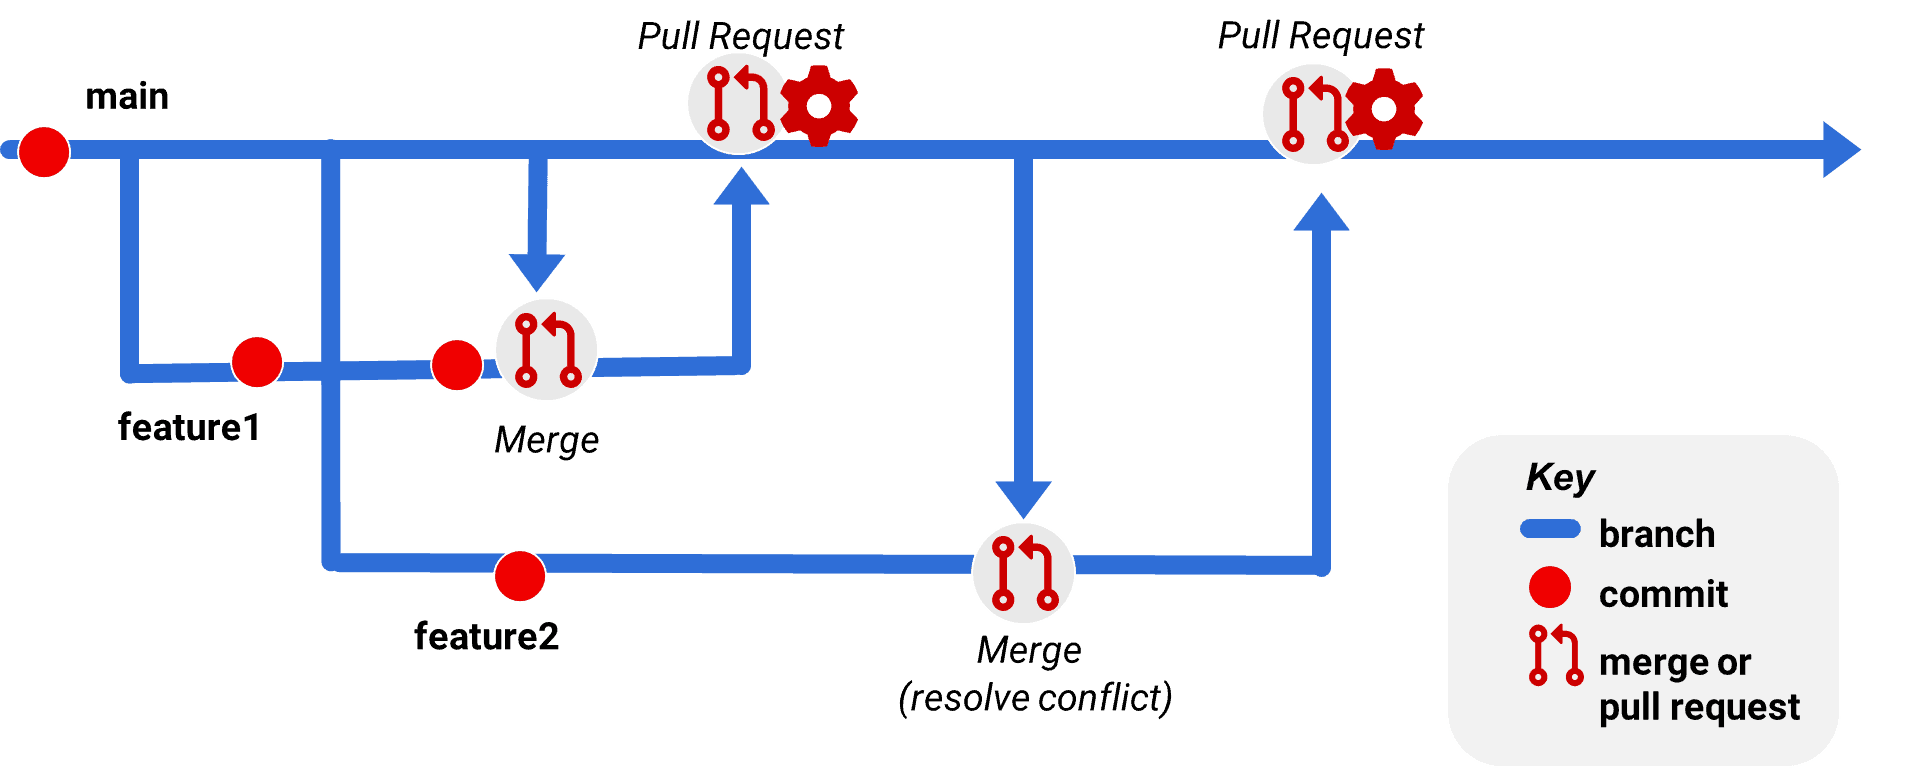
To get a solid grasp of this concept, let's turn to some excellent documentation from Atlassian.
This guide from Atlassian explains the core ideas behind the Feature Branch Workflow and the central role of pull requests. It provides the 'why' behind the commands we are about to use.
Please read the introduction (the first section on the page) and the section titled 'Pull requests'. Focus on understanding the benefits of encapsulation and how pull requests facilitate code review and discussion.
2. A Practical Walkthrough: Implementing Your First Feature
Now, let's apply this workflow to the my-devops-portfolio project. We will implement the feature defined in your first issue: creating the basic HTML structure.
Follow these steps carefully. Make sure you have the my-devops-portfolio repository cloned to your local machine and your terminal is open in that directory.
Step 1: Synchronize Your Local main Branch
Before starting any new work, it's crucial to ensure your local main branch is up-to-date with the remote repository on GitHub.
# Switch to your main branch
git checkout main

# Pull the latest changes from the remote (origin)
git pull origin main
Your repository is new, so git pull probably won't find any changes, but this is a critical habit to build.
Step 2: Create a Feature Branch
Now, create a new branch for the feature you're about to work on. It's a best practice to name the branch after the issue it addresses.
# Create a new branch and switch to it in one command
git checkout -b feat/homepage-structure
The name feat/homepage-structure is descriptive and follows the conventional naming style we discussed. You are now on your new branch, and any commits you make will be isolated here.
Step 3: Do the Work (Write the Code)
This is where you implement the feature. For this task, you just need to create an index.html file with some basic boilerplate code.
- Create a new file named
index.htmlin the root of your project directory. - Add the following content to the file:
<!DOCTYPE html>
<html lang="en">
<head>
<meta charset="UTF-8">
<meta name="viewport" content="width=device-width, initial-scale=1.0">
<title>My DevOps Portfolio</title>
</head>
<body>
<header>
<h1>My DevOps Portfolio</h1>
</header>
<main>
<!-- Content will go here -->
</main>
<footer>
<p>© 2024 Your Name</p>
</footer>
</body>
</html>
Remember to replace "Your Name" in the footer!
Step 4: Stage and Commit Your Changes
You've completed the work for this feature. Now, commit it to your feature branch with a clear message.
# Check the status to see your new file
git status

# Stage the new index.html file
git add index.html

# Commit the staged file with a descriptive message
git commit -m "feat: Create basic HTML structure for homepage"
Step 5: Push the Feature Branch to GitHub
Your commit currently only exists on your local machine. To share it and create a pull request, you need to push the branch to your remote repository on GitHub (origin).
# Push the branch and set up remote tracking
git push -u origin feat/homepage-structure
The -u flag is a shorthand for --set-upstream. It tells Git to link your local branch with the remote branch, so in the future, you can simply run git push from this branch.
The core Git commands for this workflow are standard practice. The following reading will reinforce what you just did.
Let's revisit the Atlassian guide to see the commands for the workflow you just performed.
Read the section titled 'Create a new-branch' and the subsequent code blocks for updating, committing, and pushing. Notice how the commands map directly to the steps you just took.
3. Opening a Pull Request
You've pushed your branch to GitHub. Now it's time for the main event: opening a Pull Request (PR). A PR is a formal request to merge your changes from your feature branch into the main branch. It's where code review, discussion, and automated checks happen.
- Open your
my-devops-portfoliorepository in your web browser. - You should see a yellow banner with your recently pushed branch name and a button that says "Compare & pull request". Click it.

- You'll be taken to the "Open a pull request" page. Let's configure it properly:
- Title: Give your PR a clear title. By default, it will use your commit message, which is often perfect:
feat: Create basic HTML structure for homepage. - Description: This is the most important part! Explain what the PR does and why. A great practice is to link it to the issue it resolves. In the description box, type:
TheThis PR creates the basic HTML structure for the portfolio homepage, including header, main, and footer sections. Closes #1Closes #1keyword is special. When this PR is eventually merged, GitHub will automatically close Issue #1 for you. This is a powerful way to link your work directly to your plan. - Reviewers: On the right-hand side, you can request reviews from teammates. Since you're working solo, you can skip this, but it's good to know where it is.
- Title: Give your PR a clear title. By default, it will use your commit message, which is often perfect:
- Click "Create pull request".
Congratulations! You have successfully implemented a feature and opened a pull request for review.
Test your understanding!
You've just been assigned a new issue: "docs: Add CONTRIBUTING.md file". You need to start work on it. What are the first two git commands you should run from your terminal, and why?
Show answer
git checkout mainfollowed bygit pull origin main: To ensure yourmainbranch is fully synchronized with the remote before you create a new branch from it. This prevents you from building a new feature on top of outdated code.git checkout -b docs/add-contributing-guide: To create a new, isolated branch for your work. This keeps the new documentation separate frommainuntil it's ready for review.
4. The Review Process (A Simulation)
In a team environment, this is where a colleague would take over. They would receive a notification about your PR. They could then:
- Read your description to understand the context.
- Click on the "Files changed" tab to review your code line-by-line.
- Leave comments with questions or suggestions for improvement.
- If everything looks good, they would "Approve" the pull request.
If changes were requested, you would simply make more commits on your feat/homepage-structure branch on your local machine and git push them. The pull request would update automatically with your new changes.
Conclusion
Today you've put a fundamental DevOps workflow into practice. You took a planned task from a GitHub Issue, developed it in an isolated feature branch, and proposed its integration back into the main project via a pull request.
Key Takeaways:
- The Feature Branch Workflow protects the
mainbranch and enables parallel development. - Always start new work by pulling the latest changes into
mainand creating a new branch. - Pull Requests (PRs) are the central hub for code review, discussion, and quality assurance.
- Linking PRs to issues (e.g.,
Closes #1) automates your project tracking and keeps your documentation clean.
In our next lesson, we will complete the lifecycle of this feature. You will learn how to merge your approved pull request, delete the obsolete feature branch, and tag the new version of your code as a software release.