Hello! Welcome back to our module on Advanced Networking.
In the last lesson, we demystified the theory behind the Domain Name System (DNS), exploring how it acts as the internet's address book and the hierarchical process it uses to translate names into IP addresses. Now, it's time to bring that theory into practice.
Today's goal is to configure client-side DNS settings on a Linux system and verify name resolution using command-line tools like dig and nslookup. As a DevOps engineer, you'll constantly need to diagnose why a service can't reach a database, an API, or the outside world. An overwhelming amount of the time, as the saying goes, "It's DNS." Mastering these client-side tools is a fundamental troubleshooting skill.
We will cover:
- The key configuration files that control name resolution on a Linux client.
- How to configure DNS resolvers both temporarily and persistently.
- How to use
dig,nslookup, andhostto query DNS records and verify your setup.
How a Linux System Resolves Domain Names
Before we change any settings, we need to understand where a Linux system looks for DNS information. The process is primarily controlled by three files in the /etc/ directory.
To explore these files, we'll use an article from CIQ, which provides a great overview of name resolution in Linux.
Part 2: Demystifying and Troubleshooting Name Resolution in ...
This article, 'Demystifying and Troubleshooting Name Resolution', will introduce us to the three key files that govern how your Linux machine resolves names.
Please read the sections titled 'The /etc/resolv.conf file', 'The /etc/nsswitch.conf file', and 'The /etc/hosts File'. As you read, focus on the specific role each file plays in the name resolution process.
Let's break down what you just read:
-
/etc/nsswitch.conf (Name Service Switch): This is the master configuration file. It tells the system in what order to consult different sources for name resolution. A common configuration you saw is
hosts: files dns. This means:- First, look in local files (specifically
/etc/hosts). - If no answer is found, then query the DNS servers.
This order is important. An entry in/etc/hostscan override what a DNS server would report, which is a powerful technique for local development and testing.
- First, look in local files (specifically
-
/etc/hosts: This is a simple text file that acts as a local, static address book. It maps IP addresses to hostnames. Any entries here are checked (by default) before any DNS query is sent to an external server. It's often used to define
localhostor for creating local development domains without needing a real DNS server. -
/etc/resolv.conf: If the system needs to perform a DNS query (as instructed by
nsswitch.conf), this file tells it which DNS servers to ask.

Test your understanding!
You are trying to connect to a service called test-service, but it's failing. A colleague tells you the IP address is 10.0.5.20. You check your system and find the following:
/etc/hostscontains the line:10.0.5.21 test-service/etc/resolv.confpoints to a DNS server that has an A record fortest-servicepointing to10.0.5.20./etc/nsswitch.confhas the line:hosts: files dns
Which IP address will your system try to connect to when you ping test-service, and why?
Show answer
Your system will try to connect to 10.0.5.21. The nsswitch.conf file dictates the order of operations. Since files comes before dns, the system first checks the /etc/hosts file. It finds a matching entry there and uses that IP address, never even sending a query to the external DNS server.
Configuring DNS Settings Persistently
As the reading from CIQ mentioned, directly editing /etc/resolv.conf is often a temporary solution. On modern Linux systems, this file is frequently managed by a higher-level network management service and your changes can be overwritten on the next reboot or network restart.
For persistent changes, you should use the tool that manages your system's network configuration. Two common services are NetworkManager and systemd-resolved.
-
NetworkManager: Used by default on many distributions like RHEL, CentOS, and Ubuntu Desktop. It provides a command-line tool called
nmclito modify connections.
To set the DNS servers for a connection namedeth0to Google's (8.8.8.8) and Cloudflare's (1.1.1.1), you would use:# Set the DNS servers sudo nmcli con mod 'eth0' ipv4.dns "8.8.8.8 1.1.1.1" # Re-apply the connection settings sudo nmcli con up 'eth0' -
systemd-resolved: A newer service that is becoming the standard for managing name resolution. It has its own configuration file (/etc/systemd/resolved.conf) and is controlled viasystemctl. Withsystemd-resolved,/etc/resolv.confis often a symbolic link to a file managed by the service, like/run/systemd/resolve/stub-resolv.conf.
Making changes with these tools ensures your DNS settings survive a reboot.
Verifying Name Resolution with dig and nslookup
Once you've configured your DNS settings, how do you test them? You need tools that can send DNS queries directly. The three most common are dig, nslookup, and host. While nslookup is widely available, dig (Domain Information Groper) is the preferred tool in modern DevOps because its output is more detailed and easier to script.
The following guide provides an excellent, command-driven tour of all three tools.
DNS Issues: dig, nslookup, host
This troubleshooting guide, 'DNS Issues: dig, nslookup, host', will show us how to use these essential command-line utilities to query DNS servers and analyze their responses.
Please read 'Step 1: Using dig', 'Step 2: Using nslookup', and 'Step 3: Using host'. For each tool, pay attention to the basic syntax and how to query for specific record types (e.g., A, MX, TXT).
Let's practice with dig.
A simple query looks like this:
dig fossmint.com
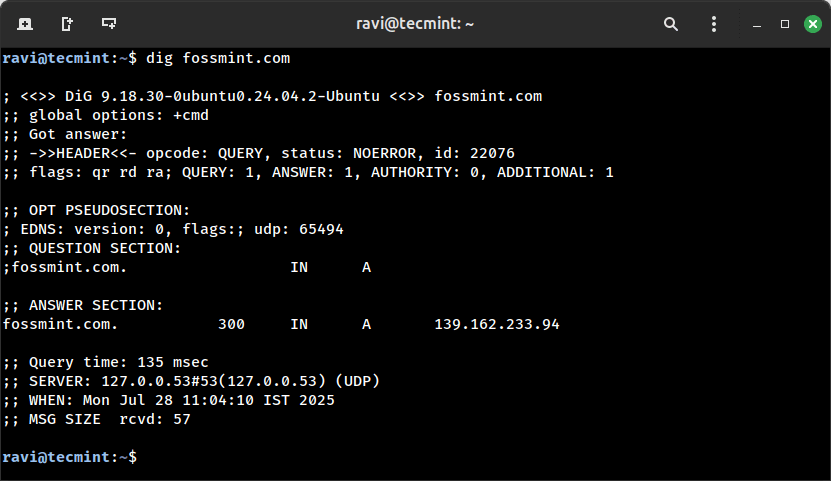
Here are some of the most useful dig commands for a DevOps engineer:
-
Get a simple answer: If you just want the IP address and nothing else, use
+short.dig google.com +short # Output: 142.250.187.238 -
Query for a specific record type: You can ask for any record type, like
MXfor mail servers orTXTfor text records.dig google.com MX +short # Output: 10 smtp.google.com. -
Query a specific DNS server: This is incredibly useful for troubleshooting. You can bypass your system's default resolver and ask another server directly. Use the
@symbol to specify the server.# Ask Cloudflare's resolver (1.1.1.1) for the IP of github.com dig @1.1.1.1 github.com A +short # Output: 20.205.243.166 -
Trace the full resolution path: The
+traceoption makesdigact like a recursive resolver, showing you every step of the query from the root servers down to the authoritative nameserver. This is a powerful diagnostic tool.dig github.com +trace
While nslookup and host are simpler, they can be useful for quick checks:
# Basic lookup with nslookup
nslookup github.com

# Basic lookup with host
host github.com
Test your understanding!
Many services use TXT records for domain verification. For example, to set up certain Google services, you might need to prove you own a domain.
Using the dig command, find the SPF (Sender Policy Framework) text record for github.com. This record helps prevent email spoofing.
Hint: The record you are looking for starts with "v=spf1".
Show answer
You would use dig to query for TXT records for github.com.
dig github.com TXT
In the ANSWER SECTION of the output, you will find a line similar to this:
github.com. 300 IN TXT "v=spf1 ip4:192.30.252.0/22 include:_spf.google.com include:esp.github.com include:amazonses.com ~all"
This record tells mail servers which IP addresses are authorized to send email on behalf of github.com.
Conclusion
In this lesson, we bridged the gap between DNS theory and practice. You learned how to investigate and configure the files that control name resolution on a Linux client, and more importantly, how to use professional tools to query, verify, and troubleshoot DNS.
Key Takeaways:
- Name resolution on Linux is primarily controlled by
/etc/nsswitch.conf,/etc/hosts, and/etc/resolv.conf. - Directly editing
/etc/resolv.confis useful for temporary tests, but persistent changes should be made using tools likenmclior by configuringsystemd-resolved. digis the most powerful and versatile command-line tool for DNS lookups. It allows you to query specific record types, target specific DNS servers, and trace the entire resolution path.nslookupandhostare simpler alternatives for quick lookups.
In our next lesson, we will move up the network stack to look at the protocols that power the web: HTTP and HTTPS. You'll learn how these application-layer protocols work and understand the critical role that TLS/SSL certificates play in securing web traffic.