Hello! Welcome back to our journey into Docker.
In our last lesson, we mastered a crucial optimization technique: multi-stage builds. You transformed a large, development-focused Docker image into a lean, secure, production-ready image by separating build-time dependencies from runtime requirements. You now have an efficient image for a web application, but there's a problem: it's locked inside its container.
Today, we'll break down that barrier.
Today's Learning Outcome: By the end of this lesson, you will be able to expose container ports to the host machine to enable external application access.
We'll start by seeing a container's network isolation firsthand. Then, we will clarify the critical difference between exposing and publishing a port, and finally, you'll get hands-on with the commands that make your containerized applications accessible to the outside world.
1. The Container's Isolated World
By default, a Docker container has its own private network stack. This means that any services running inside the container, like a web server, are not automatically accessible from your host machine (your localhost).
Let's demonstrate this. We'll run a standard Nginx web server container. Nginx is a popular web server that listens on port 80 by default.
Open your terminal and run the following command:
docker run -d --name my-nginx nginx:latest
-druns the container in detached mode (in the background).--name my-nginxgives our container a memorable name.nginx:latestis the image we want to run.
You can verify the container is running with docker ps. You'll see it in the list. Now, try to access the web server from your host machine using curl:
curl http://localhost
You will get an error message like curl: (7) Failed to connect to localhost port 80: Connection refused.
This happens because even though Nginx is running on port 80 inside the container, there is no link between port 80 on your host machine and port 80 in the container. The container is in its own isolated network bubble.
2. Exposing vs. Publishing: A Critical Distinction
To bridge the gap between your host machine and the container, we need to understand two related but distinct concepts: exposing and publishing a port. This is a common point of confusion, so let's clarify it.
How to Expose a Docker Port - Tutorial & Examples
This article from Spacelift provides a perfect explanation of the difference between exposing and publishing a port. Understanding this is key to using Docker networking effectively.
Please read the section 'What is exposing a port in Docker?' and pay close attention to the summary points under 'Exposing a port vs publishing a port'.
To summarize the key points from the article:
- Exposing a port (
EXPOSEin a Dockerfile): This is a form of metadata or documentation. It signals that the application inside the container is intended to listen on that port. It does not actually make the port accessible from the host. It's a way for the image creator to tell users which ports are important. - Publishing a port (
-por-Pwithdocker run): This is the action that maps a port on the host machine to a port inside the container. This is what creates the actual network connection allowing external traffic to reach the container.
This image provides a great visual metaphor for the concept:
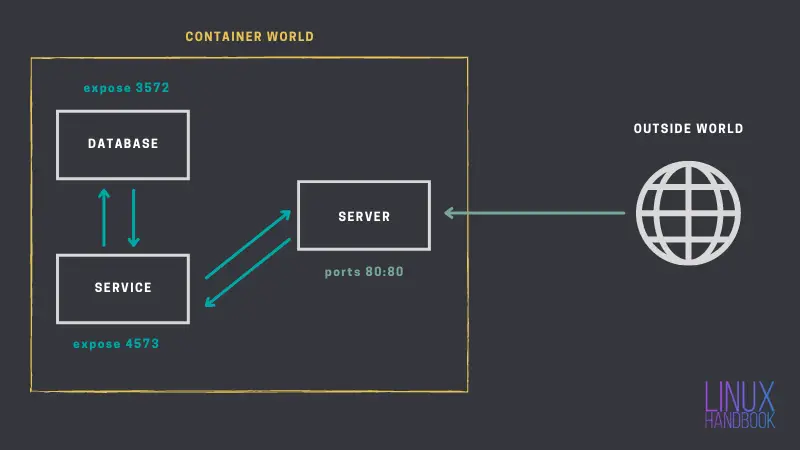
3. Hands-On: Publishing a Port to the Host
Now that we understand the theory, let's put it into practice. We will stop and remove the isolated container we created earlier and run a new one with a port published.
First, clean up the old container:
docker stop my-nginx
docker rm my-nginx
Now, let's run the Nginx container again, but this time we'll use the -p (or --publish) flag to map a host port to the container port. The syntax is -p <host_port>:<container_port>.
docker run -d --name my-nginx-accessible -p 8080:80 nginx:latest
Let's break down that -p 8080:80 flag:
8080: The port on your host machine.80: The port inside the container that Nginx is listening on.
You are telling Docker: "Any traffic that comes to port 8080 on my machine, please forward it to port 80 inside the my-nginx-accessible container."
Now, try accessing it again:
curl http://localhost:8080
Success! You should now see the HTML for the "Welcome to nginx!" page. You can also open http://localhost:8080 in your web browser.
To see this mapping in action, run docker ps:
CONTAINER ID   IMAGE          COMMAND                  CREATED         STATUS         PORTS                                   NAMES
...            nginx:latest   "/docker-entrypoint.…"   ...             Up ...         0.0.0.0:8080->80/tcp, :::8080->80/tcp   my-nginx-accessible
The PORTS column clearly shows the mapping: port 8080 on all host network interfaces (0.0.0.0) is being forwarded to 80/tcp inside the container.
Bridge mode and port mapping - Docker Tutorial
This tutorial provides another clear, step-by-step example of this exact process. Reinforcing a concept through a slightly different explanation can be very helpful.
Read this brief tutorial section. It walks through the same steps we just performed: trying to connect, failing, and then succeeding after using the --publish flag. Notice how it uses docker container inspect to show the detailed network settings.
Test your understanding!
You have a Docker image for a custom Python API that listens on port 5000 inside the container. You need to run this container and make the API accessible on port 9000 on your host machine.
What command would you use?
Show answer
You would use the -p flag to map host port 9000 to container port 5000:
docker run -d -p 9000:5000 your-python-api-image
4. Advanced Port Publishing Options
The -p flag is very flexible. Here are a couple of other common use cases you'll encounter as a DevOps engineer.
How to Expose a Docker Port - Tutorial & Examples
The Spacelift article we looked at earlier also covers these useful variations on port publishing. These are important tools for both security and convenience.
Read the subsections under 'How to publish exposed ports': 'Remapping published ports', 'Publishing ports to a specific host interface', and 'Automatically publishing exposed ports'.
Here's a quick summary of those options:
-
Publishing to a Specific Interface (e.g., localhost)
By default,-p 8080:80publishes the port on all network interfaces (0.0.0.0), meaning anyone on your local network could potentially access it. For better security, you can bind it only to your localhost.# Only accessible via http://127.0.0.1:8080 or http://localhost:8080 docker run -d -p 127.0.0.1:8080:80 nginx -
Automatically Publishing All Exposed Ports (
-P)
If aDockerfileuses theEXPOSEinstruction (like the officialnginximage does for port 80), you can use the uppercase-Pflag to tell Docker: "Publish all exposed ports to random, available ports on the host."docker run -d -P nginxIf you then run
docker ps, you'll see a random port (like32768) mapped to the container's port 80. This is a convenient shortcut during development when you don't care about the specific host port number.
Conclusion
You have now learned a fundamental Docker skill: making containerized applications accessible. By understanding the difference between exposing and publishing ports and mastering the -p flag, you can control exactly how your services connect to the outside world.
Key Takeaways:
- Containers run in an isolated network by default and cannot be accessed from the host.
- Exposing a port (
EXPOSE) is for documentation; publishing a port (-por-P) is the action that enables access. - The
docker run -p <host_port>:<container_port>command is the primary way to map a port from your host to your container. - You can control which host interface a port is published on (e.g.,
127.0.0.1) for added security. - The
-Pflag provides a quick way to publish all of an image's exposed ports to random host ports.
Next Up: Inter-Container Communication
We can now connect from our host to a single container. But in real-world applications, you often have multiple containers that need to talk to each other—for example, a web frontend container talking to a backend API container. In our next lesson, we will explore Docker's default network modes and create custom bridge networks for container communication.