Hello! Welcome back to our hands-on exploration of Docker.
In our last lesson, you learned how to publish a container's port to the host machine, making a single, containerized application accessible from the outside world. This is a crucial first step, but modern applications are rarely monolithic. They are often composed of multiple services—like a web frontend, a backend API, and a database—that need to communicate with each other.
Today, we'll build the connections between containers.
Today's Learning Outcome: By the end of this lesson, you will be able to describe Docker's default network modes and create custom bridge networks for container communication.
We'll start by exploring the default networks Docker provides and see their limitations. Then, you'll learn the best practice for connecting containers: creating custom, isolated networks that provide automatic service discovery.
1. An Overview of Docker's Network Modes
When you install Docker, it sets up several default network drivers. You can see them by running this command in your terminal:
docker network ls
You'll see at least three networks listed: bridge, host, and none. These represent the fundamental ways Docker can handle networking for a container.

Let's briefly define each one.
Docker Network Modes Explained: Bridge, Host, and Overlay...
This article provides clear, concise definitions for the main network modes. It's a great starting point for understanding the landscape before we dive deep into the bridge network.
Read the short explanations for the Bridge Network and Host Network. We will discuss the Overlay network in a future course when we cover multi-host orchestration with Docker Swarm or Kubernetes.
Here's a summary of the three main single-host modes:
bridge: This is the default network mode. Each container is attached to a private, internal network and gets its own IP address. Docker "bridges" this private network to the host's network to allow outbound connectivity. This provides isolation from the host.host: This mode removes network isolation. The container shares the host's network stack directly. The container doesn't get its own IP address; it uses the host's IP. This offers higher performance but is less secure and can lead to port conflicts on the host.none: This mode completely disables networking for the container. The container is fully isolated and only has a loopback interface (lo). This is useful for security-sensitive, self-contained batch jobs that don't require any network access.
For the rest of this lesson, we will focus on the bridge driver, as it's the foundation for building multi-container applications.
2. The Default bridge Network: How It Works
When you run a container without specifying a --network flag, Docker attaches it to the default bridge network.
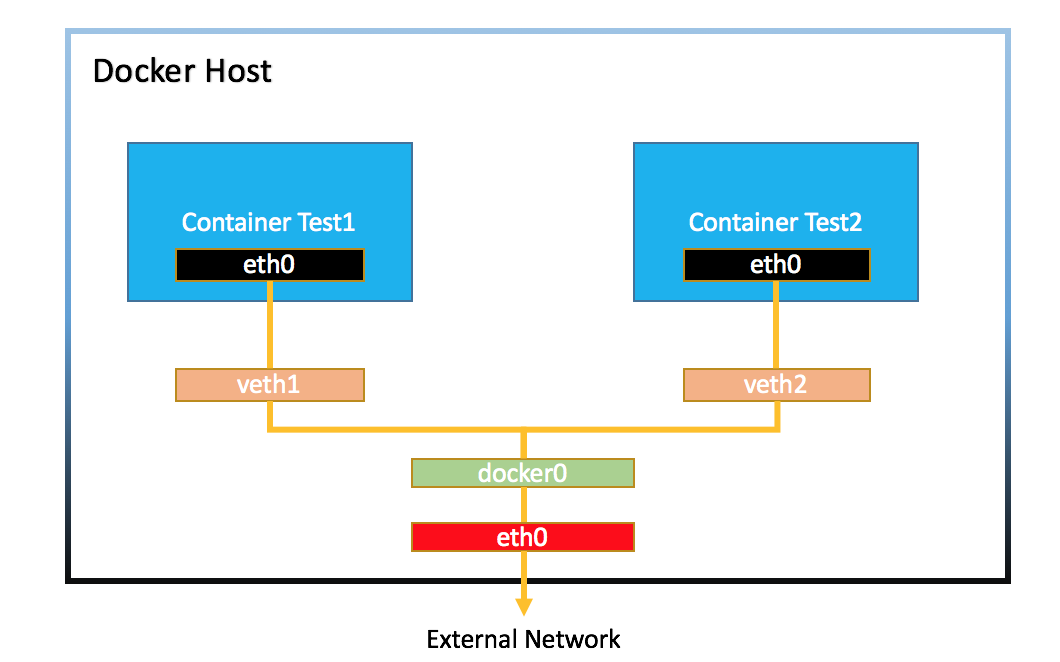
Let's see its behavior and limitations firsthand.
The official Docker documentation provides the definitive guide and a perfect hands-on example of how the default bridge network operates. We will walk through this example together.
Please read through the example under the heading 'Use the default bridge network'. The text will guide you through the same steps we are about to perform. Focus on understanding steps 3, 6, and 8, which demonstrate how to inspect the network and the results of pinging by IP versus by name.
Hands-On Lab: Exploring the Default Bridge
Let's replicate the core of that example.
-
Run two containers: We'll use the lightweight
alpineimage.docker run -dit --name alpine1 alpine ash docker run -dit --name alpine2 alpine ash-ditruns the container detached, interactively, and with a terminal.ashis the command that keeps the container running.
-
Inspect the bridge network:
docker network inspect bridgeScroll down to the
"Containers"section in the JSON output. You will seealpine1andalpine2listed, each with its ownIPv4Address(e.g.,172.17.0.2and172.17.0.3). -
Test communication: Let's enter
alpine1and try to pingalpine2.# Attach to the running alpine1 container docker exec -it alpine1 ash # Now, from inside the container, ping alpine2 by its IP address # (replace with the IP you found in the previous step) ping -c 2 172.17.0.3The ping should succeed! The containers can reach each other over the
docker0bridge. -
Test name resolution: Now, let's try to ping
alpine2by its container name.# Still inside alpine1 ping -c 2 alpine2This will fail with an error like
ping: bad address 'alpine2'. -
Clean up: Exit the container shell by typing
exit. Then stop and remove the containers.docker stop alpine1 alpine2 docker rm alpine1 alpine2
Conclusion: The default bridge network allows containers to communicate by IP address, but not by the convenient, human-readable names we give them. Manually tracking IP addresses is not scalable or practical in a dynamic DevOps environment.
3. User-Defined Bridge Networks: The Recommended Approach
To solve the limitations of the default bridge, Docker allows you to create your own user-defined bridge networks. This is the standard and recommended practice for any application composed of more than one container.
This section of the Docker documentation is crucial. It clearly lists the reasons why user-defined bridges are superior to the default one. Understanding these benefits is key to designing robust containerized applications.
Read the section titled 'Differences between user-defined bridges and the default bridge'. Pay close attention to the first two points: automatic DNS resolution and better isolation.
To summarize the key advantages:
- Automatic DNS Resolution: Containers on the same user-defined network can resolve each other by their container name. This is the solution to the problem we just discovered. If you have a container named
webappand another nameddatabase,webappcan simply connect todatabasewithout needing to know its IP address. - Better Isolation: The default bridge is a free-for-all; any container attached to it can communicate with any other. User-defined networks provide a scoped environment. Only containers explicitly attached to the same custom network can communicate, which is a significant security improvement.
- On-the-fly Management: You can connect and disconnect running containers from user-defined networks without restarting them.
4. Hands-On Lab: Creating and Using a Custom Network
Now for the "aha!" moment. Let's create a custom network and see automatic service discovery in action.
We will now follow the next example in the Docker documentation to create and use our own bridge network. This demonstrates the best-practice workflow.
Read through the example under the heading 'Use user-defined bridge networks'. Follow the logic of creating a network, attaching containers, and then testing communication by name.
Let's work through it.
-
Create a user-defined network:
docker network create my-app-netYou can verify it was created with
docker network ls. -
Run containers on the new network: We'll launch two containers, explicitly attaching them to
my-app-netusing the--networkflag.docker run -dit --name webapp --network my-app-net alpine ash docker run -dit --name database --network my-app-net alpine ash -
Test communication by name: Let's enter the
webappcontainer and try to ping thedatabasecontainer by its name.# Attach to the webapp container docker exec -it webapp ash # Now, from inside the container, ping the other one by name ping -c 2 databaseSuccess! The ping works. Docker provides a built-in DNS server for each user-defined network that resolves container names to their internal IP addresses.
-
Test isolation: Let's create one more container on the default
bridgenetwork and see if ourwebappcan reach it.- First, open a new terminal window (leave the
webappshell open in the other one). - In the new terminal, run:
docker run -dit --name isolated-container alpine ash - Now, go back to your first terminal (the one inside the
webappcontainer) and try to ping it:# Still inside the webapp container ping -c 2 isolated-container
This will fail. Because
isolated-containeris on a different network, it is not visible or accessible to the containers onmy-app-net. This demonstrates the powerful isolation that custom networks provide. - First, open a new terminal window (leave the
-
Clean up:
- Exit the
webappshell (exit). - Stop and remove all the containers:
docker stop webapp database isolated-container docker rm webapp database isolated-container - Finally, remove the network:
docker network rm my-app-net
- Exit the
Test your understanding!
You are deploying a two-tier application consisting of a frontend service (a Node.js app) and a backend service (a Python API). You need to ensure they can communicate with each other securely, but you also have a separate, unrelated monitoring-agent container running on the same host that should not be able to communicate with them.
How would you set up the networking for the frontend and backend containers?
Show answer
The best approach is to create a user-defined bridge network for the application, for example: docker network create my-app-network.
Then, you would launch both containers on this new network:
docker run -d --name frontend --network my-app-network frontend-imagedocker run -d --name backend --network my-app-network backend-image
This allows frontend and backend to find each other using their names (frontend and backend) while keeping them isolated from the monitoring-agent container, which would be running on the default bridge or another network.
Conclusion
You've now taken a significant step from managing single containers to architecting multi-service applications. Understanding Docker networking is fundamental to your role as a DevOps engineer, as it's the glue that holds microservices together.
Key Takeaways:
- Docker provides three main single-host network modes:
bridge,host, andnone. - The default
bridgenetwork is easy to use but has a major drawback: containers can only communicate via IP address, not by name. - User-defined bridge networks are the industry standard for multi-container applications.
- The key benefits of user-defined networks are automatic service discovery (DNS) and network isolation, which enhance both usability and security.
- The core commands to remember are
docker network create,docker network rm, and using the--networkflag withdocker run.
Next Up: Persisting Data
Our containers can now talk to each other, but they are still ephemeral. If you stop a database container, all of its data is lost. This is a problem for any stateful application. In our next lesson, we will solve this by learning how to persist data for stateful applications using Docker volumes and bind mounts.