Hello! Welcome back to our module on Docker.
In our last lesson, you successfully created your first custom Docker image for a simple Python application using a Dockerfile. This was a crucial step in moving from a consumer to a creator of container images.
However, the image we built, while functional, wasn't optimized. It contained the Python interpreter, pip, and other tools that are necessary for building the application, but not for running it. In a production environment, this leads to two problems: larger image sizes (costing more to store and taking longer to transfer) and a larger attack surface (more software means more potential vulnerabilities).
Today, we'll address this directly.
Today's Learning Outcome: By the end of this lesson, you will be able to optimize Docker images using multi-stage builds to reduce image size and improve security.
We will cover:
- The core problem: mixing build-time and run-time dependencies.
- The multi-stage build strategy as an elegant solution.
- A hands-on exercise to transform a bloated image into a lean, production-ready one.
- How this pattern applies across different programming languages.
1. The Problem: Why Are My Images So Big?
Almost any application has two distinct sets of dependencies:
- Build-time dependencies: The tools needed to compile, test, or package your code. This includes compilers (like
gcc), build tools (likemavenornpm), and development libraries. - Run-time dependencies: The minimal set of libraries and binaries required for your application to simply run.
A common mistake is to use a single environment for both, resulting in a final image that carries all the unnecessary build-time baggage.
To understand this problem more deeply, let's read the introduction to a great article on this topic.
How to Build Smaller Container Images: Docker Multi-Stage ...
This article from iximiuz Labs clearly explains the core issue of bloated container images and why separating build-time and run-time dependencies is so important.
Please read the introduction and the section 'Why is my image so huge?'. Focus on the distinction between build-time and run-time dependencies and see the examples of how bloated images are created for Go and Node.js applications.
As the article demonstrates, simply building your application inside a development image and then using that same image for production is a recipe for inefficiency and poor security.
2. The Solution: Multi-Stage Builds
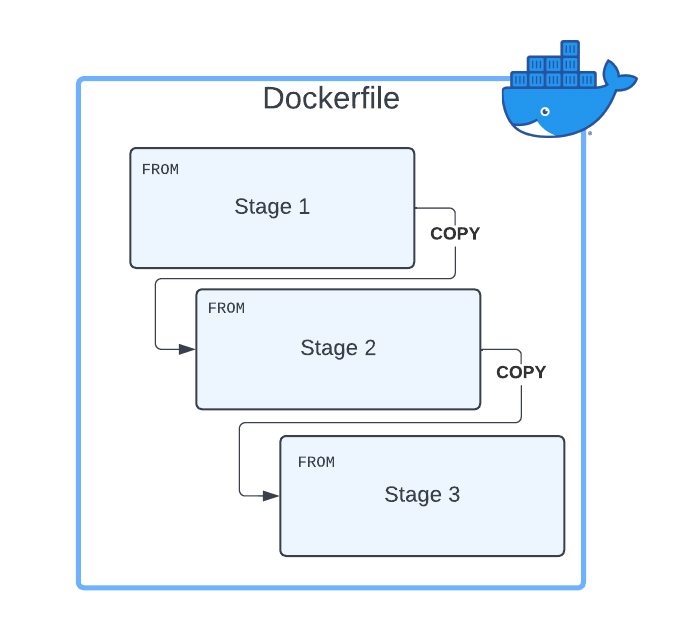
Docker provides a powerful feature called multi-stage builds to solve this problem. It allows you to use multiple FROM instructions within a single Dockerfile. Each FROM instruction begins a new "stage" of the build, and you can selectively copy artifacts—like your compiled application—from one stage to another, leaving the unwanted build tools behind.
This creates a clear separation between your build environment and your final runtime environment.

Let's look at the basic mechanics.
The official Docker documentation gives a concise introduction to the concept and its syntax.
Read the 'Explanation' section. Pay close attention to the pseudo-code example, which introduces the key syntax: AS <stage-name> and COPY --from.
The key components are:
FROM <base_image> AS <stage_name>: You start a new stage and give it a memorable name (e.g.,builder,test).COPY --from=<stage_name> <source_path> <destination_path>: In a later stage, you can copy files directly from a previous stage without needing to save them to your local disk first.
3. Hands-On: Optimizing a Java Application Image
Theory is good, but seeing the results is better. We'll now walk through a practical example of optimizing an image for a Java Spring Boot application. You don't need to know Java to follow along; the Docker principles are universal. This exercise will vividly demonstrate the impact of multi-stage builds.
For this exercise, you'll need to clone a sample project. Open your terminal and run:
git clone https://github.com/docker/spring-boot-docker.git
cd spring-boot-docker
Part 1: The Bloated Single-Stage Build
First, we'll build the application the "old way," using a single stage that includes the full Java Development Kit (JDK) and Maven build tool.
Let's follow the Docker documentation to create our initial, un-optimized Dockerfile.
Follow the steps in the section 'Create the Dockerfile'. Create a new file named Dockerfile inside the spring-boot-docker directory and add the content provided in the guide. Read the explanation for each line to understand what it does.
Now, build the image and check its size.
This section shows you how to build the image and, importantly, how to inspect its size.
Follow the instructions in the 'Build the container image' section. Run the docker build command and then the docker images command. Note the size of the spring-helloworld image. It should be around 880MB!
An 880MB image for a simple "Hello World" application is enormous. This is because it contains the entire JDK and all the build tools, which are completely unnecessary for running the final application.
Part 2: The Optimized Multi-Stage Build
Now, let's refactor our Dockerfile to use a multi-stage approach. We'll use one stage with the full JDK to build the application, and a second, final stage with only the lightweight Java Runtime Environment (JRE) to run it.
This is the core of our lesson. We will now replace our old Dockerfile with a new, optimized multi-stage version.
Read the section 'Use multi-stage builds'. Replace the entire content of your Dockerfile with the new multi-stage version provided. Carefully analyze the two stages (builder and final) and how the COPY --from=builder instruction is used to transfer the final .jar file.
Now, let's build this new version and see the difference.
With our optimized Dockerfile in place, let's build it and compare the results.
Follow the instructions at the end of the guide. Run the docker build -t spring-helloworld-builder . command, then run docker images again. Compare the size of the new spring-helloworld-builder image to the original spring-helloworld image.
You should see a dramatic reduction in size! The new image is around 428MB, less than half the size of the original. We achieved this by discarding the entire build environment and only keeping the final, essential application artifact. This is the power of multi-stage builds.
Test your understanding!
In the multi-stage Dockerfile you just created, which line is responsible for moving the application from the build environment to the final runtime environment?
Show answer
The crucial line is COPY --from=builder /opt/app/target/*.jar /opt/app/*.jar. It copies the compiled .jar file from the builder stage into the final stage.
4. Multi-Stage Builds in Other Languages
The pattern you just used with Java is applicable to virtually any compiled language or any language that has a build/transpilation step (like Node.js with TypeScript).
Let's look at how you might apply this to the Python application from our previous lesson. A multi-stage build for a typical Python app might look like this:
- Stage 1 (
builder):- Start from a full
python:3.11image. COPYyourrequirements.txtfile.RUN pip installto download dependencies into a dedicated layer.
- Start from a full
- Stage 2 (
final):- Start from a minimal
python:3.11-slimimage. COPY --from=builderthe installed Python packages from the first stage.COPYyour application source code.- Set the
CMDto run your application.
- Start from a minimal
This ensures your final image has the necessary packages but doesn't include the full pip cache or other build-time artifacts.
How to Build Smaller Container Images: Docker Multi-Stage ...
The iximiuz Labs article you read earlier contains an excellent collection of practical multi-stage build patterns for various languages. It's a great reference to see how this concept is applied in different ecosystems.
Please skim through the section 'Multi-Stage Builds in practice'. You don't need to read every detail, but pay special attention to the examples for 'Node.js' (the React application example is very clear) and 'Python'. Notice the common pattern: a build stage prepares artifacts, and a lean runtime stage copies only what's needed.
Conclusion
Today you've learned one of the most important techniques for creating professional, production-grade Docker images. By separating your build and runtime environments using multi-stage builds, you can create images that are significantly smaller, more secure, and faster to deploy. This is a fundamental skill for any DevOps engineer working with containers.
Key Takeaways:
- Production images should only contain run-time dependencies to be small and secure.
- Multi-stage builds allow you to use separate environments for building and running your application within a single Dockerfile.
- The
FROM ... AS <name>syntax defines a new build stage. - The
COPY --from=<name>instruction is used to copy artifacts from a previous stage to the current one. - This pattern dramatically reduces final image size by discarding build tools and intermediate artifacts.
Next Up: Making Your Container Accessible
You've built and optimized an image for a web application. But how do users access it? In our next lesson, we will focus on networking, where you will learn how to expose container ports to the host machine to enable external application access.