Hello! Welcome to your second lesson in the "Collaboration with GitHub" module.
In our last session, you successfully set up your GitHub account and configured SSH keys for secure, password-free communication between your local machine and GitHub. This is the foundation for all collaborative work on the platform.
Today, we'll build on that foundation to tackle one of the most fundamental workflows in modern software development: contributing to a project that you don't have direct write access to. This lesson covers how to fork repositories and contribute to projects via pull requests. This workflow is the cornerstone of open-source collaboration and is widely used within companies to manage code contributions across different teams.
1. The Problem: "I Can't Push My Changes!"
Imagine you've found a public project on GitHub—perhaps a useful DevOps tool or a library—and you've spotted a bug or thought of a great new feature. You've cloned the repository and made your changes locally. When you try to run git push, you'll be met with a permission denied error.
This is by design. You can't directly modify someone else's project, just as a stranger can't walk into your house and start rearranging the furniture. So, how do you propose your changes? The answer is the Fork and Pull Request workflow.
2. Understanding the Fork and Pull Request Workflow
This process allows you to work on a project safely and propose your changes for review without disrupting the original project. It involves three key locations:
- The Original Repository (
upstream): The source project that you want to contribute to. - Your Forked Repository (
origin): A personal, server-side copy of the original repository that lives in your own GitHub account. You have full control over this copy. - Your Local Repository: A clone of your fork on your local machine, where you do the actual work.
The entire process is visualized perfectly in the diagram below.
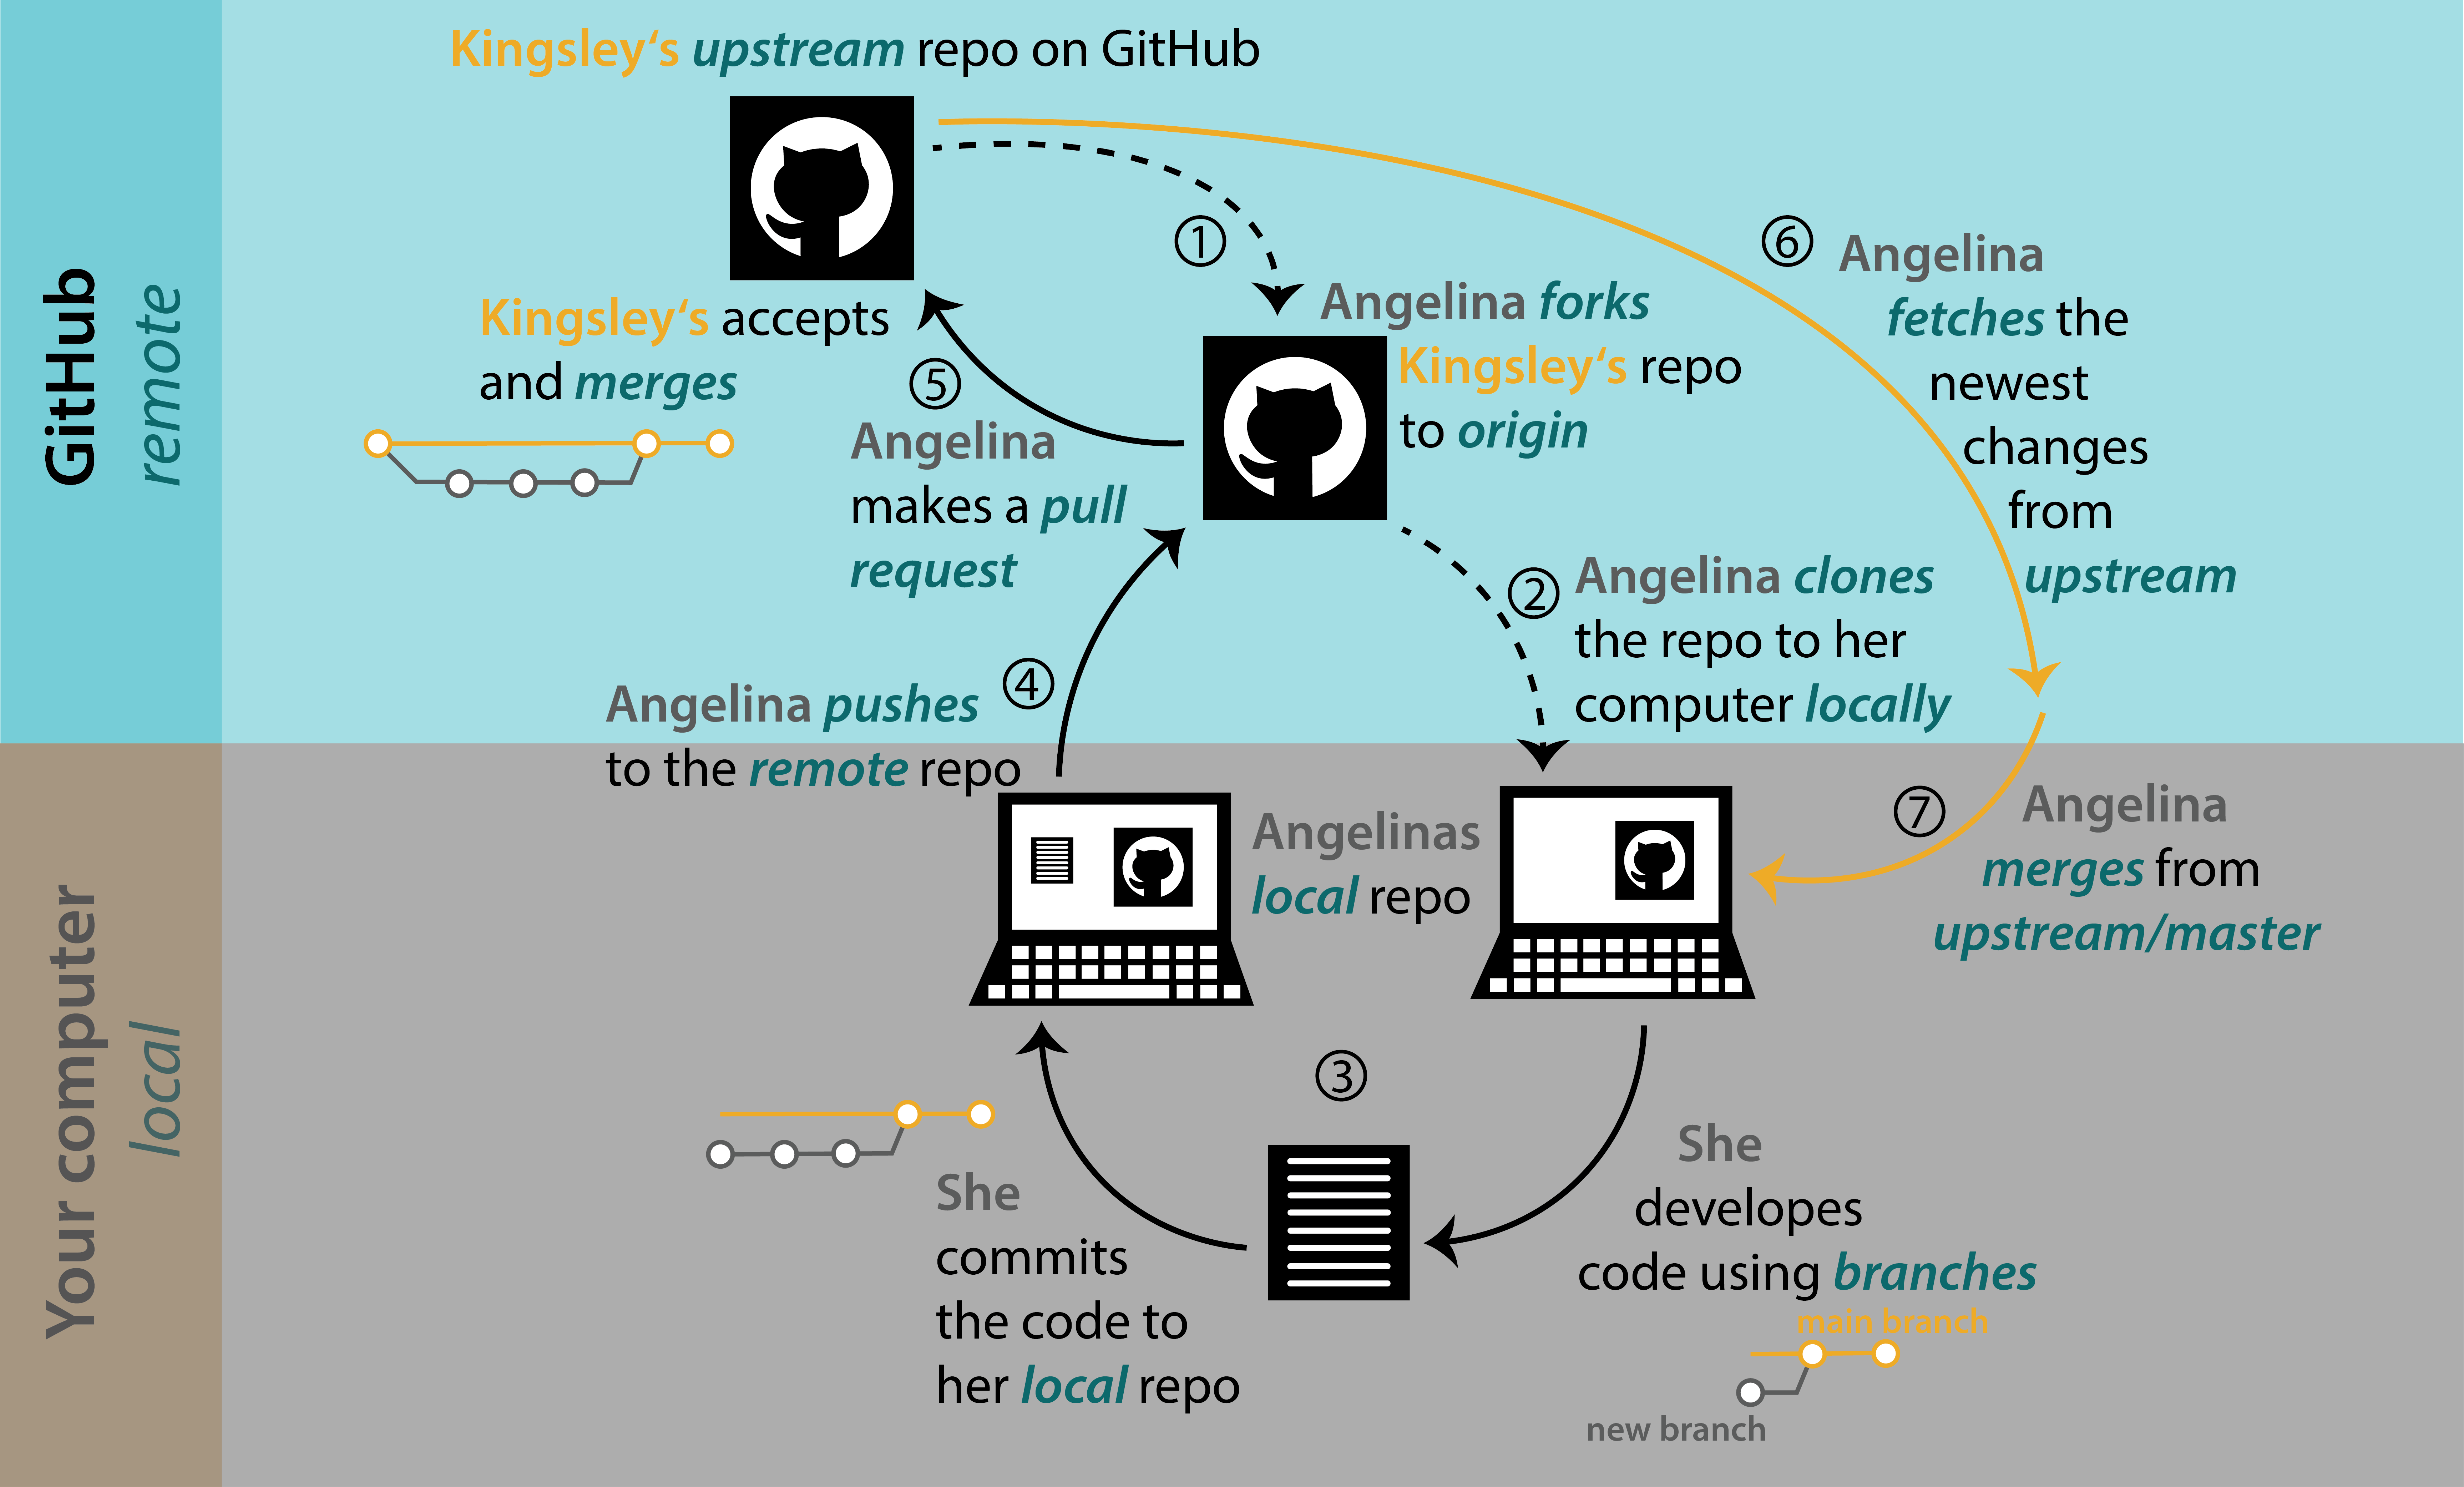
A pull request (or PR) is a formal request you send to the original project's maintainers, asking them to "pull" the changes from your forked repository into their project.
Git & GitHub Tutorial for Beginners #12 - Forking (& Contributing)
To start, let's get a high-level overview of why forking is necessary and how it fits into the contribution process. This video from The Net Ninja provides a clear, concise explanation.
Watch from the beginning to 01:33. The video explains the difference between collaborating with a team (where you have direct access) and contributing to an open-source project (where you need to fork).
3. Step-by-Step: Contributing via Fork and Pull Request
Let's walk through the entire process, from forking to creating the pull request.
Step 1: Fork the Repository
The first step is to create your own copy of the project on GitHub.
- Navigate to the GitHub page of the repository you want to contribute to.
- In the top-right corner of the page, click the Fork button.
- GitHub will ask where to fork the repository. Select your own GitHub account.

After a few moments, you will be redirected to the page for your newly created fork. You'll notice the URL now shows your username: github.com/your-username/repository-name.
Step 2: Clone Your Fork and Configure "Upstream"
Now, you'll clone the repository to your local machine. Crucially, you clone your fork, not the original project, because your fork is the one you have permission to push changes to.
# Replace with the SSH URL from YOUR FORK
git clone git@github.com:your-username/repository-name.git
cd repository-name
Next, we'll perform a vital step for keeping your project in sync: configuring a remote that points back to the original repository. By convention, this remote is named upstream. This allows you to pull in changes from the original project to keep your fork up-to-date.
GitHub Forks and Pull Requests | Step by Step
This video from Wes Doyle does an excellent job demonstrating not only the fork-and-clone process but also how to set up the upstream remote. This is a critical best practice.
Watch from 02:20 to 06:54. Pay close attention to how he forks the repo, clones his fork, and then uses git remote add upstream to link back to the original project. The verification step using git remote -v is also very important.
To configure your upstream remote, run these commands from within your local repository's directory:
-
Add the upstream remote:
# Replace with the SSH URL of the ORIGINAL repository git remote add upstream git@github.com:original-owner/repository-name.git -
Verify the remotes:
git remote -vThe output should look similar to this, showing both
origin(your fork) andupstream(the original project):origin git@github.com:your-username/repository-name.git (fetch) origin git@github.com:your-username/repository-name.git (push) upstream git@github.com:original-owner/repository-name.git (fetch) upstream git@github.com:original-owner/repository-name.git (push)
Test your understanding!
When you want to push your local changes to your personal copy on GitHub, which remote do you use (origin or upstream)? When you want to fetch the latest updates from the original project, which remote do you use?
Show answer
- You push your changes to
origin(git push origin <branch-name>), as this is your personal fork where you have write permissions. - You fetch or pull updates from
upstream(git fetch upstream), as this is the original project.
Step 3: Create a Branch, Make Changes, and Commit
Just as we learned before, all new work should happen on a dedicated feature branch.
# Create and switch to a new branch for your feature or bugfix
git checkout -b my-new-feature

# Now, open the files in your editor, make your changes, and save them.

# Stage your changes
git add .

# Commit your changes with a clear message
git commit -m "feat: Add my awesome new feature"
Step 4: Push to Your Fork and Create a Pull Request
With your changes committed locally, you're ready to push them up to your fork on GitHub.
# Push your new branch to your fork (origin)
git push origin my-new-feature
Now, navigate to your forked repository on GitHub. You will likely see a yellow banner with your recently pushed branch and a button that says "Compare & pull request". Click it!
If you don't see the banner, you can go to the "Pull requests" tab and click "New pull request".
On the "Open a pull request" screen:
- Verify the branches: Ensure the
base repositoryis the original project and thehead repositoryis your fork. It should be trying to merge your feature branch (my-new-feature) into the original project's main branch (e.g.,mainormaster). - Write a clear title and description: Explain what your change is and why you made it. This is your chance to communicate with the project maintainers.
- Click "Create pull request".
And that's it! You've successfully submitted your contribution.
4. Practical Exercise: Make Your First Contribution
Theory is great, but practice is better. Now you will complete the standard fork-and-PR workflow by contributing to a project specifically designed for first-timers.
first-contributions: A hands-on tutorial
The first-contributions project on GitHub provides a step-by-step tutorial that guides you through making a real pull request. By following these instructions, you'll put everything we've just learned into practice.
Follow the instructions in the main README.md file of this repository, starting from the 'Fork this repository' section. The tutorial will guide you through the entire process: forking, cloning, branching, editing a file to add your name, committing, pushing, and opening a pull request. This is a safe environment to make your first open-source contribution.
Completing this exercise will give you the confidence and practical experience to contribute to other projects you care about.
Conclusion
Today you've mastered a workflow that is fundamental to collaboration in the DevOps and software engineering world. By understanding how to fork repositories and use pull requests, you can now contribute to any public project on GitHub.
Key Takeaways:
- The Fork and Pull Request workflow enables contributions to projects where you don't have direct push access.
- Forking creates a personal copy of a repository in your GitHub account.
- You clone your fork, not the original project, to your local machine.
- It's a best practice to configure an
upstreamremote that points to the original project to keep your fork updated. - Changes are made on a feature branch, pushed to your fork (
origin), and then proposed to the original project via a pull request.
In our next lesson, we will explore what happens after a pull request is created. We will learn how to create pull requests and perform code reviews on GitHub, including how to respond to feedback, update your PR, and understand the review lifecycle.