Hello! Welcome to the first lesson in our module on Collaboration with GitHub.
In our last lesson, we covered the essential commands for interacting with remote repositories: clone, fetch, pull, and push. We ended on a crucial point: when you try to git push your changes to a shared repository for the first time, you'll likely face a permission denied error. This happens because the remote server needs to verify your identity before it allows you to write changes.
Today, we will solve that exact problem. This lesson marks our transition from working with Git locally to collaborating on a platform. You will learn to set up a GitHub account and configure SSH keys for authentication. This is a foundational skill for any DevOps engineer, enabling secure and efficient interaction with code repositories.
What is GitHub?
First, let's clarify a common point of confusion. Git is not GitHub.
- Git is the distributed version control system we've been learning—a tool that runs on your local machine to track changes in code.
- GitHub is a web-based platform that provides hosting for Git repositories. It's a service built around Git that adds powerful features for collaboration, such as a web interface, issue tracking, code reviews via pull requests, and much more.
As a DevOps engineer, you'll work extensively with platforms like GitHub, GitLab, or Bitbucket. We'll be focusing on GitHub, the most popular of these platforms.
1. Setting Up Your GitHub Account
Your GitHub account is your identity in the open-source community and on your team. It showcases your work and contributions. Let's start by creating one.
Getting started with your GitHub account
The official GitHub documentation is the best place to start. This guide walks you through creating an account and the initial configuration.
Please read through Part 1: Configuring your GitHub account. Follow the steps to create your account, verify your email, and—I highly recommend this for security—configure two-factor authentication (2FA). We will be using the free plan.
Once you have your account set up, you have a home for your remote repositories. The next step is to establish a secure connection between your local machine and GitHub.
2. Understanding SSH Authentication
When you git push or git pull, your computer communicates with GitHub's servers. This communication needs to be both secure and authenticated. While you can use a username and password (or a personal access token over HTTPS), the most common and robust method for command-line access is SSH (Secure Shell).
So, how does it work? SSH authentication uses a cryptographic key pair: a public key and a private key.
- Private Key: This is a secret file that you keep on your local computer. You must never share it. It acts as your ultimate proof of identity.
- Public Key: This is a corresponding file that you can safely share. You will upload this key to your GitHub account. It acts like a public-facing lock that only your private key can open.
When you try to connect to GitHub, the server uses your public key to issue a challenge that only your computer, with its corresponding private key, can correctly answer. This proves your identity without ever sending your password or private key over the network.
The Ultimate GitHub SSH Key Tutorial (Fast & Easy)
For a clear and concise explanation of what an SSH key is and why it's the preferred method for authenticating with GitHub, watch this short video from The Common Coder.
Watch the video from the beginning until 01:09. Pay close attention to the explanation of the public/private key pair and why password-based authentication was deprecated.
Test your understanding!
You've just generated a new SSH key pair: id_ed25519 and id_ed25519.pub. Which file do you upload to your GitHub account settings, and which file must you protect and never share?
Show answer
You upload the public key, id_ed25519.pub, to your GitHub account. The .pub extension stands for "public".
The private key, id_ed25519, must be kept secret on your local machine and never shared with anyone or uploaded anywhere.
3. Generating and Configuring Your SSH Keys
Now for the practical part. Let's generate your SSH key pair, add it to your system's ssh-agent (a helper program that keeps track of your keys), and provide the public key to GitHub.
The video below provides a complete walkthrough of this entire process. We will follow its steps, and I'll provide supplementary text and resources along the way.
The Ultimate GitHub SSH Key Tutorial (Fast & Easy)
This tutorial is an excellent, step-by-step guide to generating your SSH key and connecting it to GitHub. We will use this as our main guide for the next steps.
Watch this video from 01:17 to 10:51. We will break it down into steps, but this gives you a great overview of the entire process from start to finish.
Let's go through this process step-by-step. Open your terminal (Git Bash on Windows, or the default Terminal on Linux/macOS) and follow along.
Step 1: Check for Existing SSH Keys
First, it's good practice to check if you already have SSH keys on your system.
Run this command in your terminal:
ls -al ~/.ssh
If the command returns "No such file or directory" or you don't see files like id_rsa.pub, id_ecdsa.pub, or id_ed25519.pub, then you don't have an existing key and can proceed to the next step. If you do see existing keys, you can either use them or create a new one specifically for GitHub. For this lesson, we will create a new one.
Step 2: Generate a New SSH Key
We will use the modern and secure Ed25519 algorithm. Run the following command, replacing the email with the one you used for your GitHub account.
ssh-keygen -t ed25519 -C "your_email@example.com"
You will be prompted for a few things:
- "Enter a file in which to save the key": Press Enter to accept the default location (
~/.ssh/id_ed25519). - "Enter passphrase": You can optionally enter a password to protect your private key file.
- Pros: If someone gains access to your computer, they still can't use your key without the passphrase. This is more secure.
- Cons: You may need to enter this passphrase frequently.
- For now, you can leave it empty by pressing Enter. We'll see how the
ssh-agenthelps manage this.
Step 3: Add Your SSH Key to the ssh-agent
The ssh-agent is a background program that securely stores your private keys. Adding your key to the agent saves you from having to type your passphrase every time.
The specific commands can vary slightly by operating system.
Generating a new SSH key and adding it to the ssh-agent
The official GitHub documentation provides detailed, OS-specific instructions for working with the ssh-agent.
First, start the ssh-agent by following step 1 in the 'Adding your SSH key to the ssh-agent' section. Then, use the command from step 3 (for macOS) or step 2 (for Linux/Windows) to add your newly created private key (~/.ssh/id_ed25519) to the agent.
A typical sequence for Linux and macOS is:
- Start the agent:
eval "$(ssh-agent -s)" - Add your key:
ssh-add ~/.ssh/id_ed25519
Step 4: Add the Public SSH Key to Your GitHub Account
Now you need to give your public key to GitHub.
-
Copy the public key to your clipboard. The easiest way is with one of these commands:
- macOS:
pbcopy < ~/.ssh/id_ed25519.pub - Linux (requires
xclip):xclip -selection clipboard < ~/.ssh/id_ed25519.pub - Windows (in Git Bash):
clip < ~/.ssh/id_ed25519.pub - Alternatively, you can run
cat ~/.ssh/id_ed25519.pub, manually select all the output, and copy it.
- macOS:
-
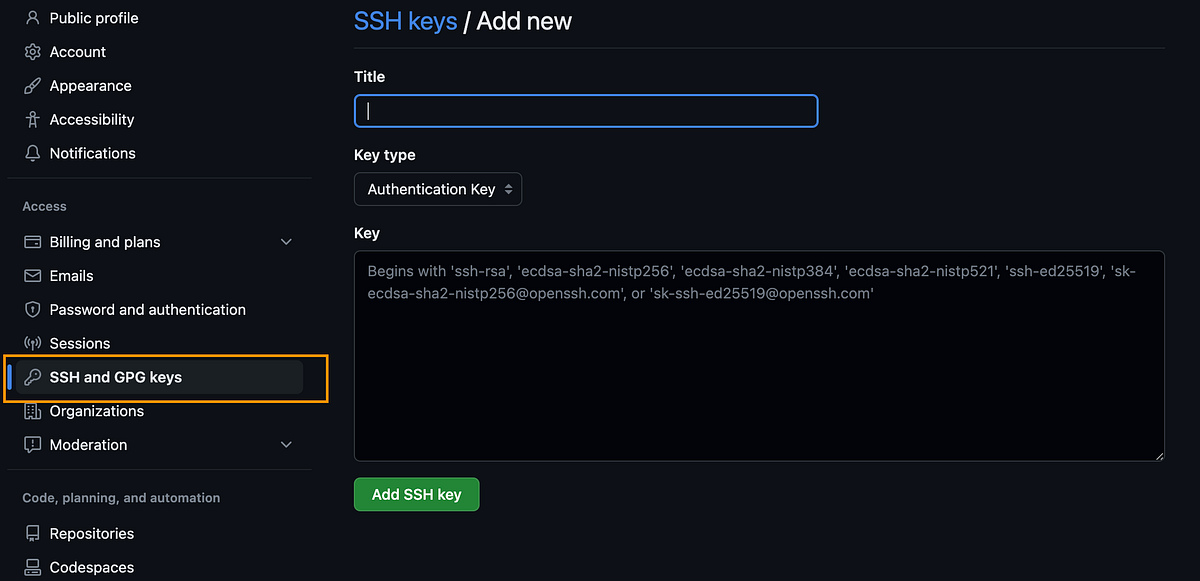
Add the key to GitHub:
- Go to your GitHub account.
- Click your profile picture in the top-right corner, then click Settings.
- In the left sidebar, click SSH and GPG keys.
- Click New SSH key.
- Give it a descriptive Title (e.g., "My Work Laptop").
- Paste your copied public key into the Key field.
- Click Add SSH key.
Step 5: Test Your SSH Connection
Finally, let's verify that everything is working. Run this command in your terminal:
ssh -T git@github.com
You may see a warning about the authenticity of the host. This is normal for the first connection. Type yes and press Enter.
If everything is successful, you will see a message like this:Hi your-username! You've successfully authenticated, but GitHub does not provide shell access.
This message confirms that your SSH key is correctly configured and can securely communicate with GitHub.
Conclusion
Congratulations! You have successfully set up a critical piece of your DevOps toolkit. You now have a GitHub account and a secure, password-less way to interact with it from your command line. This setup is the standard for professional development and automation.
Key Takeaways:
- GitHub is a web platform for hosting Git repositories and facilitating collaboration.
- SSH keys provide secure authentication using a public/private key pair. The private key remains secret on your machine, while the public key is uploaded to services like GitHub.
- The process involves:
- Generating a key pair using
ssh-keygen. - Adding the private key to the
ssh-agentfor convenience. - Adding the public key to your GitHub account settings.
- Testing the connection with
ssh -T git@github.com.
- Generating a key pair using
In our next lesson, we will put this new setup to practical use. You will learn how to fork repositories and contribute to projects via pull requests, which is the primary workflow for collaboration on GitHub.