Hello! Welcome to your third lesson in the "Collaboration with GitHub" module.
In our last session, you mastered the "fork and pull" workflow, which is essential for contributing to projects where you don't have direct write access, like most open-source software. You successfully forked a repository, cloned it, made changes in a branch, and submitted your first pull request.
Today, we'll dive deeper into the heart of team collaboration on GitHub. We will focus on the full lifecycle of a pull request, covering not just its creation but also the crucial process of performing a code review. Understanding both sides of this interaction—as the author and the reviewer—is fundamental for any DevOps professional responsible for maintaining code quality and enabling team velocity.
1. The Pull Request: A Conversation About Code
At its core, a Pull Request (PR) is more than just a request to merge code. It's a dedicated forum for proposing changes, discussing the implementation, and ensuring new code meets the team's standards before it's integrated.
In the last lesson, we created a PR from a fork. Today, we'll also consider the "shared repository" model, where all team members have access to a single repository and create branches directly within it. The process of creating a PR is nearly identical in both scenarios.
How to create a pull request in 4 min | GitHub for Beginners
Let's begin with a quick and clear definition of a Pull Request (PR) and see the end-to-end process of creating one. This official video from GitHub will serve as a great refresher and set the stage for today's lesson.
Watch from 00:13 to 02:21. Focus on the definition of a PR as a proposal to merge changes and the sequence of steps: branch, change, commit, push, and then 'Compare & pull request' on the GitHub UI.
Key Terminology
As you saw in the video, a PR involves merging one branch into another. GitHub uses specific terms for these:
- Base Branch: The branch you want to merge your changes into. This is typically the
mainordevelopbranch. - Head Branch (or Compare Branch): The branch that contains the changes you have made (e.g.,
your-feature-branch).
The request is to "pull" the changes from the head branch into the base branch.
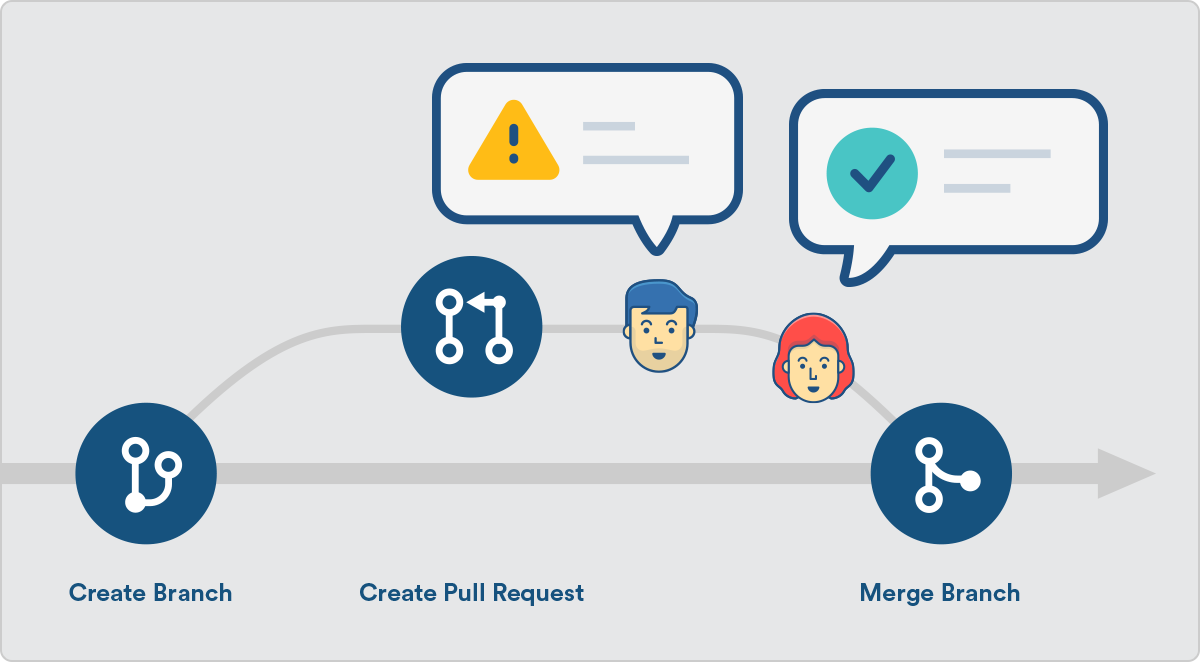
2. Performing a Code Review: The Other Side of the PR
Creating a PR is only half the story. Once a PR is open, the code review process begins. The goal of a code review is not to criticize the author, but to work together to improve the quality of the codebase. It's a chance to catch bugs, improve readability, share knowledge, and ensure consistency.
When you review a PR on GitHub, you can comment on the PR as a whole or on specific lines of code. However, a common mistake beginners make is to post each comment individually, which can send a flurry of notifications to the author. The professional approach is to batch your comments into a single, comprehensive review.
How to Review a Pull Request in GitHub the RIGHT Way
Performing a code review effectively is a skill in itself. This video demonstrates the professional way to batch your feedback into a single, cohesive review, avoiding the common pitfall of flooding the author with notifications.
Watch from 00:41 to 03:52. The video first shows the wrong way (adding single comments) and then the correct way: starting a review, adding pending comments, and finally submitting the review with a decision (Comment, Approve, or Request Changes).
As the video demonstrated, when you finish your review, you submit it with one of three statuses:
- Comment: You provide general feedback without giving a formal approval or rejection. This is useful for asking questions.
- Approve: You signal that the changes look good and are ready to be merged.
- Request Changes: You indicate that the author must address specific issues before the PR can be merged. This effectively blocks the PR from being merged until the reviewer is satisfied.
Test your understanding!
You are reviewing a colleague's Pull Request. You find three separate issues: a typo in a comment, a potential performance bug, and a variable that doesn't follow the team's naming convention. What is the most effective way to provide this feedback on GitHub?
Show answer
The best approach is to start a single review. You would add three separate "pending" comments, one for each issue, on the relevant lines of code. Once you've added all your comments, you would click "Finish your review" and submit it with the "Request Changes" option, along with a summary comment. This batches all feedback into one notification and clearly signals that action is required before merging.
3. Code Review Best Practices
The mechanics of a review are simple, but conducting a good review is a skill. It's as much about communication and collaboration as it is about technical correctness.
Beyond the technical steps, effective code review involves professional etiquette and a clear set of goals. Let's explore some established best practices that will help you be a better author and reviewer.
Read the 'Best Practice for Code Review' section. Focus on the key points, such as deciding the focus of the review (design, readability, tests), fostering a positive feedback culture, and the technical advice (e.g., avoid large PRs).
A few key takeaways from that reading:
- Review the code, not the person.
- Keep PRs small. Smaller changes are easier and faster to review.
- Automate what you can. Use linters and automated checks for style issues, so human reviewers can focus on logic and design.
- Be clear and constructive. Explain why a change is needed.
4. Practical Exercise: The Full PR and Review Cycle
Now, let's put everything together by simulating the entire workflow. Since you're working solo, you will act as both the author and the reviewer of a pull request on your own repository. This is a great way to understand the complete lifecycle.
Goal: Create a PR to add a README.md file, review it, request changes, address the feedback, and finally approve and merge it.
Step 1: Setup Your Project
- Go to GitHub and create a new, empty public repository. Name it
pr-practice. Do not initialize it with a README file. - Clone this repository to your local machine:
git clone git@github.com:YOUR-USERNAME/pr-practice.git
cd pr-practice
Step 2: Author Role - Create the PR
- Since this is a new project, we'll establish a
mainbranch. First, create an initial empty commit:# This creates the main branch without any files initially git commit --allow-empty -m "Initial commit" git push origin main - Create a feature branch for your new
README.mdfile:git checkout -b feature/add-readme - Create a
README.mdfile and add some initial text:echo "# PR Practice Project" > README.md - Stage and commit your change:
git add README.md git commit -m "feat: Add initial README file" - Push your branch to GitHub:
git push origin feature/add-readme - Now, go to your
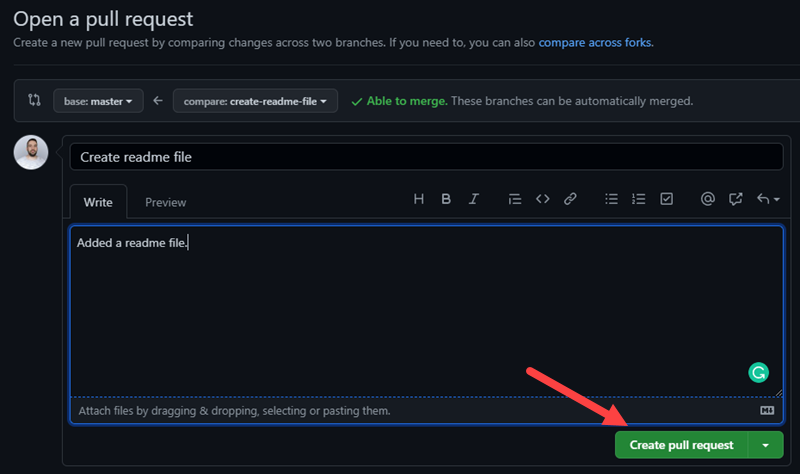
pr-practicerepository on GitHub. You should see a banner prompting you to "Compare & pull request". Click it. - Ensure the base branch is
mainand the compare branch isfeature/add-readme. Give it a title like "Add README file" and click "Create pull request".
Step 3: Reviewer Role - Request Changes
- On the pull request page, click the "Files changed" tab.
- Hover over the line with your new text and click the blue
+icon that appears. - In the comment box, click "Start a review".
- Write a comment suggesting an improvement, for example:
Could we add a short description of what this project is for? - Click the "Finish your review" button at the top right.
- Select "Request changes" and submit the review. You'll see the PR status change to "Changes requested".
Step 4: Author Role - Address Feedback
- Back in your local terminal (you should still be on the
feature/add-readmebranch), update theREADME.mdfile to address the review comment:echo "This project is for practicing the GitHub pull request and code review workflow." >> README.md - Stage and commit your update:
git add README.md git commit -m "docs: Add project description based on review feedback" - Push the new commit to the same branch. This automatically updates the PR.
git push origin feature/add-readme
Step 5: Reviewer Role - Approve and Merge
- Go back to the pull request on GitHub. You'll see the new commit has been added.
- Go to the "Files changed" tab again and see the new line. It looks good!
- Go back to the "Conversation" tab. You can now formally approve the changes. Click "Review changes", select "Approve", and submit your review.
- The PR is now approved. Click the green "Merge pull request" button, and then "Confirm merge".
- Finally, delete the now-unneeded feature branch by clicking the "Delete branch" button.
Congratulations! You've successfully navigated the entire PR and review lifecycle.
Conclusion
Today you've explored the collaborative core of GitHub. You learned that a pull request is a platform for discussion and that code review is a constructive, team-oriented process for improving quality.
Key Takeaways:
- A Pull Request (PR) is a formal proposal to merge code from one branch (the
head) into another (thebase). - Code Review is a critical practice for catching bugs, sharing knowledge, and maintaining standards.
- The professional way to review on GitHub is to batch comments into a single review and submit it with a clear status: Approve, Request Changes, or Comment.
- The PR lifecycle involves creation, review, discussion, updates (pushing new commits), final approval, and merging.
In our next lesson, we'll answer the question: "How do we decide what work needs to be done in the first place?" We will learn how to use GitHub Issues to track bugs and feature requests, effectively turning ideas and problems into actionable work items for your team.