Hello! Welcome to the third lesson in our Git module.
In our last lesson, we mastered the fundamental workflow of staging changes with git add and saving them into the repository's history with git commit. This created a clean, linear history on our main branch, which is perfect for simple, sequential work.
However, in any real-world DevOps environment, work rarely happens one task at a time. You might be developing a new feature when an urgent bug needs fixing, or multiple team members might be working on different parts of the same application simultaneously. This is where Git's most powerful feature comes into play: branching.
Today's lesson directly addresses the learning outcome: Create, switch between, and merge branches in Git. We will explore how to use branches to work on different tasks in parallel without interfering with each other, and then how to integrate those changes back together. This is the cornerstone of modern collaborative development.
1. What is a Branch?
Imagine your project's history is a single timeline of commits. A branch is like creating a new, parallel timeline that diverges from the main one. This allows you to work on new features or bug fixes in an isolated environment without affecting the stable, main version of your code.
The following video introduces this concept using a common real-world scenario: you're working on a feature when your manager asks you to fix an urgent bug.
Git Branching and Merging - Detailed Tutorial
This video from SuperSimpleDev clearly explains the problem that branching solves and introduces the idea of creating a separate line of work.
Watch the first 1 minute and 44 seconds of the video. Focus on understanding why working on a single branch can be problematic in a team environment.
Technically, a branch in Git is just a lightweight, movable pointer to a specific commit. When you create a new branch, you're creating a new pointer. Git also uses a special pointer called HEAD to keep track of which branch you are currently working on.
This approach is incredibly efficient because Git doesn't copy all your files for each new branch; it just creates a new pointer.
2. Creating, Listing, and Switching Branches
Now let's get practical. The main commands you'll use are:
git branch <branch-name>: Creates a new branch.git branch: Lists all local branches and shows which one you're currently on (marked with an*).git checkout <branch-name>: Switches your working directory to the specified branch.git checkout -b <branch-name>: A convenient shortcut that creates a new branch and immediately switches to it.
The following video demonstrates how to use these commands.
Git Branching and Merging - Detailed Tutorial
Continuing with the SuperSimpleDev tutorial, let's see how to create and switch branches on the command line.
Watch from 04:26 to 07:24. Observe how git branch creates the new pointer and git checkout moves the HEAD pointer to the new branch.

Hands-on Practice: Branching in Action
Let's try this in our my-first-repo project.
- Navigate to your repository directory in the terminal.
- Ensure you're on the main branch (it might be called
masterormain). You can check withgit branch. - Create and switch to a new branch for a new feature:
git checkout -b feature/add-readme - List your branches to confirm you've switched:
git branch
You should seefeature/add-readmewith an asterisk next to it. - Now, create a new file and commit it on this branch:
echo "# My First Repo" > README.md
git add README.md
git commit -m "feat: Add README file" - Switch back to your main branch:
git checkout main(ormaster) - Look at your project folder or run
ls. TheREADME.mdfile is gone! This is because it only exists on thefeature/add-readmebranch. Yourmainbranch is untouched. This demonstrates the power of isolation.
3. Merging Branches: Combining Work
Once you've completed the work on your feature branch, you'll want to integrate those changes back into your main branch. This process is called merging.
The command is simple: git merge <branch-name>.
The process is always:
- Check out the branch you want to merge into (the receiving branch, usually
main). - Run the
git mergecommand with the name of the branch you want to merge from.
There are two main types of merges you'll encounter.
Fast-Forward Merge
This is the simplest case. If the receiving branch (main) hasn't had any new commits since you created your feature branch, Git can simply move the main pointer forward to the latest commit of your feature branch. No new "merge commit" is created.
The official Git documentation provides an excellent text-based walkthrough of a scenario involving a "hotfix" that results in a fast-forward merge.
Git - Basic Branching and Merging
Read this section from the official Git documentation to understand a real-world hotfix workflow and the concept of a fast-forward merge.
Read the text under the heading 'Basic Branching', starting from the paragraph 'Now you get the call that there is an issue...' down to '...and continue working on it.' Pay attention to the steps: create a hotfix branch, commit the fix, check out master, and merge. Note the phrase 'Fast-forward' in the output.
Three-Way Merge
What if the main branch has changed while you were working on your feature? This is very common in team projects. In this case, Git can't just move the pointer. Instead, it performs a three-way merge.
Git looks at three commits:
- The tip of the
mainbranch. - The tip of your feature branch.
- Their last common ancestor.
It then creates a brand new merge commit that combines the changes from both branches. This new commit is unique because it has two parents.
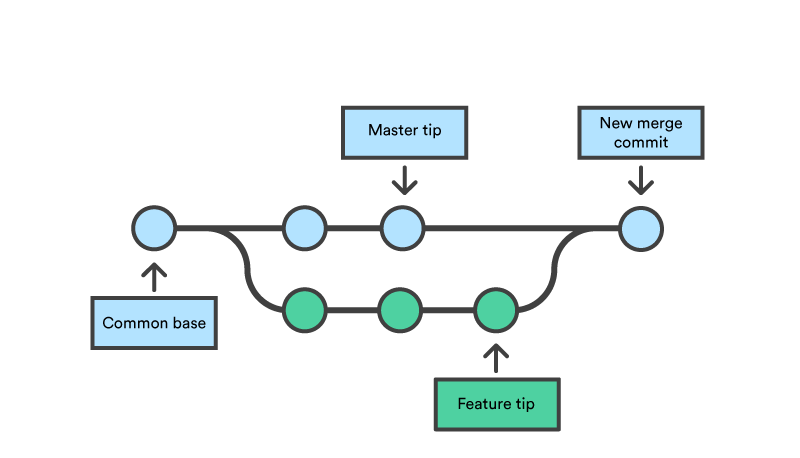
This text from the same Git documentation page explains this process.
Git - Basic Branching and Merging
Now let's look at what happens when the histories have diverged, leading to a three-way merge.
Read the section 'Basic Merging'. Notice how the merge process is different from the hotfix example because the iss53 branch and the master branch have both changed.
Hands-on Practice: Merging Your Feature
Let's merge the README.md file you created.
- First, make sure you are on the
mainbranch:git checkout main. - Now, merge the feature branch:
git merge feature/add-readme. - Check your files. The
README.mdshould now be present on yourmainbranch! - Since the work is merged, you can safely delete the feature branch:
git branch -d feature/add-readme
4. Dealing with Merge Conflicts
Sometimes, the merge process isn't smooth. A merge conflict occurs when you try to merge two branches that have changed the same part of the same file. Git doesn't know which change is correct, so it stops and asks you to resolve it manually.
Test your understanding!
Which of the following scenarios will most likely cause a merge conflict?
- Branch A adds a new file
a.txt, and Branch B adds a new fileb.txt. - Branch A modifies the first line of
config.yml, and Branch B modifies the last line ofconfig.yml. - Branch A and Branch B both modify the first line of
config.yml.
Show answer
Option 3 is the correct answer. A merge conflict occurs when Git cannot automatically decide how to combine changes because the exact same lines in a file were modified on both branches. In options 1 and 2, the changes are in different files or in different, non-overlapping parts of the same file, which Git can typically merge automatically.
When a conflict happens, Git will insert conflict markers directly into the problematic file. They look like this:
<<<<<<< HEAD
This is the change from your current branch (e.g., main).
=======
This is the change from the branch you are merging.
>>>>>>> feature/some-feature
To resolve the conflict, you must:
- Open the file and edit it to be the way you want it. This might mean keeping one version, the other, or a combination of both.
- Remove the
<<<<<<<,=======, and>>>>>>>markers. - Save the file.
- Tell Git you've resolved the conflict by staging the file:
git add <filename>. - Finalize the merge with
git commit.
The following video provides a fantastic, step-by-step walkthrough of creating and resolving a merge conflict.
Git Branching and Merging - Detailed Tutorial
Understanding how to handle merge conflicts is a crucial skill. This part of the SuperSimpleDev tutorial will demystify the process.
Watch from 19:18 to 27:29. The video first explains what a merge conflict is conceptually, then walks through intentionally creating one and resolving it step-by-step. Pay close attention to how the file is edited and the commands used to finalize the merge.
Conclusion
Congratulations! You've just learned one of the most transformative concepts in version control. Branching is what enables agile workflows, parallel development, and safe experimentation.
Key Takeaways:
- Branches are lightweight pointers that create isolated environments for development.
- Use
git checkout -b <name>to create and switch to a new branch. - Use
git merge <name>to integrate changes from one branch into another. - A fast-forward merge happens when the receiving branch has no new commits.
- A three-way merge happens when both branches have diverged, creating a new merge commit.
- Merge conflicts occur when the same lines are changed on both branches and must be resolved manually by editing the conflicted files, running
git add, and thengit commit.
In our next lesson, we will dive into how you can explore your project's history. We'll learn to use powerful commands like git log, git diff, and git blame to see the branches you've created, compare changes between commits, and find out who wrote a specific line of code.