Hello! Welcome back to our module on Git.
In our last lesson, we explored the power of branching and merging, which allows you to work on multiple features or fixes in parallel. This process creates a rich, and sometimes complex, project history. Now that you know how to build this history, it's time to learn how to explore it.
Today, we'll focus on the essential tools for inspecting your repository's history. Understanding what has changed, when, and by whom is a critical skill for any DevOps role, especially when you need to debug an issue, review code, or understand the evolution of a project.
This lesson directly addresses the learning outcome: Use git log, git diff, and git blame to inspect repository history. We will cover each of these commands, turning you into a "Git archaeologist" capable of digging through the past to find the information you need.
1. git log: Your Project's Diary
The git log command is your primary tool for viewing the history of commits in a repository. In its simplest form, it shows a chronological list of commits leading up to the branch you currently have checked out.
Basic Usage and Navigation
Let's start by understanding the basic output of git log and how to navigate it.
Full Git Tutorial (Part 7) - Git Log Fully Explained
This video from Ben Kadel's "Full Git Tutorial" provides an excellent introduction to git log. It explains the basic output and how to navigate the 'pager' that Git uses to display long histories.
Watch from 01:23 to 07:17. Pay attention to the components of a log entry (commit hash, author, date, message) and the keybindings for navigating the output (arrow keys, j/k, and q to quit).
As the video shows, each commit entry contains:
- A unique commit hash (a 40-character SHA-1 ID).
- The author and their email.
- The date the commit was made.
- The commit message.
Formatting the Log Output
The default git log output is verbose. Fortunately, Git provides many options to format the output to be more concise and useful.
Full Git Tutorial (Part 7) - Git Log Fully Explained
Let's continue with the same video to explore some of the most powerful formatting options for git log.
Watch from 08:22 to 22:25. This is a longer segment, but it's packed with useful options. Focus on understanding --oneline, --stat, --graph, and --all. The section on custom formats using placeholders is also very powerful for advanced use.
Here are some of the most useful combinations you'll use daily:
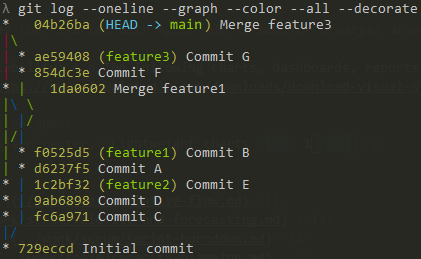
git log --oneline: Condenses each commit to a single line, showing just the abbreviated hash and the commit message subject.git log --stat: Shows the list of files changed in each commit, along with the number of lines added and deleted.git log --graph: Displays an ASCII art graph showing the branch and merge history. This is incredibly helpful for visualizing how different lines of development have interacted.git log --all: Shows the history of all branches, not just the current one.
You can combine these flags to create a powerful, customized view. A very common and highly recommended alias for DevOps professionals is:git log --graph --oneline --all --decorate
The --decorate flag adds branch and tag names to the output, making the graph even more informative.
Filtering the Log
Sometimes you don't want to see the entire history; you want to find specific commits. git log has powerful filtering capabilities.
Full Git Tutorial (Part 7) - Git Log Fully Explained
Finally, let's look at how to filter the commit history to find exactly what you're looking for.
Watch from 22:25 to 29:03. This section covers filtering by number of commits, author, date ranges, and commit message content (--grep).
Key filtering options include:
-n <limit>or-<limit>: Limit the number of commits shown (e.g.,git log -5).--author="<pattern>": Show commits by a specific author.--since="<date>"/--until="<date>": Show commits within a date range (e.g.,git log --since="2 weeks ago").--grep="<pattern>": Search for commits with messages that match a pattern.<file>: Show only commits that affected a specific file (e.g.,git log README.md).
2. git diff: Spotting the Difference
While git log shows you that changes happened, git diff shows you what those changes were. It's used to compare different states in your repository. To use it effectively, remember the three main areas in Git: the Working Directory (your local files), the Staging Area (changes you've run git add on), and your Repository (your committed history).

The following video provides a complete guide to using git diff in various scenarios.
git diff: everything you need to know
The git diff command is essential for reviewing changes. This tutorial by Andrew Burgess covers everything you need to know, from basic comparisons to more advanced options.
Watch the video in these segments: 00:15 - 02:13: Understand the difference between git diff (unstaged changes) and git diff --staged (staged changes). 04:26 - 04:54: See how to compare any two commits. 06:05 - 08:48: Learn about --word-diff for easier-to-read output and --stat for a summary view.
Here's a summary of the main git diff commands:
git diff: Shows differences between your Working Directory and the Staging Area (i.e., unstaged changes).git diff --staged(or--cached): Shows differences between the Staging Area and the last commit (HEAD) (i.e., staged changes that are not yet committed).git diff HEAD: Shows all changes in your Working Directory since the last commit, both staged and unstaged.git diff <commit1> <commit2>: Shows the differences between two specific commits. You can get the commit hashes fromgit log.git diff <branch1>..<branch2>: Shows the differences between the latest commits of two branches.
Test your understanding!
You have made changes to a file, app.js. You then run git add app.js. Now you want to see the changes you just staged. Which command should you use?
git diffgit diff HEADgit diff --stagedgit log app.js
Show answer
The correct answer is 3. git diff --staged. This command specifically compares the staging area to the last commit (HEAD), showing you exactly what you've prepared to commit. git diff would show nothing because there are no unstaged changes left. git diff HEAD would show the same output in this case, but --staged is more explicit about your intent. git log shows commit history, not uncommitted changes.
3. git blame: The Detective Tool
Have you ever looked at a line of code and wondered, "Who wrote this, and why?" The git blame command is the tool for answering that question. It annotates each line in a given file with information about the commit that last changed it.
This is not for "blaming" people in a negative sense, but for understanding context. It helps you find the relevant commit so you can read the commit message or find the person who has the most context on that piece of code.
The Complete Git Mastery Guide. From Beginner to Pro
This section from 'The Complete Git Mastery Guide' provides a concise and clear explanation of git blame.
Read the subsection 'Git Blame: Find Who Changed What'. It's very short and directly explains the command's purpose and syntax.
How to Use git blame
The basic command is simple:
git blame <filename>
The output for each line will show:
- The abbreviated commit hash that last modified the line.
- The author of that commit.
- The timestamp of the commit.
- The line number and the content of the line itself.
If you are only interested in a specific part of a file, you can use the -L option to specify a line range:
git blame -L 10,25 <filename> (This shows the blame information for lines 10 through 25).
Conclusion
You've now added three powerful investigative tools to your Git toolkit. These commands are fundamental to navigating a project's history, understanding changes, and collaborating effectively in a DevOps environment.
Key Takeaways:
git logis your window into the commit history. Use formatting (--oneline,--graph) and filtering (--author,--grep) to find what you need.git diffshows you the content of changes between commits, branches, and your working areas. Usegit difffor unstaged changes andgit diff --stagedfor staged changes.git blameis your detective tool for discovering the history of any line of code, linking it back to a specific commit and author.
In our next lesson, we will explore how to safely undo changes in Git. We'll cover how to discard local modifications with git checkout and how to reverse a commit that has already been made public using git revert.