Hello and welcome back!
In our last lesson, you mastered user and group management, learning how to create identities and organize them on a Linux system. Now, we'll connect that knowledge to a core DevOps activity: securely accessing your servers. This is where SSH, the Secure Shell, comes in.
Today's learning outcome is to configure SSH for secure remote access and set up key-based authentication. You will learn what SSH is, how to connect to a server, why password-based logins are risky, and how to implement the much more secure method of key-based authentication. This is the standard practice for managing servers in any professional environment.
1. What is SSH?
SSH, or Secure Shell, is a cryptographic network protocol for operating network services securely over an unsecured network. In the world of DevOps, it is the primary tool for remotely accessing the command line of servers to manage them.
SSH operates on a client-server model:
- SSH Client: The program on your local machine that initiates the connection (e.g., the
sshcommand). - SSH Server (Daemon): The program on the remote machine that listens for and accepts incoming connections. In Linux, this is typically the
sshdservice.
To get a clear overview of what SSH is and why it's so important, let's watch a short introduction.
OpenSSH for Absolute Beginners
The video 'OpenSSH for Absolute Beginners' by Veronica Explains provides an excellent starting point. This first clip will introduce the core concepts of SSH.
Watch the segment from 00:25 to 01:29. Focus on understanding the client-server model and the default TCP port used by SSH (port 22).
2. Connecting to a Server: The Basics
Before we can set up secure keys, you first need to understand how to make a basic connection using a username and password. This requires a few things to be in place.
OpenSSH for Absolute Beginners
Let's continue with the 'OpenSSH for Absolute Beginners' video to walk through the initial setup and connection process.
Watch the video from 02:39 to 10:15, which covers several key steps: Checking your local client (02:39 - 03:45): How to verify you have the ssh command available. Checking the remote server (03:45 - 06:21): How to ensure the sshd service is installed and running using systemctl status sshd. You'll see how to install openssh-server if it's missing. Finding the server's IP (06:21 - 07:34): How to find the remote machine's IP address using commands like ip a. Making the connection (08:24 - 10:15): How to use the ssh user@ip_address command, and what the 'host key fingerprint' prompt means on your first connection.
This password-based method works, but it has a significant security flaw: it's vulnerable to automated brute-force attacks, where bots repeatedly try to guess your password. Now, let's learn the professional, secure way.
3. Key-Based Authentication: The Secure Standard
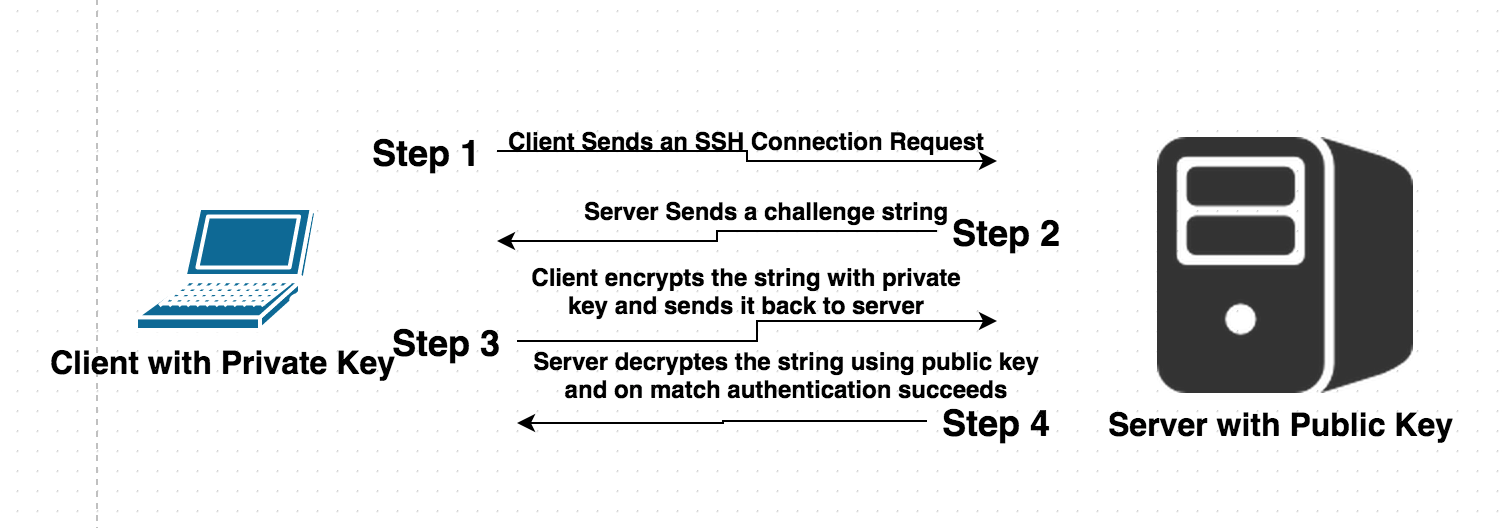
Instead of a password that can be guessed, SSH key-based authentication uses a pair of cryptographic keys to verify your identity. This method is drastically more secure.
The key pair consists of:
- A Private Key: This key is secret and must never be shared. It stays on your local machine (the client).
- A Public Key: This key can be shared freely. You place it on any server you want to access.

When you try to connect, the server uses the public key to issue a "challenge" that only the holder of the matching private key can correctly answer.
Step 1: Generate Your SSH Key Pair
The first step happens on your local machine. You'll use the ssh-keygen utility to create your public and private keys.
OpenSSH for Absolute Beginners
Let's return to the 'OpenSSH for Absolute Beginners' video to see how to generate a key pair.
Watch the segment from 10:15 to 14:40. Pay close attention to: Why keys are better (10:15 - 11:56): The video explains the security motivation for switching from passwords to keys. The ssh-keygen command (11:56 - 14:40): Observe the recommended command options like -t ed25519 (a modern, secure key type), -f to specify a filename, and -C to add a comment. Most importantly, understand the prompt for a passphrase, which adds an extra layer of security to your private key.
A note on passphrases: Using a passphrase to encrypt your private key is strongly recommended. If your local machine is ever compromised and an attacker steals your private key file, they still won't be able to use it without knowing the passphrase.
Step 2: Copy Your Public Key to the Server
Now that you have your key pair, you need to copy the public key to the remote server. The easiest way to do this is with the ssh-copy-id command. This utility automatically appends your public key to the correct file (~/.ssh/authorized_keys) on the server and sets the right file permissions.
OpenSSH for Absolute Beginners
The 'OpenSSH' video demonstrates this simple and effective command.
Watch from 14:40 to 16:13 to see how to use ssh-copy-id -i /path/to/your/public_key.pub user@host.
After running ssh-copy-id, try logging in again with ssh user@host. If you set a passphrase, you'll be prompted for it instead of your user password.
Step 3: Harden Your Server by Disabling Password Authentication
You can now log in with your key, but the server will still accept password logins, leaving the old vulnerability open. The final and most important step is to disable password authentication entirely.
Warning: Before you do this, make sure you can successfully log in with your SSH key. If you disable passwords and your key is not set up correctly, you could lock yourself out of your server!
OpenSSH for Absolute Beginners
Let's see how to configure the SSH server to only accept key-based authentication.
Watch from 16:46 to 19:06. This segment shows you how to: Edit the SSH server configuration file: sudo nano /etc/ssh/sshd_config. Find the line PasswordAuthentication yes, uncomment it (remove the #), and change it to no. It's also good practice to set PermitRootLogin no to prevent direct root login. Restart the SSH service with sudo systemctl reload sshd to apply the changes.
Now, your server is significantly more secure. It will only accept connections from clients who possess the correct private key.
4. Bonus: Simplifying Connections with a Config File
As a DevOps engineer, you'll manage many servers. Typing ssh -i ~/.ssh/some_key myuser@192.168.1.100 every time is tedious. The SSH client has a configuration file on your local machine that lets you create shortcuts.
This file is located at ~/.ssh/config.
OpenSSH for Absolute Beginners
The last part of the 'OpenSSH' video shows how to use this powerful feature to make your life easier.
Watch from 19:30 to 21:42 to learn how to create an entry in your ~/.ssh/config file. You will learn to define a Host alias, and specify the HostName (IP address), User, and IdentityFile (your private key).
With an entry like this:
Host web-prod
  HostName 203.0.113.50
  User deploy
  IdentityFile ~/.ssh/prod_key
You can now simply type ssh web-prod to connect.
Test your understanding!
Imagine you have a server at 10.20.30.40. You have a user account named app_admin. You need to set up secure access for this user.
On your local machine, what are the sequence of commands you would run to:
- Generate a new
ed25519key pair specifically for this server, saving it as~/.ssh/app_server_keywithout overwriting other keys. Add a comment "app_admin access key". (You can skip the passphrase for this exercise). - Copy the new public key to the
app_adminuser account on the server. - Create an alias
appserverin your local~/.ssh/configfile for easy connection. - Connect to the server using your new alias.
What commands would you use for each step?
Show answer
Here are the commands you would run on your local machine:
-
Generate the key:
ssh-keygen -t ed25519 -f ~/.ssh/app_server_key -C "app_admin access key"(Press Enter twice to skip the passphrase for this exercise)
-
Copy the public key to the server:
ssh-copy-id -i ~/.ssh/app_server_key.pub app_admin@10.20.30.40 -
Create the alias: Open
~/.ssh/configin a text editor and add the following block:Host appserver HostName 10.20.30.40 User app_admin IdentityFile ~/.ssh/app_server_key -
Connect using the alias:
ssh appserver
Conclusion
Fantastic! You have just implemented one of the most fundamental security practices in system administration. Securely accessing your servers is a non-negotiable skill, and by mastering key-based authentication, you've taken a major step towards professional DevOps operations.
Key Takeaways:
- SSH is the standard protocol for secure remote command-line access.
- Key-based authentication is vastly more secure than using passwords.
- The process involves three main steps:
- Generate a public/private key pair on your client machine (
ssh-keygen). - Copy the public key to the remote server (
ssh-copy-id). - Test the connection and then harden the server by disabling password authentication in
/etc/ssh/sshd_config.
- Generate a public/private key pair on your client machine (
- Using a passphrase for your private key provides an essential extra layer of security.
- The client-side
~/.ssh/configfile is a powerful tool for managing connections to multiple servers.
In our next lesson, we'll dive into another daily task for a DevOps engineer: installing, updating, and removing software packages using apt or yum package managers. This is what you'll typically do right after you SSH into a new server.