Hello! In our last lesson, we configured DRF's default authentication schemes, focusing on SessionAuthentication. We learned that it's "stateful," meaning the server keeps track of your logged-in status in a session. This is great for traditional websites and the browsable API, but less ideal for modern, decoupled applications like mobile apps or single-page applications (SPAs).
Today, we will implement token-based authentication, a stateless approach that is the industry standard for securing APIs. Instead of relying on server-side sessions, the client will present a special "token" with each request to prove its identity. By the end of this lesson, you will be able to add a robust, token-based authentication system to your Django project, enabling secure communication with any type of client.
Stateful vs. Stateless Authentication
The core difference between session-based and token-based authentication lies in the concept of state.
- Stateful (
SessionAuthentication): The server creates a session for a user upon login and stores this session data. For every subsequent request, the server looks up the session ID sent by the client (usually in a cookie) to identify the user. The "state" (the user's session) lives on the server. - Stateless (Token Authentication): The server does not store any session information. After the initial login, the server gives the client a self-contained token. For every subsequent request, the client includes this token. The server can validate the token on its own without needing to look up any stored data.
The following diagram illustrates this key difference. With token authentication, we follow the stateless model, where each request from the client contains all the information needed for the server to process it.
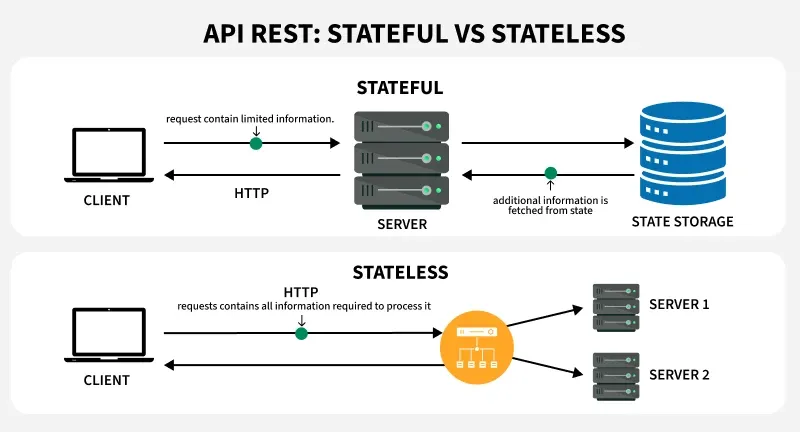
This stateless nature is a major reason why token authentication is preferred for modern APIs that serve a variety of clients (web, mobile, other services).
Introducing JSON Web Tokens (JWT)
While DRF has a simple built-in token system, a more powerful and widely adopted standard is the JSON Web Token (JWT), often pronounced "jot".
A JWT is a compact, self-contained token that securely transmits information between parties as a JSON object. The key benefits are:
- Stateless: As we discussed, the token contains all the necessary user information (like their ID) in its data payload, reducing the need for database lookups on every request.
- Expiration: JWTs have a built-in expiration time, which is a crucial security feature.
- Industry Standard: Being a well-defined standard (RFC 7519), it has wide support across different languages and frameworks.
To implement JWT authentication in DRF, we'll use djangorestframework-simplejwt, a popular and well-maintained package that handles all the complexities for us.
Implementing JWT Authentication with simple-jwt
This video provides a complete, practical walkthrough of setting up simple-jwt from start to finish. We'll follow its steps to integrate JWT into our project.
Django REST Framework - JWT Authentication with djangorestframework-simplejwt
This excellent tutorial by BugBytes demonstrates how to add JWT authentication to a DRF project. We will follow its key steps for installation, configuration, and usage.
First, watch this segment to install and configure the package. Follow along in your own project: Install the package (pip install djangorestframework-simplejwt) (04:48 - 06:47). Configure settings.py by adding SimpleJWT's authentication class to DEFAULT_AUTHENTICATION_CLASSES (06:47 - 07:27). Pay attention to the explanation of why SessionAuthentication is kept as a fallback.
After these steps, your settings.py should have a REST_FRAMEWORK dictionary that looks something like this:
REST_FRAMEWORK = {
    'DEFAULT_AUTHENTICATION_CLASSES': (
        'rest_framework_simplejwt.authentication.JWTAuthentication',
        'rest_framework.authentication.SessionAuthentication',
    ),
    # ... other settings
}
DRF tries authentication classes in order. With this setup, it will first try to authenticate using a JWT. If that fails or isn't provided, it will fall back to SessionAuthentication, ensuring the browsable API continues to work as before.
Obtaining and Using Tokens
simple-jwt provides views that you can add to your urls.py to allow clients to get and refresh tokens.
Django REST Framework - JWT Authentication with djangorestframework-simplejwt
Now let's expose the endpoints for clients to obtain their tokens.
Watch this segment (07:27 - 08:49) to add the necessary URL patterns to your project's urls.py file. The video clearly explains the purpose of the TokenObtainPairView and TokenRefreshView.
You've now created two crucial endpoints:
/api/token/: A client sends aPOSTrequest here with theirusernameandpassword. If valid, they receive an access token and a refresh token./api/token/refresh/: A client sends their refresh token here to get a new access token when the old one expires.
The access token is the one you'll use to authenticate most requests. It's short-lived (e.g., 5-15 minutes). The refresh token is long-lived (e.g., hours or days) and its only purpose is to get new access tokens without forcing the user to log in again. This separation is a key security pattern.
Now, let's see this in action.
Django REST Framework - JWT Authentication with djangorestframework-simplejwt
This part of the video demonstrates the full workflow: exchanging credentials for tokens, and then using a token to access a protected endpoint.
Watch this final segment (08:49 - 13:14). Focus on: How to make a POST request with username and password to get the access/refresh tokens. The structure of the JWT token itself when decoded on jwt.io. Notice the user_id in the payload—this is what makes it stateless! How the access token is passed in the Authorization header of a subsequent request using the Bearer keyword (e.g., Authorization: Bearer <your_token>).
Test your understanding!
You are building a mobile app that communicates with your Django API. When a user first logs in, your API returns an access token and a refresh token. Where should the mobile app securely store these two tokens? Is it okay to store them in the same way?
Show answer
The two tokens should be stored differently due to their different security characteristics.
- Access Token: This token is short-lived and used frequently. It can be stored in a place that's quickly accessible but still secure, such as in-memory application state or an encrypted local variable.
- Refresh Token: This token is long-lived and highly sensitive. It should be stored in the most secure storage available on the mobile platform, such as Android's
EncryptedSharedPreferencesor iOS'sKeychain. It should only be accessed when the access token expires.
Storing the powerful, long-lived refresh token in a less secure location (like plain text in local storage) would be a significant security risk.
DRF's Built-in TokenAuthentication
It's worth noting that DRF also provides a simpler, built-in token system. While simple-jwt is generally recommended for its features, you should be aware of the built-in option for simpler use cases.
The official DRF documentation explains its built-in TokenAuthentication scheme. It's much simpler than JWT but lacks features like token expiration.
Read the sections titled TokenAuthentication and Generating Tokens. You don't need to implement this, but understand the key steps: Add 'rest_framework.authtoken' to INSTALLED_APPS. Run manage.py migrate to create the token database table. Clients send the token as Authorization: Token <token_key> (note the keyword is Token, not Bearer). DRF provides a built-in view, obtain_auth_token, to get a token from a username and password.
This built-in system creates a single, permanent token for each user and stores it in the database. Every request requires a database lookup to validate the token, making it stateful in a way, although it doesn't use Django sessions. For most modern projects, simple-jwt is the superior choice.
Conclusion
Congratulations! You have successfully implemented a modern, secure, and stateless authentication system for your API. This is a fundamental skill for any backend developer building services that need to communicate with diverse clients.
Key Takeaways:
- Stateless vs. Stateful: Token-based authentication is stateless, making APIs more scalable and flexible than stateful, session-based systems.
- JWT is the Standard: JSON Web Tokens (JWT) are the modern standard for API authentication, offering features like self-contained user data and expiration times.
simple-jwtWorkflow:- Install and configure
djangorestframework-simplejwt. - Add its URL endpoints for obtaining and refreshing tokens.
- Clients exchange
username/passwordfor anaccessandrefreshtoken pair. - The short-lived
accesstoken is sent with each request in theAuthorization: Bearer <token>header.
- Install and configure
- Access vs. Refresh: Access tokens grant access to resources, while long-lived refresh tokens are used solely to obtain new access tokens.
Preview of the Next Lesson:
So far, our authentication classes determine who a user is. Now we need to control what they are allowed to do. In the next lesson, we will dive into Permissions. We'll learn how to use DRF's built-in permission classes like IsAuthenticated and IsAdminUser to protect our API views and ensure that only the right users can perform certain actions.