Hello! Welcome back to our Django course.
In our last lesson, we configured some of the most critical variables in settings.py, including a first look at INSTALLED_APPS and a quick demo of creating an app with startapp.
Today, we'll build directly on that foundation. This lesson is dedicated to the core Django concept of "apps." You will learn not just the commands to create and register an app, but also the design philosophy behind this modular structure. By the end, you'll understand why Django is organized this way and how to wire up a new app so it can begin to handle web requests. This will solidify your understanding of the project's architecture and set the stage for building actual features.
1. Projects vs. Apps: A Core Design Principle
First, let's formalize the distinction between a Django project and a Django app. While we've touched on this, understanding the philosophy is key to building clean, scalable applications.
Writing your first Django app, part 1
The official Django documentation provides a concise and authoritative definition of projects and apps. This is the best place to start.
Read the short subsection titled 'Projects vs. apps'. It clearly explains the distinction and the purpose of each.
As the documentation states, an app is a self-contained unit of functionality (like a blog or a user polling system), while a project is a collection of configurations and apps for a specific website.
This design promotes two critical software engineering principles:
- Modularity: It forces you to separate concerns. User authentication logic lives in one app, the blog in another, and a store in a third. This prevents your codebase from becoming a single, tangled file.
- Reusability: A well-designed app is plug-and-play. You could, for instance, build a "tagging" app and reuse it across multiple projects—a blog, an e-commerce site, a photo gallery—with minimal changes.
Thinking about how to break down a large system into smaller, cohesive, and loosely coupled components is a fundamental skill in software design. Django's app structure provides a framework for applying these principles to web development.
To see how these design principles play out in practice, let's watch a short discussion on different strategies for organizing a project.
Django Tutorial for Beginners – Build Powerful Backends
This segment from Programming with Mosh provides an excellent discussion on the software design theory behind Django apps, touching on concepts like monoliths, coupling, and cohesion. Given your background, this perspective on architecture should be particularly interesting.
Watch the segment from 56:26 to 1:01:50. Pay attention to the reasoning for separating the 'tags' functionality into its own app.
2. Creating an App: The startapp Command
Now let's move from theory to practice. The command to create a new app is startapp, which you run via manage.py.
Make sure you are in your project's root directory (the one containing manage.py) and run:
python manage.py startapp blog
This command creates a new directory named blog with a predefined structure.
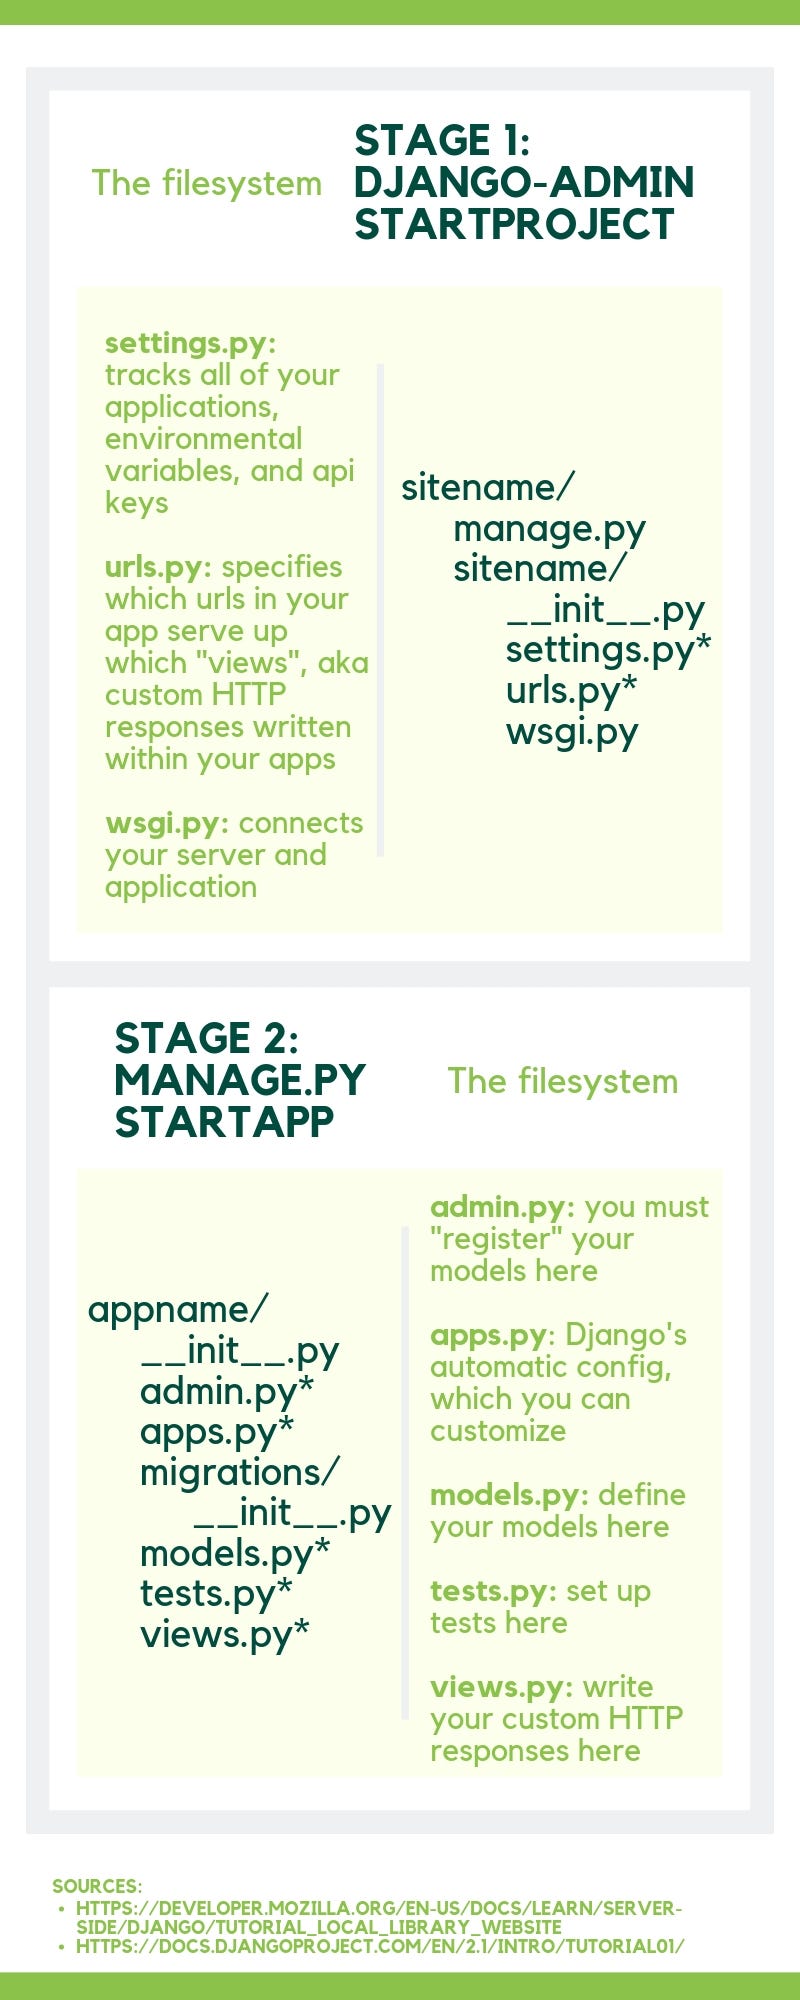
Here's a quick rundown of the most important files created inside the blog directory:
admin.py: Configuration for registering your app's models with the Django admin site.apps.py: Configuration for the app itself.models.py: Where you will define your database models (the structure of your app's data).tests.py: For writing unit and integration tests for your app.views.py: Where you'll write the logic to handle requests and return responses.
3. Registering an App: Updating INSTALLED_APPS
Creating the files isn't enough. You must explicitly tell your Django project that this new app exists and should be included. As we saw in the last lesson, this is done in the settings.py file.
Open your project's settings.py file (e.g., mysite/settings.py) and add your new app to the INSTALLED_APPS list.
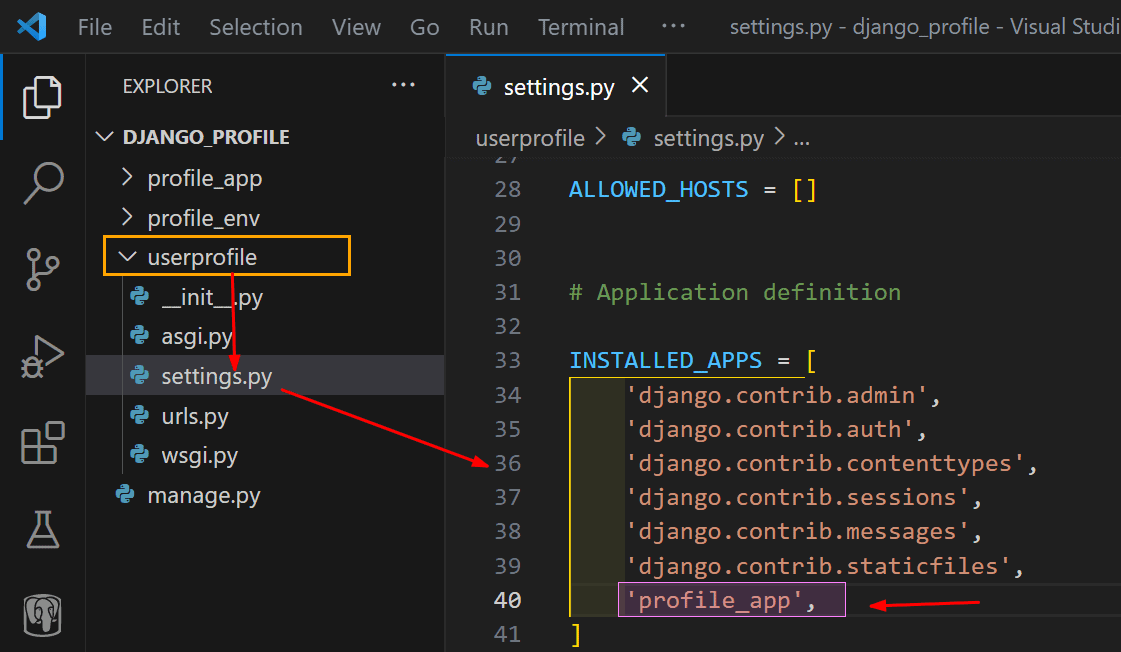
There are two common ways to register an app:
- By name (simple):
INSTALLED_APPS = [ # ... other apps 'blog', ] - By app config class (more explicit and recommended):
TheINSTALLED_APPS = [ # ... other apps 'blog.apps.BlogConfig', ]BlogConfigclass is found in theblog/apps.pyfile that Django generated for you. Using this full path avoids potential naming conflicts and is considered modern best practice.
By adding the app to INSTALLED_APPS, you enable Django to:
- Discover your app's models when creating database migrations.
- Find your app's URL patterns.
- Locate your app's templates and static files.
- Include your app's tests when you run the test suite.
Test your understanding!
A teammate asks you to add a new "store" feature to your Django project. What are the two distinct steps (the command-line action and the code modification) you need to perform to create this app and make the project aware of it?
Show answer
- Command: In the terminal, at the project root, run
python manage.py startapp store. - Code Modification: In
settings.py, add'store.apps.StoreConfig'(or simply'store') to theINSTALLED_APPSlist.
4. A Practical Walkthrough: From Creation to First View
So far, we've created the app's structure and told our project about it. But the app doesn't do anything yet. To make it functional, we need to give it a URL and a view that handles requests to that URL.
This next video provides a perfect, end-to-end demonstration of the workflow, picking up right where we left off. It will show you how to:
- Create a simple view function.
- Create a
urls.pyfile for our newblogapp. - Use
include()to connect the project's URLs to the app's URLs.
While views and URL routing are the focus of our next module, seeing the complete process now is invaluable for understanding how all the pieces fit together.
Python Django Tutorial: Full-Featured Web App Part 2 - Applications and Routes
Corey Schafer's tutorial series provides a clear, practical walkthrough. We'll watch the section that covers creating an app, defining its views and URLs, and connecting it to the main project.
Watch from the beginning (00:00:08) to 09:28. Follow along with the code you created. This will take you through the entire process of creating the blog app, adding a simple 'home' view, creating a urls.py for the app, and finally including it in the project's main urls.py file.
Let's recap the crucial step shown at the end of that video segment: modifying the project's urls.py file.
mysite/urls.py
from django.contrib import admin
from django.urls import path, include # Make sure to import include

urlpatterns = [
    path('admin/', admin.site.urls),
    path('blog/', include('blog.urls')), # This line connects to our app
]
The include() function is Django's mechanism for plug-and-play URLs. It tells Django: "For any URL that starts with blog/, chop off that part and pass the rest of the string to the blog.urls module for further processing." This is the final step that makes your app's pages accessible to the outside world.
Conclusion
In this lesson, we moved beyond basic file configuration and into the core architectural philosophy of Django. You now have a solid grasp of how to create and integrate a new, modular piece of functionality into your project.
Key Takeaways:
- Django apps are self-contained, reusable modules that promote clean code architecture.
- The
python manage.py startapp <app_name>command scaffolds the directory and files for a new app. - Every new app must be registered in the
INSTALLED_APPSlist insettings.py. - To make an app's views accessible, you must
include()the app'surls.pyfrom the project's mainurls.pyfile.
In our final lesson of this module, we will officially cover running the development server to verify the project installation. We've already had some practice with this, so it will be a quick confirmation before we move on to Module 2, where we'll dive deep into the request-response cycle, views, and the Django Template Language.