Welcome back! In our last lesson, we took a high-level tour of the Django project structure, distinguishing between projects and apps and identifying the purpose of key files like manage.py, urls.py, and the all-important settings.py.
Today, we're diving deep into that central configuration file. This lesson focuses on configuring three of the most fundamental settings in any Django project: DEBUG, ALLOWED_HOSTS, and INSTALLED_APPS. Mastering these settings is the first step in tailoring a Django project to your specific needs, whether for local development or for a production-ready backend service.
1. The settings.py File: Your Project's Control Panel
As we discussed, the settings.py file is the heart of your project. From a Python perspective, it's simply a Python module with module-level variables. Django reads these variables to configure its behavior.
You'll find this file inside your project's configuration directory (e.g., mysite/settings.py).
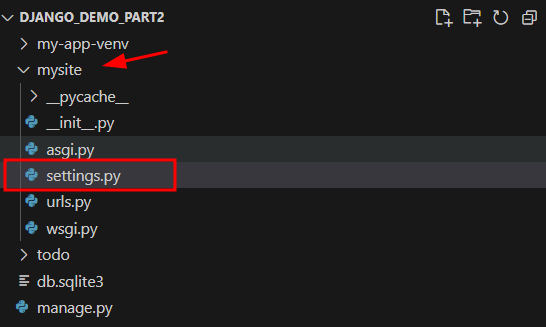
Let's explore the first two crucial security-related settings.
Understanding Django's settings.py File: A Comprehensive Guide for Beginners
This guide provides a clear, beginner-friendly walkthrough of the most important settings. We'll focus on the sections for DEBUG and ALLOWED_HOSTS first.
Please read sections 4 ('Debug Mode') and 5 ('Allowed Hosts'). Pay close attention to the distinction between development and production configurations.
2. The DEBUG Setting
The DEBUG setting is a boolean that radically changes how Django behaves.
-
DEBUG = True(Default for new projects)
This is your development mode. When active, Django provides detailed error pages if something goes wrong. This "yellow screen of death" is incredibly valuable for debugging as it shows the full traceback, local variables, and other configuration details. The development server also uses this setting to automatically reload when you save a file. -
DEBUG = False(Required for production)
This is your production mode. You must setDEBUGtoFalsebefore deploying your application to a live server. Running a site withDEBUG = Truein production is a major security vulnerability, as it can expose sensitive information about your project's inner workings. WithDEBUG = False, users will see a generic server error page instead of your detailed debug information.
3. The ALLOWED_HOSTS Setting
This setting is a list of strings representing the host/domain names that your Django site can serve. It's a critical security measure to prevent HTTP Host header attacks.
-
During Development (
DEBUG = True): IfALLOWED_HOSTSis empty, Django defaults to allowing['localhost', '127.0.0.1']. This is why your development server works out-of-the-box without any changes. -
During Production (
DEBUG = False): When you switch to production mode, Django becomes much stricter. IfALLOWED_HOSTSis empty, no requests will be served. You must explicitly list all the domain names that should be able to serve your site.
For example, for a live website, your configuration might look like this:
# settings.py

ALLOWED_HOSTS = ['yourdomain.com', 'www.yourdomain.com']
You can also use a wildcard to allow all subdomains:
# settings.py

ALLOWED_HOSTS = ['.yourdomain.com'] # Note the leading dot
Test your understanding!
You are about to deploy your Django application to a server at the address api.my-awesome-project.com. What two essential changes must you make in settings.py for a secure, functional deployment?
Show answer
- Set
DEBUG = Falseto prevent exposing sensitive error details. - Set
ALLOWED_HOSTS = ['api.my-awesome-project.com']to allow requests to that specific hostname.
4. The INSTALLED_APPS Setting
The INSTALLED_APPS setting is a list that tells Django which applications are active for your project. An "app" can be one of Django's built-in features (like the admin site or authentication system) or one of your own custom-built apps.
When you create a new project, Django pre-populates this list with several common apps:
django.contrib.admin: The powerful admin interface.django.contrib.auth: The user authentication framework.django.contrib.contenttypes: A framework for content types.django.contrib.sessions: The session framework.django.contrib.messages: The messaging framework for notifications.django.contrib.staticfiles: The framework for managing static files like CSS and JavaScript.
Registering Your Own App
A key part of building any Django project is creating your own apps and registering them here. The process involves two steps:
- Use a
manage.pycommand to create the app's directory structure. - Add the app's name to the
INSTALLED_APPSlist insettings.py.
The following video provides an excellent demonstration of this process.
Django Tutorial for Beginners – Build Powerful Backends
This segment from Programming with Mosh clearly explains the default installed apps, then walks through creating a new app and registering it. This is a core workflow you'll use constantly.
Watch from 21:51 to 25:46. Follow along by opening your terminal in your project directory. Try running the startapp command yourself and adding the new app to your settings.py file.
As a quick recap of the process shown in the video:
Step 1: Create the app
In your terminal, at the root of your project (where manage.py is), run:
python manage.py startapp playground
This will create a new playground/ directory with all the necessary files (models.py, views.py, etc.).
Step 2: Register the app
Open mysite/settings.py and add the name of your new app to the INSTALLED_APPS list:
# settings.py

INSTALLED_APPS = [
    'django.contrib.admin',
    'django.contrib.auth',
    'django.contrib.contenttypes',
    'django.contrib.sessions',
    'django.contrib.messages',
    'django.contrib.staticfiles',
    'playground', # Add this line
]
Now, Django knows about your playground app and will include it when running commands like creating database migrations or collecting static files.
Conclusion
In this lesson, you've moved from observing the project structure to actively configuring it. You now have control over three of the most important settings in your settings.py file.
Key Takeaways:
DEBUG = Trueis for development only; it provides helpful error pages but is a security risk in production.ALLOWED_HOSTSis a security setting that you must configure with your domain name(s) whenDEBUGisFalse.INSTALLED_APPSis the registry for all active features in your project. You must add any new app you create to this list to make it functional.- The workflow for adding a new feature involves using
manage.py startappand then updatingINSTALLED_APPS.
In our next lesson, "Create and register a new Django app within a project," we will build upon what you just learned. Having created and registered an app, we'll take the next logical step: making it do something by creating our first view and wiring it up to a URL.