Hello! Welcome to the next lesson in your Django journey.
In our last session, you successfully implemented a full user authentication flow, allowing users to register, log in, and log out. Now that users can identify themselves, our next task is to control what they can access.
Today's learning outcome is to protect function-based views using the @login_required decorator. We'll take a view that is currently public and restrict its access so that only authenticated users can see it. This is a fundamental skill for building any application with user-specific areas, like a profile page, a dashboard, or a page for creating new content.
Given your Python background, you're already familiar with decorators as a way to modify or enhance function behavior. We'll see how Django leverages this powerful Python feature to provide a clean and declarative way to handle security.
1. The Need for Access Control
Imagine you have a page where users can create a new blog post. It wouldn't make sense for a visitor who isn't logged in to access this page. We need a mechanism to check "Is this user logged in?" before showing them the view. If they aren't, we should politely redirect them to the login page.
There are two main ways to achieve this in a Django view:
- The "Manual" Way: Inside your view function, you can explicitly check if the user is authenticated using
request.user.is_authenticated. If this check fails, you would manually return anHttpResponseRedirectto the login page. - The "Django" Way: Use a decorator. This is the preferred method as it's cleaner, more reusable, and clearly states the view's requirements. The primary tool for this is the
@login_requireddecorator.
Let's focus on the Django way.
2. Protecting a View with @login_required
The @login_required decorator is a simple wrapper you place on a view function. It automatically performs the authentication check for you.
To see this in action, we'll follow a practical example: creating a new page for users to write an article and then protecting it. The following video from Net Ninja provides an excellent, step-by-step demonstration.
Django Tutorial #24 - Requiring Login
This video will walk you through creating a simple function-based view and then securing it with the @login_required decorator.
Please watch from 01:10 to 07:43. The first part (until 05:19) sets up a simple view and template to protect. The second part (from 05:19 onwards) is the core of this lesson, where the decorator is imported and applied. Pay close attention to: The import statement for login_required. The syntax for applying the decorator to the article_create view. The use of the login_url parameter within the decorator.
Breakdown of the Process
As you saw in the video, applying the protection involves two main steps in your views.py file:
Step 1: Import the Decorator
You must first import the decorator from Django's authentication utilities.
# some_app/views.py
from django.shortcuts import render
from django.contrib.auth.decorators import login_required # <--- Import this

# ... other views
Step 2: Apply the Decorator to Your View
You then "decorate" your function-based view by placing @login_required on the line directly above its definition.

Here's the minimal code structure:
# some_app/views.py

@login_required
def create_post(request):
    # This view logic will only run if the user is logged in.
    # If they are not logged in, Django will redirect them automatically.
    return render(request, 'create_post.html')
It's that simple. The decorator intercepts the incoming request, checks request.user.is_authenticated, and if it's False, it redirects.
3. Configuring the Redirect
When an unauthenticated user is redirected, where do they go? Django gives you two ways to configure this.
Option 1: Global Configuration (Recommended)
The most common method is to define a single, site-wide login URL in your project's settings.py file. If you followed the previous lesson, you might have already set LOGIN_REDIRECT_URL, which is for after a successful login. The setting for the login page itself is LOGIN_URL.
# your_project/settings.py

LOGIN_URL = 'login' # The 'name' of your login URL pattern
If LOGIN_URL is set, @login_required will automatically redirect users there without any extra configuration.
Option 2: Per-View Configuration
As shown in the Net Ninja video, you can also specify the login URL directly in the decorator. This is useful if you have multiple login pages or need to override the global setting for a specific view.
# The login_url parameter points to the URL where the user should be sent.
@login_required(login_url="/accounts/login/")
def create_post(request):
    ...
4. The next Parameter: A Smart Redirect
When Django redirects an unauthenticated user from a protected page (e.g., /posts/create/) to the login page, it does something clever. It appends the path they were trying to visit to the login URL as a query parameter named next.
The URL in the browser's address bar will look something like this:/accounts/login/?next=/posts/create/
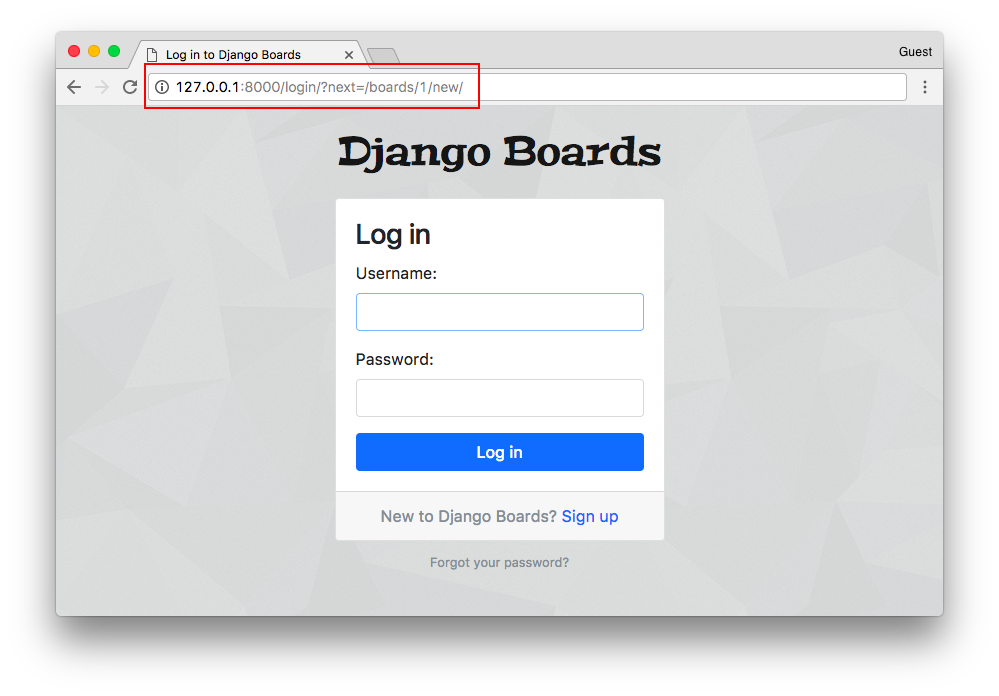
This next parameter is crucial for good user experience. Django's default LoginView is designed to look for this parameter. After the user successfully logs in, the view will redirect them to the path specified in next, returning them to the page they originally wanted to see instead of just dumping them on the homepage.
Test your understanding!
You have a function-based view called user_profile that renders a user's profile page. The URL for this view is /profile/ and it is named 'profile'. Currently, anyone can access it.
How would you modify your views.py to ensure only logged-in users can see this page? If a user is not logged in, they should be redirected to a login page whose URL is named 'signin'.
Show answer
You would need to make two changes to your views.py file.
- Import the
login_requireddecorator at the top of the file. - Apply the decorator to the
user_profileview, passing the URL name to thelogin_urlparameter.
from django.shortcuts import render
from django.contrib.auth.decorators import login_required

# ... other imports and views

@login_required(login_url='signin')
def user_profile(request):
    # Logic to fetch and display the user's profile
    return render(request, 'profile.html')
Conclusion
You have now learned how to enforce one of the most common security patterns in web development. By using a simple decorator, you can easily protect your views and ensure that sensitive or user-specific content is only accessible to authenticated users.
Key Takeaways:
- The
@login_requireddecorator is the standard, idiomatic way to protect function-based views in Django. - It automatically checks if
request.user.is_authenticatedisTrue. - If a user is not authenticated, it redirects them to the URL specified in the
LOGIN_URLsetting or the decorator'slogin_urlparameter. - Django thoughtfully includes a
nextquery parameter in the redirect URL, allowing the login view to send the user back to their originally requested page after they log in.
Preview of the Next Lesson:
The @login_required decorator is perfect for function-based views. However, Django also offers Class-Based Views (CBVs), which provide powerful patterns for reducing boilerplate code. In the next lesson, we will explore the CBV equivalent for authentication: protecting class-based views using the LoginRequiredMixin.