Hello! Welcome to the next lesson on mastering the Django Admin.
In our last session, we transformed the default admin list view from a simple list of object names into a rich, multi-column table using the list_display attribute in a ModelAdmin class. This gave us a much better at-a-glance overview of our data. However, as your application's database grows from a few dozen records to hundreds or thousands, even the best-looking list becomes difficult to navigate.
Today, we'll solve that exact problem. This lesson focuses on the learning outcome: add filtering and search capabilities to the admin interface. You will learn how to use Django's built-in tools to instantly add a powerful search bar and a context-aware filtering sidebar, making it trivial to find the specific records you need, no matter how large your dataset becomes.
Let's continue customizing the ModelAdmin class you learned about in the previous lesson.
Adding a Search Bar with search_fields
The quickest way to find a specific record is to search for it. Django makes adding a search bar to your model's admin page incredibly simple. You just need to tell it which fields to search on.
This is done by adding a search_fields attribute to your ModelAdmin class. This attribute should be a tuple or list of field names that you want to be searchable.
To see this in action, let's watch a short demonstration.
Intro to Customizing the Django Admin Dashboard
The video 'Intro to Customizing the Django Admin Dashboard' from the Pretty Printed channel provides a concise walkthrough of implementing search_fields.
Watch from 10:21 to 11:14. Notice how adding the search_fields attribute instantly makes a search bar appear and how you can then search across multiple fields like name, address, and city.
As you saw, the implementation is straightforward. If we were customizing an admin for a Book model, it would look like this:
# in your app's admin.py

@admin.register(Book)
class BookAdmin(admin.ModelAdmin):
    list_display = ('title', 'author', 'published_date')
    search_fields = ('title', 'summary') # Add this line
With that single line, a search bar appears on the Book list page.
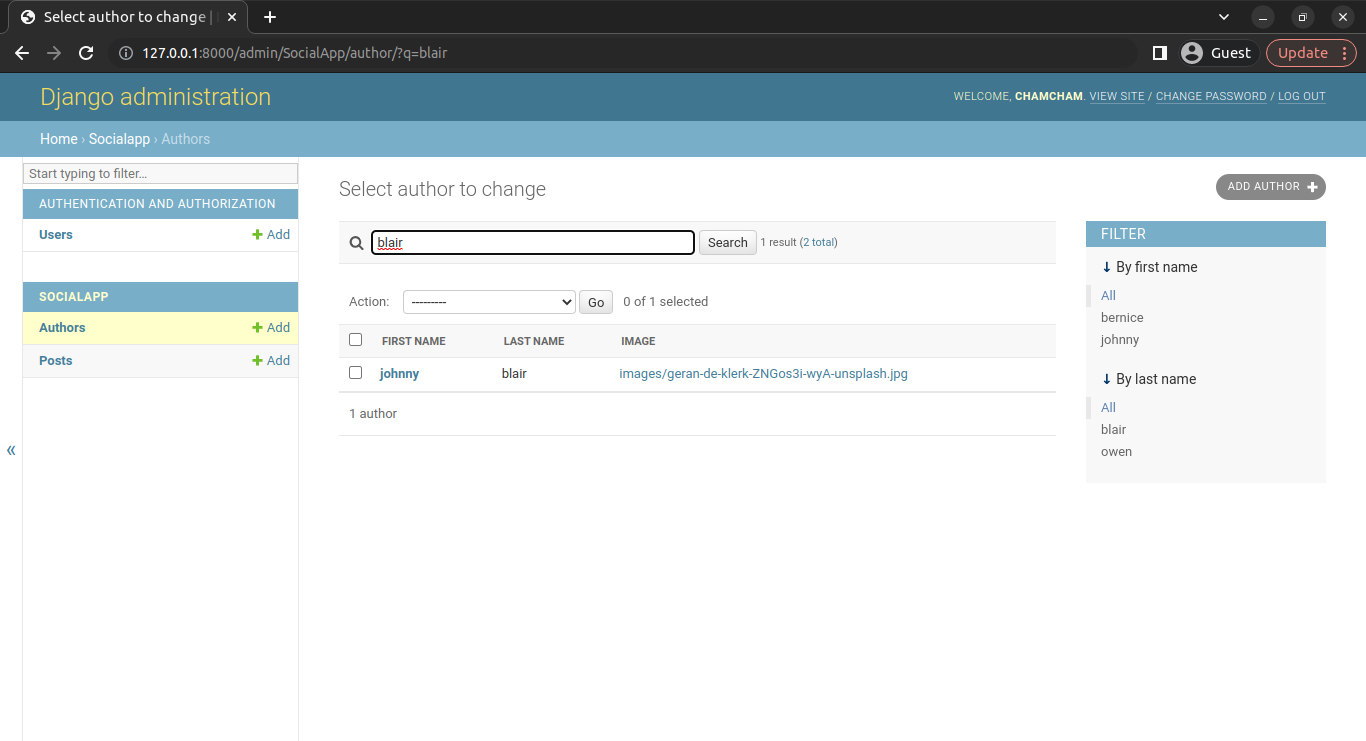
How Does search_fields Work?
Your experience with SQL will help you understand what's happening under the hood. When you use the search bar, Django constructs a SQL query using ILIKE (or LIKE on some database backends), which performs a case-insensitive "contains" search on the fields you've specified.
This has two important implications:
- Searching Related Models: You can search fields on related models (via
ForeignKeyorManyToManyField) using the double-underscore__syntax, just like in QuerySets. - Performance: Be mindful of which fields you make searchable. Searching across many large text fields can become slow on a very large database.
Filtering In Admin - Mastering Django Admin Book!
The 'Mastering Django Admin' guide provides a great technical explanation of search_fields, including how to search related models and the performance implications.
Read the section titled 'Search Fields'. Pay close attention to the example search_fields = ('name', 'author__name') which demonstrates searching a related model, and the explanation of the resulting SQL query.
Adding a Filter Sidebar with list_filter
Searching is great for finding specific items, but often you want to browse a subset of your data—for example, "all published articles" or "all users who are staff members." This is where filtering comes in.
By adding the list_filter attribute to your ModelAdmin, Django will automatically create a filter sidebar with sensible options based on the field type.
Let's watch another quick demo.
Intro to Customizing the Django Admin Dashboard
Let's return to the Pretty Printed video, which now demonstrates how to add filters for different types of fields.
Watch from 11:14 to 12:46. The video shows how list_filter generates different kinds of filters for a boolean field (availability), a character field (state), and a foreign key (manager).
This feature works best for fields that have a limited number of discrete choices. Good candidates for list_filter include:
BooleanField: Automatically gives you "All", "Yes", and "No" options.- Fields with
choicesset: Displays the choice options. ForeignKey: Lists all related objects as filter options.DateFieldorDateTimeField: Gives you smart defaults like "Today", "Past 7 days", "This month", etc.
Here is how you would add it to our BookAdmin:
# in your app's admin.py

@admin.register(Book)
class BookAdmin(admin.ModelAdmin):
    list_display = ('title', 'author', 'is_published')
    search_fields = ('title', 'summary')
    list_filter = ('is_published', 'author') # Add this line
This would add a sidebar allowing you to filter books by their publication status and by their author.

Test your understanding!
You are building a blog. You have a Post model with the following fields:
title(CharField)content(TextField)author(ForeignKey to the User model)status(CharField withchoices=[('draft', 'Draft'), ('published', 'Published')])publish_date(DateTimeField)
How would you configure the PostAdmin to:
- Allow searching by the
titleandcontentof the post. - Allow filtering by
status,author, andpublish_date.
Show answer
Your admin.py would look like this:
from django.contrib import admin
from .models import Post

@admin.register(Post)
class PostAdmin(admin.ModelAdmin):
    list_display = ('title', 'author', 'status', 'publish_date')

    # 1. Configure search
    search_fields = ('title', 'content')

    # 2. Configure filters
    list_filter = ('status', 'author', 'publish_date')
This setup provides a powerful interface for managing blog posts.
Creating Custom Filters
The list_filter attribute is powerful, but it's limited to filtering directly on a model's field values. What if you want to filter based on a computed condition? For example, "show all concerts that are sold out" (where tickets_left == 0) or "show all books with more than 500 pages"?
For this, Django provides the admin.SimpleListFilter class. You can create a subclass of it to define your own custom filtering logic. This is a great example of how your Python skills with classes can extend Django's core functionality.
To create a custom filter, you need to:
- Create a class that inherits from
django.contrib.admin.SimpleListFilter. - Define a
title(what appears as the header in the filter sidebar) and aparameter_name(the unique name for the URL query parameter). - Implement the
lookups()method: This returns the filter options that will be displayed to the user (e.g., "Yes" and "No"). - Implement the
queryset()method: This contains the logic that modifies the queryset based on the user's selected option.
Let's look at a practical guide for this.
The article 'Customizing the Django Admin' on TestDriven.io has an excellent, easy-to-follow example of creating a custom filter to find sold-out concerts.
Read the subsection 'Filter Model Objects'. First, review the basic use of list_filter. Then, focus on the code for the SoldOutFilter. Analyze how the lookups method defines the 'Yes'/'No' options and how the queryset method applies .filter(tickets_left=0) or .exclude(tickets_left=0) based on the selected value.
As the article shows, you would define your custom filter class and then simply add it to the list_filter tuple in your ModelAdmin:
# tickets/admin.py
from django.contrib import admin
from django.contrib.admin import SimpleListFilter

# (Assuming a Concert model with a 'tickets_left' IntegerField)

class SoldOutFilter(SimpleListFilter):
    title = "Sold out"  # A user-friendly title
    parameter_name = "sold_out"  # A unique URL parameter

    def lookups(self, request, model_admin):
        # Returns a list of tuples. The first element is the URL query value,
        # the second is the human-readable label.
        return [
            ("yes", "Yes"),
            ("no", "No"),
        ]

    def queryset(self, request, queryset):
        # This method is called to filter the queryset.
        if self.value() == "yes":
            return queryset.filter(tickets_left=0)
        if self.value() == "no":
            return queryset.exclude(tickets_left=0)

@admin.register(Concert)
class ConcertAdmin(admin.ModelAdmin):
    list_display = ('name', 'venue', 'tickets_left')
    list_filter = ('venue', SoldOutFilter) # Add your custom filter here
This pattern is extremely powerful and allows you to build a highly tailored admin experience for your specific business logic.
Conclusion
You've now equipped your Django admin with essential tools for data navigation. What was once a simple, long list of objects is now a dynamic and searchable interface.
Key Takeaways:
- Add the
search_fieldsattribute to yourModelAdminto enable a search bar. You can search across related models using the__syntax. - Add the
list_filterattribute to enable a filter sidebar. This works best for fields with a limited set of choices like booleans, foreign keys, or date fields. - For more complex filtering logic based on computed values, create a custom filter class by inheriting from
admin.SimpleListFilterand implementing thelookups()andqueryset()methods.
In our next lesson, we will shift our focus from the list page to the detail page where you edit a single object. You will learn how to customize the layout of model editing pages using fieldsets, allowing you to group related fields and make even the most complex forms clean and intuitive to use.