Hello! Welcome back to our work on the Django admin.
In the last lesson, you mastered how to organize the admin form for a single model using fieldsets, transforming potentially cluttered pages into clean, logical sections. This is a fantastic skill for improving the data entry experience.
Today, we'll address another common admin workflow: managing related objects. Often, creating or editing one object requires you to immediately create or edit several others linked to it. This lesson will teach you how to register related models for inline editing, one of the most powerful and time-saving features of the Django admin. You'll learn how to manage child objects directly from their parent's admin page, streamlining your workflow significantly.
From Separate Forms to an Integrated View
Imagine you have a Project model and a Task model, where each Task belongs to a Project. Without inlines, your workflow would be:
- Go to the
Projectadmin and create a new project. - Go to the
Taskadmin. - Create a new task, and use a dropdown to select the project you just created.
- Repeat for every single task.
This is inefficient and disconnected. Inline editing allows you to add, edit, and delete tasks directly on the Project edit page, providing a much more intuitive and cohesive interface. Since you have experience with SQL, you can think of this as bringing the "many" side of a one-to-many relationship directly into the admin page for the "one" side.
Implementing Inline Model Admins
To achieve this, Django provides two main classes that you can inherit from:
admin.StackedInline: Displays each related object as a full block of fields, similar to a standard admin form.admin.TabularInline: Displays each related object in a more compact, table-based row.
Let's start by looking at a clear example from the MDN Django tutorial.
Django Tutorial Part 4: Django admin site - MDN Web Docs
The MDN Web Docs provide a concise and clear explanation of how to set up inline editing. This will serve as our foundation.
Read the section titled 'Inline editing of associated records'. It walks through creating a BooksInstanceInline and adding it to the BookAdmin. Pay close attention to the three key steps: defining the inline class, specifying the model, and adding the inline class to the parent model admin's inlines list.
The process you just read about can be summarized as:
- Create a class that inherits from
admin.TabularInlineoradmin.StackedInline. - Set the
modelattribute of this class to your "child" model (the one with theForeignKey). - In your "parent"
ModelAdminclass, add aninlinesattribute, which should be a list containing your newly created inline class.
The result of using TabularInline is a clean, row-based layout for related objects, as shown in the image below.
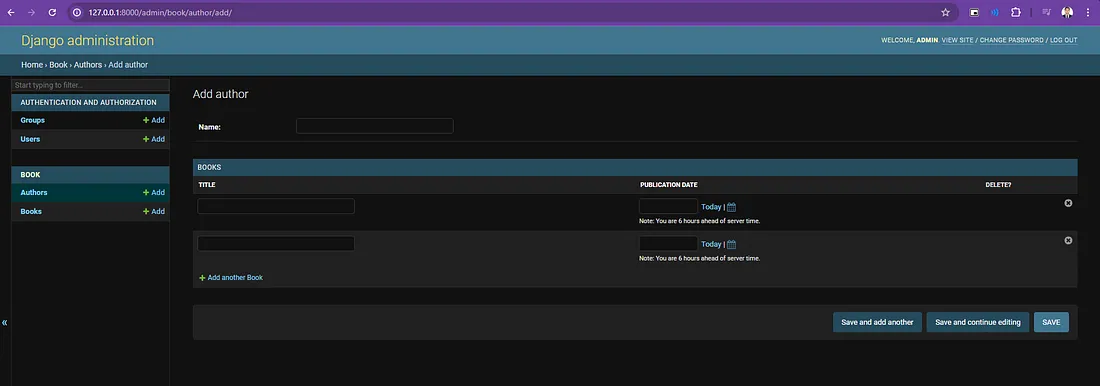
Choosing Between TabularInline and StackedInline
The choice between TabularInline and StackedInline is mostly about presentation.
TabularInlineis best when the related model has just a few fields. It's compact and easy to scan.StackedInlineis better when the related model has many fields, as it gives each field its own line and more space, preventing the form from becoming too wide and hard to read.
The following video demonstrates this difference clearly and also introduces a useful customization option.
51 - Admin Inlines for Foreign Keys - Python & Django 3.2 Tutorial Series
Let's watch a clip from CodingEntrepreneurs. This video will show you a practical comparison between TabularInline and StackedInline and how to control the number of empty forms that appear by default.
Watch from 04:03 to 06:35. The video first implements a TabularInline that looks too crowded, then switches to a StackedInline which is a better fit. You'll also learn about the extra attribute, which is used to control how many blank inline forms are displayed.
As you saw, setting extra = 0 is a common practice. It creates a cleaner interface by hiding the empty forms until you explicitly click "Add another...".
A Crucial Rule: The Direction of the ForeignKey
There is one critical rule you must follow for inlines to work: The model being inlined must have a ForeignKey to the parent model.
You cannot, for example, inline the User model on a Recipe admin page if the Recipe model has a ForeignKey to User. The relationship is in the wrong direction. The Recipe is the "child" that points to the User "parent". Therefore, you can inline recipes on the user's admin page, but not the other way around.
This concept can be tricky, and seeing the error it produces is the best way to understand it. The next segment of the video does an excellent job of demonstrating this.
51 - Admin Inlines for Foreign Keys - Python & Django 3.2 Tutorial Series
Let's continue with the video to see what happens when you try to set up an inline with the wrong foreign key relationship.
Watch from 07:00 to 10:53. The presenter first attempts to inline the User model within the RecipeAdmin and explains the resulting has no foreign key error. Then, they show the correct approach: inlining the Recipe model within a custom UserAdmin.
This is a fundamental concept. The inlines list effectively tells Django: "On this parent admin page, show me all the children that point to this specific parent instance."
Test your understanding!
You have two models in your projects app:
# projects/models.py
from django.db import models
from django.conf import settings

class Project(models.Model):
    name = models.CharField(max_length=200)
    owner = models.ForeignKey(settings.AUTH_USER_MODEL, on_delete=models.CASCADE)
    start_date = models.DateField()

    def __str__(self):
        return self.name

class Task(models.Model):
    project = models.ForeignKey(Project, on_delete=models.CASCADE, related_name='tasks')
    description = models.CharField(max_length=255)
    is_completed = models.BooleanField(default=False)

    def __str__(self):
        return self.description
Write the admin.py code for the projects app to meet these requirements:
- When editing a
Projectin the admin, you should be able to add and edit its relatedTasks on the same page. - The tasks should be displayed in a compact, tabular format.
- By default, no empty forms for new tasks should be displayed. A user must click "Add another Task" to add one.
Show answer
Your projects/admin.py file should look like this:
from django.contrib import admin
from .models import Project, Task

class TaskInline(admin.TabularInline):
    model = Task
    extra = 0 # Don't show any extra forms by default

@admin.register(Project)
class ProjectAdmin(admin.ModelAdmin):
    list_display = ('name', 'owner', 'start_date')
    inlines = [TaskInline]

# We can also register the Task model on its own if we want a separate admin for it
admin.site.register(Task)
This configuration creates a TaskInline that uses TabularInline for a compact layout. extra = 0 prevents empty forms from showing. Finally, TaskInline is included in the ProjectAdmin's inlines list, making it appear on the project's change page.
Conclusion
You have now completed the final core competency for customizing the Django admin. By combining list_display, search_fields, list_filter, fieldsets, and now inlines, you can build a highly efficient and user-friendly data management interface for almost any application.
Key Takeaways:
- Inline editing allows you to manage related objects (the "many" side of a relationship) directly on the parent object's admin page.
- Use
admin.TabularInlinefor a compact, table-like layout, andadmin.StackedInlinefor a more spacious, form-like layout. - The model you want to inline must have a
ForeignKeypointing to the parent model. - Configuration involves creating an inline class (specifying its
model) and adding it to the parentModelAdmin'sinlineslist. - The
extraattribute in an inline class controls how many empty forms are shown for adding new related objects. Settingextra = 0is common.
This lesson concludes our module on the Django Admin. You are now well-equipped to build powerful internal dashboards. In our next module, we will shift our focus back to the user-facing part of your application. We'll begin by exploring Class-Based Views (CBVs), a powerful, reusable, and object-oriented way to handle web requests that builds on the function-based views you've seen before.