Introduction
Welcome to the first lesson of our module on Head and Face Construction! Today, we'll tackle one of the most powerful techniques in an artist's toolkit: constructing a basic head shape from any angle using the Loomis method.
This method, developed by illustrator Andrew Loomis, is a game-changer for drawing portraits. It provides a reliable, structured approach to what can otherwise be an intimidating subject. You'll find it's a bit like an algorithm for drawing the head—it breaks down a complex form into a series of logical, manageable steps.
This lesson will build directly on the skills you've developed in previous modules. We will use your ability to draw basic 3D forms (like spheres), your understanding of perspective, and your eye for proportion to create a solid foundation for the human head. By the end of this session, you'll have a repeatable process for constructing a believable head structure, ready for placing features in our upcoming lessons.
What is the Loomis Method?
Before we start drawing, let's understand the core principles of the Loomis method. It's based on the idea that the cranium (the upper part of the skull that encloses the brain) can be simplified into a sphere. By "slicing off" the sides of this sphere and then adding the jaw and face-front, we can create a robust structural model of the head.
To get a solid theoretical overview, please read the following sections from the article "The Loomis Method of Drawing the Head, a Step-by-Step Guide." This will give you the "why" behind the steps we're about to practice.
The Loomis Method of Drawing the Head, a Step-by-Step Guide
This article from Gvaat's Workshop provides a clear, step-by-step breakdown of the Loomis method's core theory. It uses helpful diagrams and quotes from Andrew Loomis himself.
Please read from the beginning down to the end of 'Step 4'. Focus on understanding these key concepts: The Ball: Why the method starts with a sphere. The Cross: How the vertical and horizontal center lines establish the direction the head is facing. The Flattening: The concept of slicing the sides of the sphere to create the temporal planes. The Breakup: The crucial 'rule of thirds' for placing the hairline, brow line, nose line, and chin.
To summarize, the key steps are:
- Start with a sphere for the cranium.
- Draw a cross of contour lines (a vertical centerline and a horizontal brow line) to define the direction the head is facing.
- Slice off the sides of the sphere to create flat planes where the ears will eventually attach.
- Use the brow line as a reference to measure down and find the nose line, and then again to find the chin line.
This infographic is a great visual summary of the process:
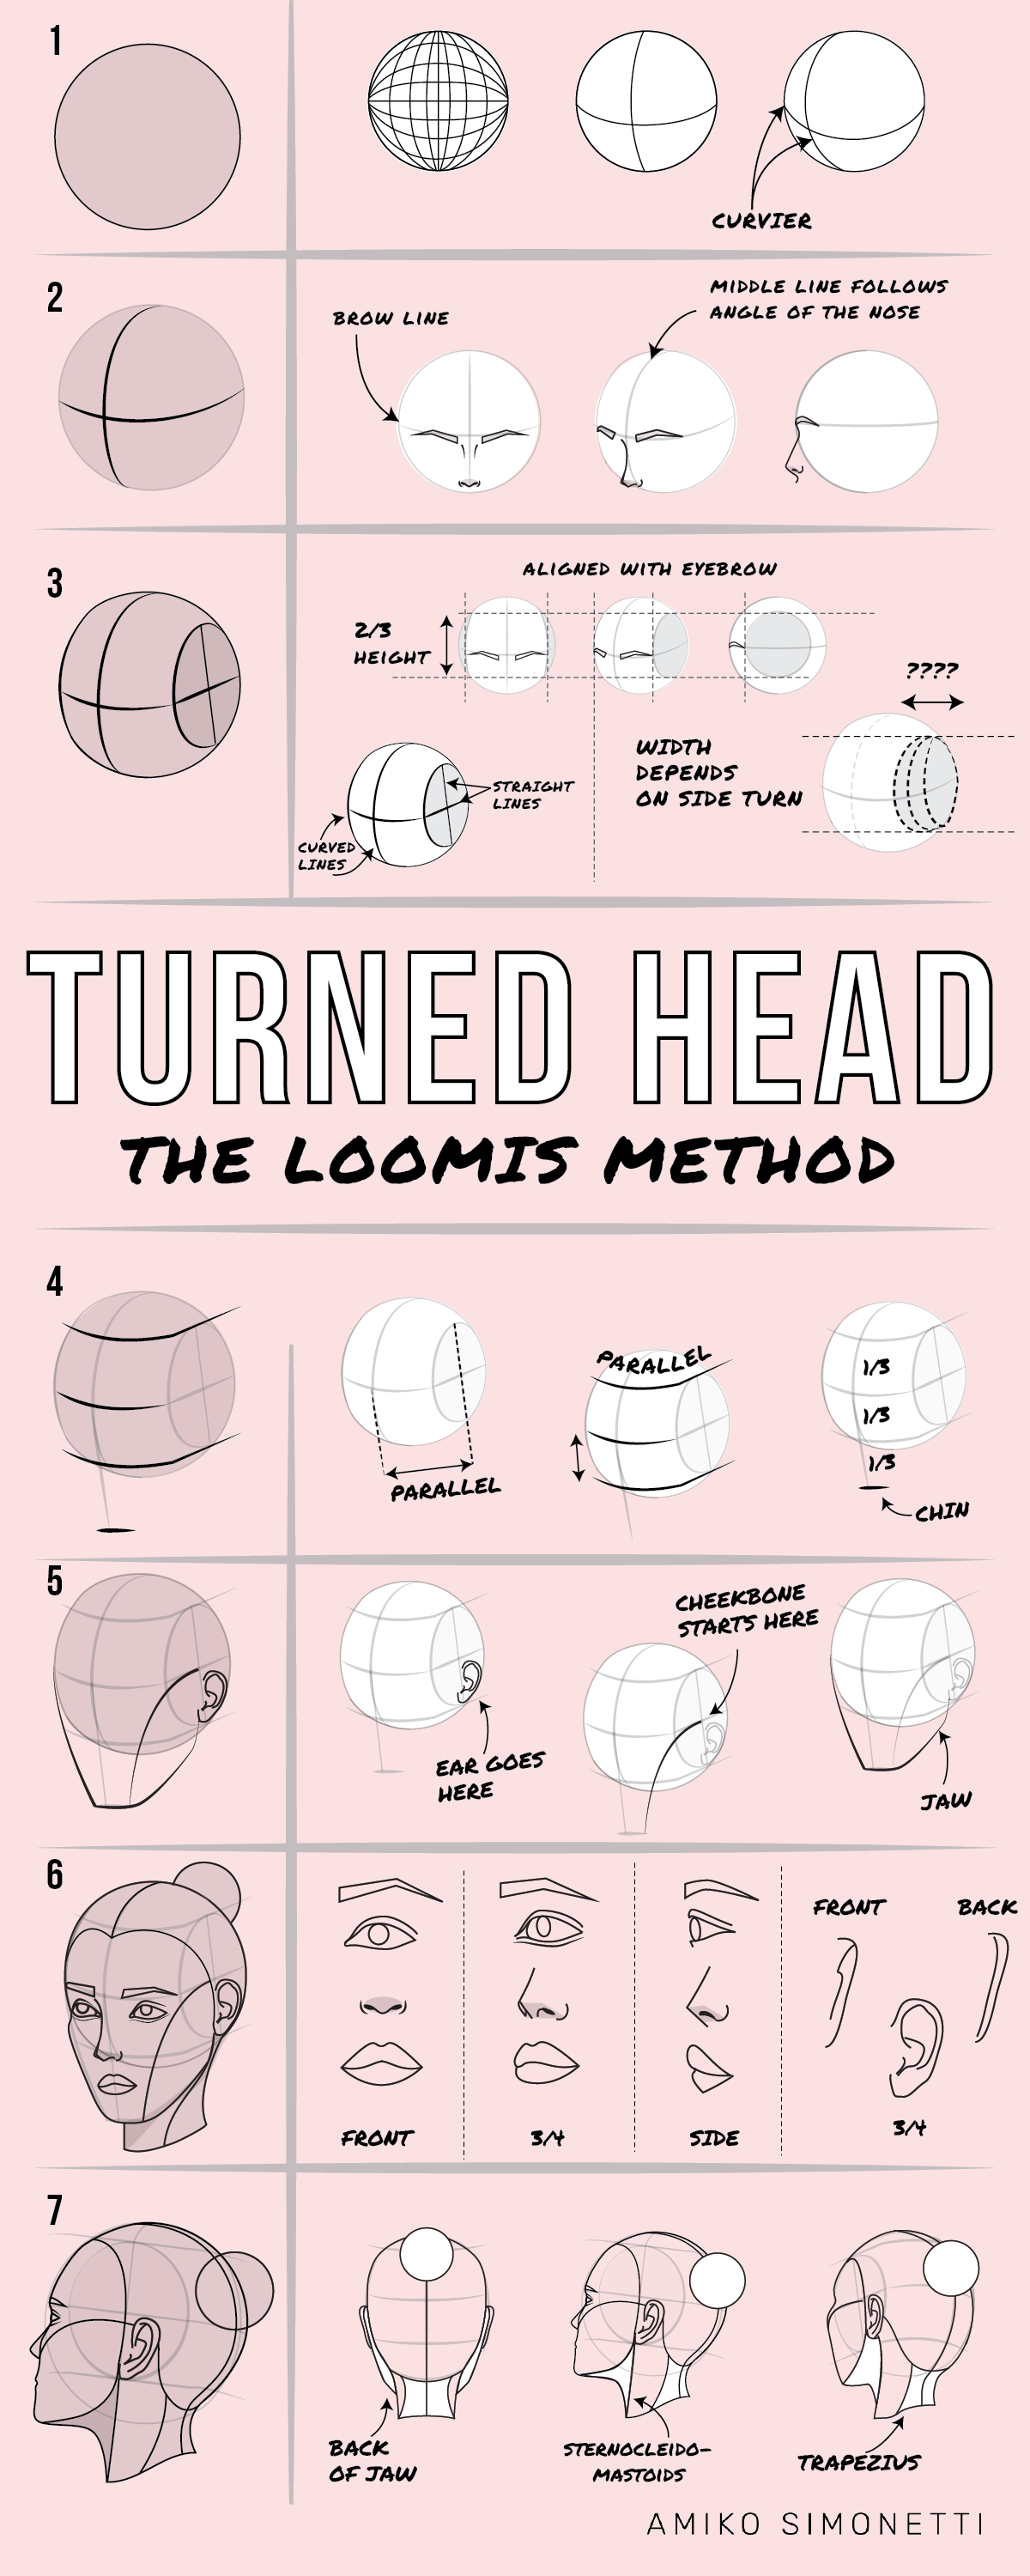
Constructing the 3D Form
Now that you understand the theory, let's focus on how to turn these 2D lines into a convincing 3D structure. The most important part of using the Loomis method effectively is to constantly think about the head as a three-dimensional object in space.
The following video does an excellent job of emphasizing this 3D thinking. It will guide you through the process of drawing the initial sphere and rotating it in your mind's eye.
Unlock Drawing Mastery: The Loomis Method for Heads + Free Worksheet
This video by Alfie Berger focuses on the fundamental 3D principles of the Loomis method. Pay close attention to how he talks about rotating the form in space and 'drawing through' the sphere.
Watch from 01:27 to 05:29. As you watch, focus on: How to draw spheres with confidence (01:27). The concept of drawing centerlines that wrap around the form to show rotation (02:26). How the ellipses are added to 'slice' the sides and define the cranium's form (04:21).
The key insight here is that the curves of your guidelines (the brow line and centerline) are what sell the illusion of three-dimensionality. If the head is looking up, the horizontal lines will curve upwards. If it's looking down, they will curve downwards.
Practice: Drawing the Loomis Head from Different Angles
It's time for the practice-heavy part you enjoy. We're going to put the theory into action by drawing several Loomis heads from different angles. For this exercise, grab your sketchbook and a pencil. Don't worry about making perfect drawings; the goal is to practice the construction process and build muscle memory.
We'll follow along with a video that demonstrates the method for 15 different angles. For today's lesson, let's focus on the first five heads, where the subject is looking straight ahead but turned at different angles (front, three-quarter, and profile).
How to Easily Draw the Head from ANY ANGLE | Understanding the Loomis Method Part III
This video by Messer Creations is a fantastic follow-along drawing exercise. The instructor draws the Loomis head in real-time from multiple angles, making it easy to see the process in action.
Please watch the segment from 01:52 to 10:54. Follow along with the instructor and draw the first five heads in your sketchbook. Don't stop and start the video too much; try to keep pace and focus on the construction steps: Draw the circle. Establish the side plane (the 'sliced' oval). Draw the vertical and horizontal axes. Mark the hairline, brow line, and nose line. Drop down to find the chin. Construct the jawline and cheek plane.
A quick tip: The instructor uses a compass to draw a perfect circle. Feel free to do the same, or you can practice drawing circles using the ghosting technique we covered in Module 1. The construction is the important part, not the perfection of the initial circle.
Feel free to continue with the "looking up" (10:54) and "looking down" (18:47) angles from the video if you have extra time or want more practice later.
Conclusion
Great work today! You've taken a massive step toward being able to draw believable heads and portraits.
Here are the key takeaways from this lesson:
- The Loomis method is a structured system for constructing the head, starting with a sphere to represent the cranium.
- The cross-contour lines (brow line and centerline) are critical for establishing the angle and tilt of the head.
- Slicing off the sides creates the temporal planes, turning a simple sphere into a more accurate head shape.
- The face is proportionally divided into three equal parts: hairline to brow, brow to nose, and nose to chin.
Keep this reference image handy. It’s a fantastic one-page summary of the entire process and a great tool for practice.

In our next lesson, we will build directly on the structures you learned to draw today. We'll learn how to apply standard facial proportions to place the guidelines for the eyes, nose, mouth, and ears, bringing your head constructions one step closer to a finished portrait.