Introduction
Hello! Over the last few lessons, we've systematically explored the artist's anatomy of the human body. We've identified key skeletal landmarks, constructed the torso from the ribcage and pelvis, and simplified the complex musculature of the arms and legs into functional, drawable forms.
Today, we bring all of that knowledge together. The goal of this lesson is to sketch a figure from reference, indicating how underlying anatomical structures create the visible bumps and curves. This is the capstone of our anatomy module. We're moving from studying parts in isolation to seeing the body as a single, integrated system where bone and muscle work together to create the form we see on the surface.
This isn't about simply copying an outline. It's about understanding why the outline looks the way it does.
The Integrated Drawing Process
When you have a toolbox full of skills—gesture, construction, anatomy, shading—the main challenge becomes knowing which tool to use and when. A successful figure drawing seamlessly blends these skills.
Let's watch a demonstration that perfectly illustrates this integrated process. The artist walks through a complete figure drawing, explaining their thought process and which "tool" they are using at each stage.
Figure drawing will make sense after this video
The video 'Figure drawing will make sense after this video' by Love Life Drawing is a masterful demonstration of how to combine different drawing skills to create a cohesive figure. It shows how to move from large, simple forms to specific anatomical details.
Watch the following key segments. Notice how the artist's knowledge of anatomy isn't just for naming parts, but for making specific drawing decisions. 00:56 - 02:17: Observe how the artist uses the sternocleidomastoid muscle and the pit of the neck (middle of the collarbones) as crucial landmarks to connect the head to the torso. This is a practical application of our landmarks lesson. 02:17 - 04:21: See how the ribcage egg and the visualization of the pelvis are used to establish the core volume and dynamism (squash and stretch) of the torso. 06:43 - 08:47: Pay close attention to how the artist uses the edge of a shadow to describe form. Critically, notice how their knowledge of anatomy (the transition from pecs to abs) informs where they draw that shadow line. 08:47 - 09:51: Here, the artist emphasizes a specific bump on the outline. They don't just copy it; they identify it as the ribcage jutting out and consciously choose to emphasize it to enhance the sense of structure and squash/stretch in the pose.
This process shows that the bumps and curves on the surface aren't random. They are the direct result of the underlying framework of bone and the fleshy masses of muscle stretched or compressed over it.
Your Analytical Toolkit
To draw like this, you first need to analyze the reference like an artist. Before you draw a single final line, you should be able to answer the "why" behind the forms you see.
Step 1: Re-establish Your Bony Landmarks
The skeleton is the scaffolding. The most prominent bony points that are close to the skin are your most reliable anchor points.
Let's do a quick review of the most important bony landmarks with this video from Proko. Having these fresh in your mind is essential for the exercise that follows.
Quickly re-watch from 01:27 - 02:03 (Front Centerline) and 02:43 - 04:05 (Front Lateral). Refresh your memory of these key points: Pit of the neck Sternum Clavicles (Collarbones) Acromion Process (point of the shoulder) ASIS (the front points of the pelvis/iliac crest)
Step 2: The Anatomical Overlay
Now, we'll use an exercise that forces you to connect the surface you see with the anatomy you've learned. It involves tracing over a reference photo to map out its underlying structure. This is a pure analysis step.
Learning the muscles for figure drawing
The article 'Learning the muscles for figure drawing' describes a powerful exercise for internalizing anatomy. We are going to perform this exact exercise.
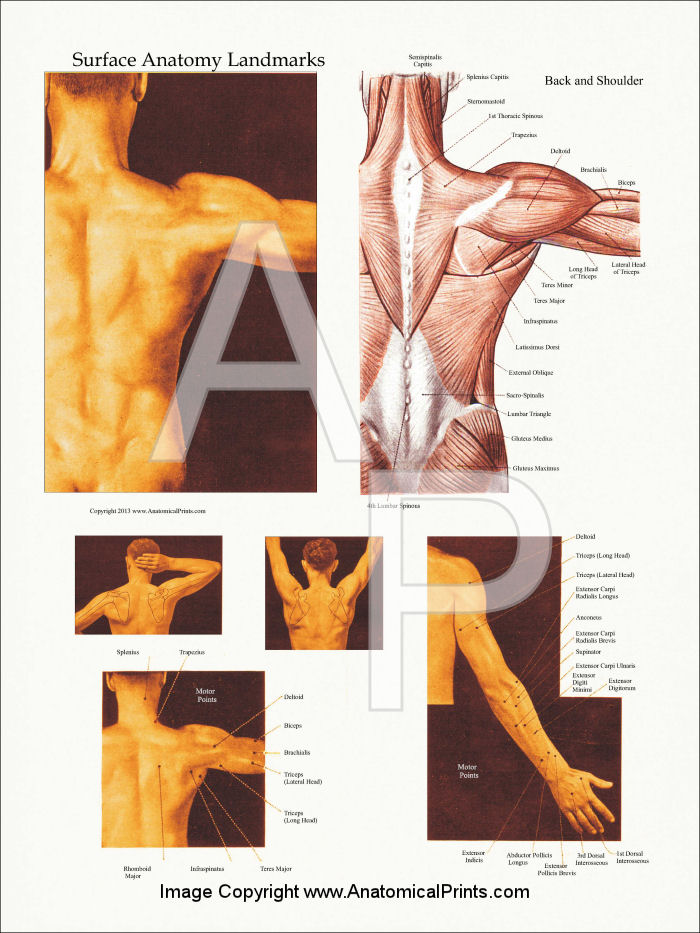
Read 'Exercise 2' in the article. This is precisely our next task. You will take a drawing or photo, place tracing paper over it (or a new digital layer), trace the contours, and then draw in the major muscles you believe are creating those contours. The list of muscles at the end of the article is a good guide for what to look for.
Practice Session (30-40 minutes)
Your goal is to create a sketch that demonstrates your understanding of the underlying anatomy. This will be a two-part process: analysis and synthesis.
Materials:
- A clear reference photo of a figure. Choose one with some visible muscle definition (e.g., a dancer, athlete, or a well-lit life model). You can find good references on sites like Pinterest or Line-of-Action.com.
- Tracing paper and a pencil, OR a digital drawing program with layers.
- Your sketchbook/drawing paper.
Part A: Anatomical Analysis (10-15 minutes)
- Print your reference photo or have it open in your software.
- Place tracing paper over it or create a new layer.
- Trace the outer contour of the figure lightly.
- Now, draw inside the contour. Using a different color can be helpful. Your goal is to map the anatomy:
- Mark the key bony landmarks you reviewed (pit of the neck, clavicles, ASIS, etc.) with dots.
- Draw the simplified forms of the ribcage (egg/barrel) and pelvis (box/pants), showing their tilt.
- Sketch in the major muscle groups that you can identify. For example, if you see a bulge on the shoulder, draw the deltoid. If you see the curve of the torso, sketch in the lats and obliques. If you see the front of the thigh, block in the teardrop shape of the quads. Refer to the muscle chart and your notes from previous lessons.
This is your "anatomical blueprint." It's not supposed to be a pretty drawing; it's a diagram of your analysis.
Part B: Synthesis Drawing (20-25 minutes)
- Put your reference and your analytical overlay to the side where you can see them.
- On a fresh sheet of paper, begin sketching the figure.
- Use your blueprint! Start by lightly placing the landmarks and major masses (ribcage/pelvis) you identified.
- As you draw the final contours, think about the "why." When you draw the side of the torso, let your line swell out where the latissimus dorsi is and tuck in at the waist. When you draw the front of the thigh, make sure your line describes the specific bulge of the vastus medialis near the knee.
- You are not just copying the reference's outline. You are rebuilding the figure from the inside out. Your lines should feel like you are tracing over the surface of the muscles themselves.
- You can add minimal shading to help show where one form turns or one muscle overlaps another, but the focus should be on a clear, structural line drawing.
Your final drawing should feel more solid and three-dimensional because you've built it on a foundation of anatomical understanding.
Conclusion
Fantastic work. Today, you bridged the gap between knowing anatomy and using anatomy. By analyzing a reference for its underlying structure and then using that analysis to guide your drawing, you've taken a significant step toward creating figures that have weight, structure, and life.
Key Takeaways:
- Figure drawing is a process of synthesis, combining skills like construction and anatomy.
- The visible bumps and curves on a figure are caused by the underlying skeleton and musculature.
- An "anatomical overlay" is a powerful tool for analyzing a reference before you begin drawing.
- The goal is to move from copying outlines to constructing form based on your anatomical knowledge.
This concludes our module on the full-body anatomy. We've built a strong foundation. In our next module, we will zoom in to tackle one of the most challenging and rewarding subjects in drawing: Head and Face Construction. We'll start with the Loomis method to construct the basic head shape from any angle.