Introduction
Welcome back! In our last lesson, we established a solid foundation by learning to construct the basic 3D form of the head from any angle using the Loomis method. You learned how to start with a sphere, slice the sides, and establish the three primary vertical divisions of the face: the hairline, brow line, and nose line.
Today, we're going to build directly upon that structure. Your goal for this lesson is to apply standard facial proportions to place the guidelines for the eyes, nose, mouth, and ears. Think of the Loomis head you can now draw as a blank 3D canvas. Today, you'll learn how to draw the "map" on that canvas that tells you exactly where each feature belongs. Mastering these proportions is the key to moving from a structural drawing to a recognizable portrait.
1. The Proportional Map of the Face
Before we start placing individual features, let's get a clear overview of the standard proportions artists use. These guidelines are not rigid laws—every face is unique—but they represent a statistical average that provides an incredibly strong starting point.
There are two main sets of divisions we use:
- Vertical Divisions (The Rule of Thirds): As we covered last lesson, the face from the hairline to the chin is divided into three roughly equal parts:
- Hairline to brow line
- Brow line to the bottom of the nose
- Bottom of the nose to the chin
- Horizontal Divisions (The Rule of Fifths): The width of the head at eye level is typically about five times the width of one eye.
These two images provide an excellent visual summary of these rules. Keep them in mind as we proceed.
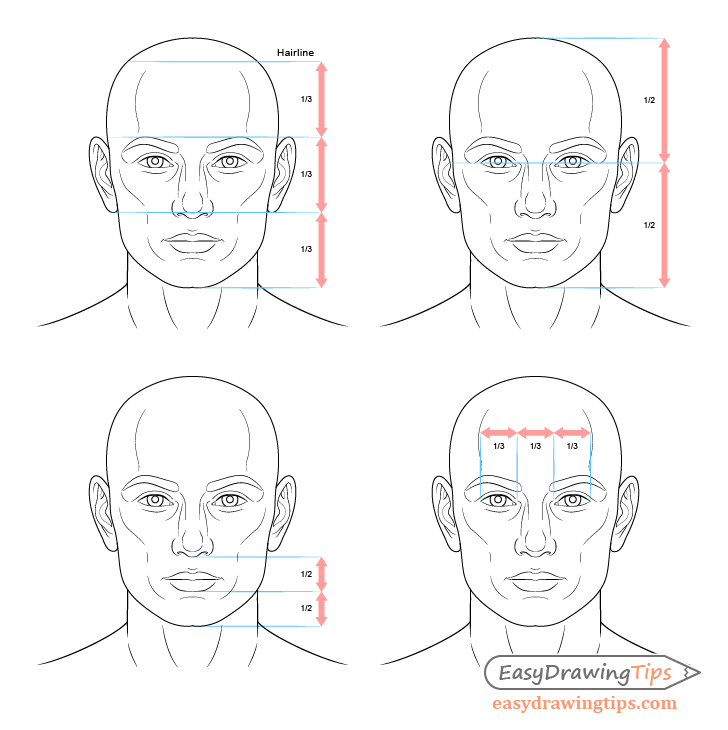

To get a more detailed breakdown of these rules, let's start with a short reading.
How to Draw a Face Step by Step – Ultimate Guide to Facial ...
This guide from 'learntodrawfaces.com' clearly explains the classic proportion guidelines for a front-view portrait. Pay close attention to the diagrams, as they provide excellent visual reinforcement of the concepts.
Please read the section titled 'Proportions – Front View'. Focus on internalizing these key placement rules: The 'Five Eyes' rule for spacing the eyes. How to use vertical lines from the eyes to place the nose and mouth. The vertical alignment of the ears with the brow and nose lines.
2. Locating the Feature Guidelines
Now that you have the theoretical map, let's watch a practical demonstration of how these guidelines are measured and drawn on a head structure. The following video breaks down the process methodically, which aligns well with the "theory first, then practice" approach you prefer.
Drawing Proportions of the Head and Face | Getting the Fundamentals Down
In this video, artist Bradwynn Jones provides a clear, real-time demonstration of finding and applying facial proportions. Notice how he constantly measures and compares sections to ensure accuracy.
Please watch the segment from 03:25 to 10:32. The video covers: (03:25 - 04:51): Establishing the vertical thirds of the face (hairline, brow, nose, chin). (04:51 - 06:46): Dividing the brow line into fifths to place the eyes. (07:21 - 10:32): Placing the ears between the brow and nose lines, and positioning the mouth between the nose and chin.
Let's quickly summarize the key placements from the video and reading:
- Eyes: The eye line is halfway between the top of the head and the chin. The width of the face is five eyes across. The space between the two eyes is one eye-width.
- Nose: The bottom of the nose rests on the line halfway between the brow and the chin. The width of the nostrils generally aligns with the inner corners of the eyes.
- Mouth: The center line of the mouth is about one-third of the way down from the bottom of the nose to the chin. The corners of the mouth typically align with the center of the pupils.
- Ears: The tops of the ears align with the brow line, and the bottoms align with the base of the nose.
3. Practice: Mapping a Loomis Head
It's time to put this into practice. For this exercise, you will combine the skills from the previous lesson with what you've just learned.
Your task:
- Lightly sketch a front-view Loomis head construction, just as you practiced in the last lesson (sphere, side planes, jaw, and center/brow lines).
- Using the proportional rules we've just covered, add the guidelines for the eyes, nose, mouth, and ears.
- Block in the simple shapes for these features on your guidelines. Don't worry about details; focus only on correct placement and size.
The following video provides a perfect demonstration to follow along with. The artist starts with a complete Loomis head and then populates it with features according to the proportional rules.
How to draw heads with Loomis Method (Tutorial) | DrawlikeaSir
This clip from the 'Draw like a Sir' channel will guide you through the process of placing features on a pre-drawn Loomis head. It's a great way to see how today's topic connects directly with the previous lesson.
Watch the demonstration of the front view, from 10:22 to 12:15. Follow along in your sketchbook, pausing as needed. Your goal is to replicate the process of mapping and placing the features onto your own Loomis head drawing.
4. Building Fluency: The Five-Minute Head Drill
To truly internalize these proportions, you need to be able to recall them without hesitation. An excellent way to do this is through quick, repetitive drills.
As the instructor in the Bradwynn Jones video suggested (resource LINK, section 4, timestamp 12:22), practicing "five-minute heads" is like a musician practicing scales. It builds muscle memory and speed.
Your Drill (Optional, but highly recommended):
- Set a timer for 5 minutes.
- On a new page in your sketchbook, draw a head from the front view, applying all the construction and proportion rules from memory.
- Don't aim for a finished piece. The goal is to quickly and accurately lay down the entire proportional structure.
- When the timer is up, stop. Repeat the exercise 3-4 times.
This practice will rapidly improve your ability to construct a well-proportioned face from imagination.
Conclusion
Excellent work today. You have now learned the complete foundational "algorithm" for constructing a human head with accurate feature placement. You started with the 3D structure and have now added the precise 2D map for all the features.
Key Takeaways:
- The head's height is bisected by the eye line.
- The face (hairline to chin) is divided into three equal vertical sections by the brow line and nose line.
- The head's width at the eyes is five eye-widths across.
- The nose width aligns with the inner corners of the eyes.
- The mouth corners align roughly with the pupils.
- The ears are framed between the brow line and the nose line.
Remember, these rules are your starting point. As you become more comfortable with them, you'll learn to see how individual faces deviate from this "ideal" model, which is the secret to capturing a person's unique likeness.
In our next lesson, we will begin to zoom in. Now that you know where the eye goes, you'll learn how to draw the eye as a three-dimensional sphere within its socket.