Hello! Welcome back.
Introduction
In the previous lessons, you've built a solid foundation in perspective, learning to construct everything from simple boxes to complex curved forms like cylinders and cones. You now have the tools to create the illusion of three-dimensional space.
However, just as in software development, building something is only half the battle. The other half is debugging—finding and fixing the inevitable errors. In drawing, even small perspective mistakes can make a scene feel "off" or unnatural.
Today's lesson is all about debugging your drawings. The goal is to detect and correct common perspective errors in your own work. We'll move from being the creator to being the critic. You'll learn to spot common pitfalls and, more importantly, develop a systematic method for verifying the accuracy of your forms. This skill is what will allow you to learn from every drawing you make and continually refine your work.
1. Training Your Eye: A Perspective Challenge
The first step in correcting errors is learning to see them. Let's start with an interactive challenge. The video below presents a drawing containing six common perspective mistakes.
Can You Find the 6 Perspective Errors in this Drawing?
The creator of this video, Stephen Travers, challenges you to find six perspective errors in a scene he has drawn. This is a great exercise to start training your eye.
First, watch only the introduction from 00:00 to 00:59. When he tells you to pause, do it! Take a few minutes to look at the drawing and see how many errors you can spot on your own. You can even sketch over a screenshot if it helps. Once you've found as many as you can, continue watching the rest of the video as he explains each mistake in detail.
How did you do? The errors he points out are extremely common, even for experienced artists. Let's quickly summarize them, as they form a great initial checklist:
- Wrong Perspective Type: The scene was head-on, implying one-point perspective, but was drawn using two-point perspective rules, creating a visual contradiction.
- Inconsistent Eye Level: Different parts of the scene were drawn as if viewed from different heights, breaking the coherence of the world.
- Multiple Vanishing Points: Elements that should have been parallel (like the lampposts and the building) were drawn converging to different vanishing points.
- "Flattening" Angles: Lines on the upper parts of the building failed to converge as steeply as those on the lower parts, losing the dramatic effect of perspective.
- No Foreshortening: Objects receding into the distance (like the windows) were not compressed, making the wall look flat.
- Incorrect Figure Scale: The size and placement of people did not correctly align with the established eye level and perspective, making them look too big or too small.
Keep this list in mind. When you finish a drawing, running through these six points is an excellent first pass for catching major issues.
2. A Systematic Checklist for Common Errors
The video gave us a practical look at errors in a complex scene. Now, let's generalize this into a more structured checklist you can apply to any drawing.
A webpage from Artistic Designers provides a great, concise summary of the most frequent mistakes. While we won't cover all of them in detail, let's focus on the absolute fundamentals.
Foundation Errors
These are mistakes related to the basic setup of your perspective grid. Getting these wrong will undermine the entire drawing.
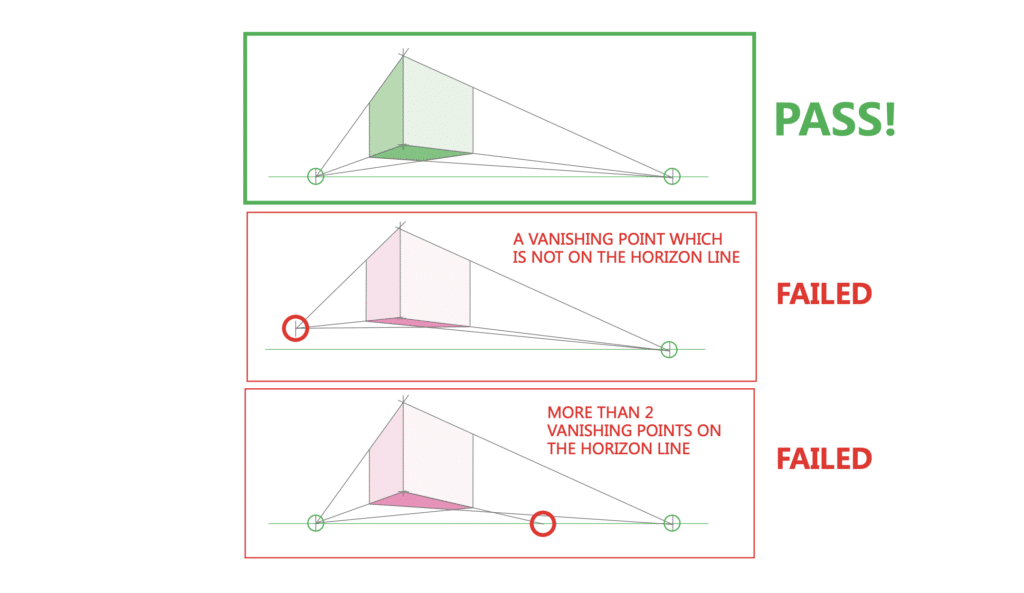
- Ignoring the Horizon Line: The horizon line (your eye level) is the anchor for your entire scene. All vanishing points for horizontal parallel lines must live on it.
- Misaligned Vanishing Points: All parallel lines receding in the same direction must converge to the same vanishing point. It's easy to accidentally create multiple, slightly-off VPs, which fragments the drawing.
These two images clearly illustrate what happens when these foundational rules are broken.

Form and Scale Errors
These mistakes relate to how you depict the size and shape of objects within your perspective system.
- Inconsistent Scale: An object should appear smaller as it moves further away. Drawing a distant object too large, or a foreground object too small, breaks the illusion of depth.
- Forgetting Foreshortening: As we saw in the video, parts of an object that recede from the viewer must appear compressed or shorter. Drawing them at their "true" length makes them look flat and distorted.
- Drawing Symbols: This is a classic beginner trap. Instead of drawing a window as a plane that exists in perspective, you draw the symbol of a window (a flat rectangle). You must "think in 3D" and draw the form, not the symbol.
For a complete overview and other useful points (like using atmospheric perspective and avoiding mechanical lines), take a look at the following resource.
9 Common Mistakes in Perspective (and How to Fix Them)
This article, "9 Common Mistakes in Perspective (and How to Fix Them)," provides a clear and comprehensive list that serves as an excellent reference guide.
Read through the full list of 9 mistakes. You don't need to memorize them all right now, but familiarize yourself with the concepts. Think of this as a reference you can return to when you feel a drawing isn't working.
3. A Geometric "Proof" for Correcting Forms
So, you've identified that a box in your drawing looks "off." How can you be sure? And how do you fix it?
Here is a powerful, almost mathematical technique for verifying the perspective of any square plane, which is the basis for cubes and many other objects. Since you have a background in CSE, you might appreciate this logical, almost algorithmic approach to "debugging" a shape.
The core idea is this:
- A perfect circle inscribed in a perfect square will touch the exact midpoint of all four sides.
- This geometric truth remains constant even when the square is viewed in perspective.
- Therefore, a correctly drawn ellipse inside a correctly drawn perspective square must touch the perspective midpoints of the sides.
If it doesn't, your perspective square is distorted.
The following resource explains this method step-by-step. It's a bit dense, but the core principle is a game-changer for achieving accuracy.
How to Spot Mistakes in Perspective Drawing
The article "How to Spot Mistakes in Perspective Drawing" from Life Drawing Academy details a brilliant method for using inscribed ovals to check the perspective of a cube's faces.
This is a detailed guide, so focus on understanding the core concept. Start by reading the section "Square & Circles" to grasp the basic geometry. Then, jump to the summary section starting with "Let's summarise the points we've learned so far:". Finally, read the sections "Oval Rules" and "How to Spot Mistakes in Linear Perspective Drawing" to see how the method is applied. The key takeaway is the rule in bold: if the inscribed oval doesn't touch the midpoints of the edges, the perspective is wrong.
This method gives you an objective tool. Instead of just relying on "it feels wrong," you can now prove it geometrically and see exactly which lines need to be adjusted.
4. Practice Drill: Debug Your Drawing (15-20 minutes)
It's time to put these new critical skills to the test.
-
Draw a simple scene from imagination. On a sheet of paper, sketch a room in two-point perspective. Include at least:
- A rectangular table or desk.
- A box (like a shoebox or book) sitting on the table.
- A cylinder (like a can or a lamp base).
- Use light construction lines. Don't worry about making it perfect on the first try.
-
Become the debugger. Switch to a different colored pencil (if you have one) or use lighter lines to analyze your own work.
- Check the Foundations: Draw your horizon line across the page. Extend the receding lines of your table and box. Do they all meet at two consistent vanishing points on the horizon line? Adjust them if they don't.
- Verify a Form: Choose the box you drew. Find the perspective center of its top face by drawing an 'X' from corner to corner. Lightly sketch an inscribed ellipse. Does the ellipse look symmetrical and touch the midpoints of the perspective plane? (Remember, you can find the midpoints by drawing lines through the center parallel to the sides). If it looks pinched or doesn't touch the sides correctly, your box's proportions are off.
- Self-Critique and Correct: Based on your analysis, identify the biggest error in your drawing. On the same page or a new one, redraw the object or the entire scene, correcting the mistake.
This exercise isn't about producing a beautiful drawing; it's about practicing the analytical process of finding and fixing errors.
Conclusion
Fantastic work today. Learning to critique your own drawings is arguably more important than learning the initial construction rules. It's the engine for all future progress.
Key Takeaways:
- You can use a mental checklist to spot common perspective errors like inconsistent eye levels, misaligned vanishing points, and incorrect scaling.
- When a form looks "off," it's often because you've drawn its symbol instead of its 3D structure in space.
- The inscribed ellipse method is a powerful analytical tool to verify if a square plane (and by extension, a cube) is drawn in correct perspective.
- The process of drawing, analyzing, and correcting is a fundamental feedback loop for improvement.
This lesson concludes our module on perspective. You now have a robust toolkit for creating and correcting believable spaces and objects. In our next lesson, we will begin a new module, "Measuring and Proportions," where we'll shift our focus from creating imaginary spaces to accurately representing the objects we see in the world around us.