Hello! Welcome back to our course on sketching.
Introduction
In our last lesson, you mastered the construction of boxes and simple scenes in two-point perspective. This was a crucial step, giving you a powerful tool to create the illusion of depth for rectilinear (straight-edged) objects. We ended by asking: how do we apply these rigid perspective rules to curved objects?
Today, we'll answer that question. Our goal is to apply perspective principles to draw curved forms like cylinders and cones accurately. You'll discover that the boxes you practiced drawing are the perfect scaffolding for constructing these more organic shapes. The key is understanding how a circle appears when viewed in perspective—a shape called an ellipse. By the end of this lesson, you'll be able to confidently draw convincing cylinders and cones from any angle.
1. The Ellipse: A Circle in Perspective
Everything from a can of soda to a car tire to the top of a coffee mug can be understood as a circle viewed in perspective. This foreshortened circle is not just any oval; it's a specific, symmetrical shape called an ellipse. Getting this shape right is the secret to drawing believable curved objects.
An ellipse has two important axes:
- The major axis is the longest diameter across the ellipse.
- The minor axis is the shortest diameter, and it's always perpendicular to the major axis.
In perspective drawing, the minor axis is our most important guide. It always represents the axis or axle of the circular plane. For a cylinder standing upright, the minor axes of its top and bottom ellipses would be vertical. For a cylinder lying on its side and receding from us, the minor axes would point directly to the vanishing point.
Let's watch a video that explains these concepts clearly.
How to Draw Cylinders and Ellipses
In this clip from his channel Proko, artist Stan Prokopenko provides an excellent explanation of what an ellipse is and how its properties are crucial for drawing in perspective.
Watch from 00:15 to 02:51. Focus on the difference between a generic oval and a true ellipse, and the definition of the major and minor axes. Pay special attention to his explanation of how the minor axis behaves when the circle is tilted in perspective – this is a key concept for the rest of the lesson.
To recap the video's main point for our purposes: The minor axis of an ellipse always passes through the true center of the circle in 3D space and remains perpendicular to the plane of that circle.
2. Constructing a Cylinder
A cylinder is essentially a stack of ellipses. To draw one accurately, we can use the box-drawing skills you developed in the last lesson. The process involves drawing a rectangular box (a cuboid) in perspective and then inscribing ellipses on two opposite faces.
This image provides a great overview of the entire process.
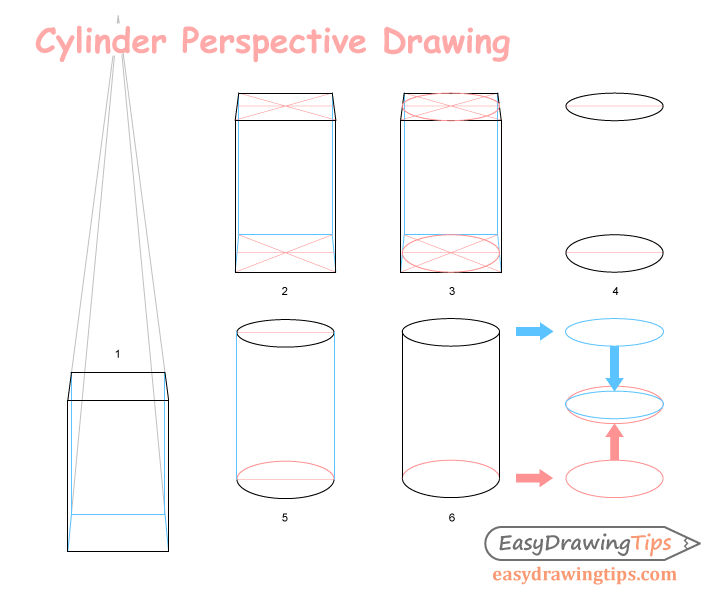
Now, let's watch a detailed demonstration of this construction method.
How to Draw Cylinders and Ellipses
We'll return to the Proko video to see how to fit a cylinder perfectly inside a box drawn in perspective. This connects directly to what you learned in the previous lesson.
Watch from 03:35 to 13:44. Observe how he uses the 'X' method to find the center and midpoints of the perspective square. This structure is the key to drawing a correctly proportioned and oriented ellipse. Also, notice his point that the ellipse farther away appears wider (less compressed). This is a critical perspective effect.
Practice Drill 1: Cylinder in a Box (15 minutes)
Time to put this into practice. Grab your pencil and paper.
- Start by drawing a rectangular box in two-point perspective, placing it below your horizon line so you can see its top surface.
- On the top face of the box, draw an 'X' from corner to corner to find the exact center.
- Draw lines through this center point that are parallel to the sides of the box. This will give you the midpoints of all four sides.
- Now, sketch an ellipse inside this top face. It should be tangent to (just touching) the four midpoints you found. Use smooth, confident strokes. Remember the ghosting technique from our first lessons.
- Repeat the process for the bottom face of the box. You'll need to "draw through" the form to construct the full ellipse on the bottom.
- Finally, connect the widest points of the top and bottom ellipses with straight vertical lines to form the sides of the cylinder.
- Go over the visible lines of your cylinder to make them stand out.
3. Constructing a Cone
A cone follows a very similar logic. It's essentially a cylinder that tapers to a single point, the apex. The construction process starts the same way: by creating an accurate elliptical base.
The steps are:
- Draw a square plane in perspective.
- Inscribe the base ellipse within this plane.
- Find the center of the plane using the 'X' method.
- From the center, draw a line perpendicular to the plane to define the cone's axis and height. The end of this line is the apex.
- Draw two straight lines from the apex down to the outer edges of the base ellipse.
Let's see this in action.
How to draw CONES in PERSPECTIVE [ BEGINNER TUTORIAL]
Constructing a cone uses the same starting point as a cylinder. This tutorial demonstrates the process clearly.
Watch from 00:44 to 03:38. Observe how the artist first establishes a base plane in perspective, draws the ellipse within it, and then projects a central axis upwards to define the apex. The final step is to connect the apex to the edges of the ellipse.
Practice Drill 2: A Basic Cone (10 minutes)
Let's apply this method.
- On a new sheet, draw a square plane in perspective, as if it's lying on the ground.
- Inscribe an ellipse within it to serve as the cone's base.
- Use the 'X' method to find the center.
- Draw a vertical line straight up from the center to your desired height. This point is the apex.
- Draw two straight lines from the apex down to the left and rightmost points of the ellipse. These are the sides of your cone.
As you become more familiar with these forms, you'll be able to sketch them more intuitively, without needing to construct a full box every time.

Conclusion
Excellent work today! You've tackled a concept that can be tricky for many aspiring artists. By leveraging your knowledge of perspective and box construction, you've unlocked the ability to draw two of the most fundamental curved forms: cylinders and cones.
Key Takeaways:
- A circle viewed in perspective becomes an ellipse.
- The minor axis of an ellipse is the key to orienting it correctly in 3D space.
- The box construction method is a reliable way to draw accurate cylinders. You create a box in perspective and inscribe ellipses on opposite faces.
- A cone is constructed similarly, with a base ellipse and straight sides that converge to a single apex.
So far in this module, you've learned to establish a perspective system and construct both straight and curved objects within it. But how do you ensure these objects are the right size and in the right place relative to each other? In our next lesson, we'll begin a new module, "Measuring and Proportions," where you'll learn techniques to draw what you see with greater accuracy.