Introduction
Hello! In our last lesson, we concluded our module on perspective by learning how to act as our own "debugger," systematically finding and correcting errors in our drawings. That skill was about ensuring the internal consistency of forms we create from imagination.
Today, we shift our focus from the invented to the observed. You've mentioned that you often draw from references, and this module is designed to give you a powerful and systematic way to do so accurately. We begin with the most fundamental skill of observational drawing: learning to see proportions correctly.
The goal for this lesson is to learn how to use comparative measurement to accurately judge the relative sizes of objects and their parts. Instead of relying on guesswork, you'll learn a technique that artists have used for centuries to achieve likeness and realism in their work. This is the "why" and "how" behind drawing what you see, accurately.
1. Two Ways to See: Sight-Size vs. Comparative Measurement
When drawing from life or a reference, artists primarily use two methods to get proportions right: Sight-Size and Comparative Measurement.
- Sight-Size: This is a very rigid method where you set up your easel and subject so that your drawing is created at the exact same size as you see the subject. It's a 1:1 transfer. Think of it like tracing the air.
- Comparative Measurement: This is a far more flexible and common technique. Instead of matching the absolute size, you measure the relative size of one part of your subject against another. This creates a system of ratios that you can then scale to fit any size of paper.
Given your background in computer science, you can think of it like this: Sight-Size is akin to an absolute file path. It's precise but only works under one specific setup. Comparative measurement is like a relative file path; it describes the relationships within the subject, making it portable and scalable to any context (i.e., any drawing size).
For the rest of this course, we will focus exclusively on comparative measurement.
To solidify this distinction, let's read a quick definition of these two methods.
Read the introductory paragraphs and the short sections defining "Sight Size" and "Comparative Measurement." Focus on understanding the core difference: one is about drawing 1:1, and the other is about drawing in scale using ratios.
2. The Core Concept: Finding Your Unit of Measure
Comparative measurement works by establishing a basic unit of measure. You choose one convenient dimension on your subject—like the width of a bottle, the height of a head, or the length of a finger—and use that single unit as your ruler for everything else.
By asking "How many 'head heights' tall is this figure?" or "How many 'bottle widths' make up its height?", you take the guesswork out of drawing.
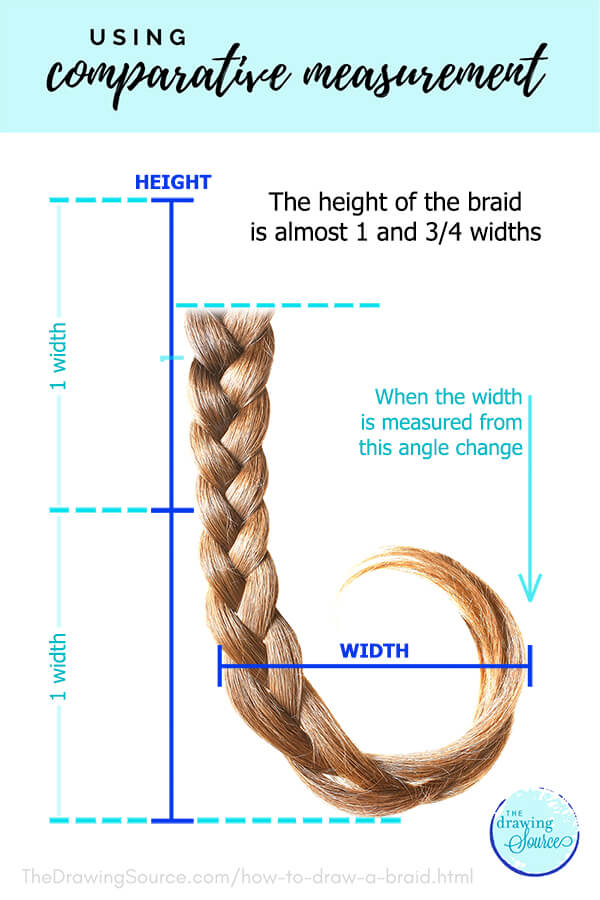
Getting this right is crucial for avoiding a common beginner mistake: "tunnel vision," where you focus on one small part at a time, causing the proportions of your drawing to slowly drift and become distorted. Establishing the big relationships first provides a solid foundation.
The following video from Proko explains the importance of measuring and how establishing these large relationships first prevents common errors.
Watch the sections from 00:00 - 01:23 and 02:29 - 04:38. Pay close attention to his explanation of why measuring is exclusive to observational drawing and how establishing the overall proportions first helps prevent your drawing from growing or shrinking as you work down the page.
3. The Technique: Using Your Pencil as a Measuring Tool
Now that you understand the "why," let's get into the "how." Your pencil is the only tool you need. The technique requires a specific, consistent posture to ensure your measurements are reliable.
Here is the process:
- Sit or stand at a comfortable distance from your subject.
- Hold your pencil at its end and extend your arm straight out towards the subject, locking your elbow. Your arm must remain straight for every measurement.
- Close one eye. This flattens the image and removes depth perception, making it easier to measure on a 2D plane.
- Align the tip of your pencil with one end of your chosen unit of measure.
- Slide your thumb along the pencil until it aligns with the other end of the unit. You have now "captured" the measurement on your pencil.

With this unit captured, you can now pivot your arm (keeping it straight!) to compare this length to other parts of the subject, counting how many units fit into other dimensions.
Let's watch a demonstration of this physical process.
This video from Drawing Art Academy provides a very clear, step-by-step demonstration of the measuring process.
Watch the sections from 00:29 - 01:10 and 02:42 - 04:04. Focus on the physical actions: the straight arm, closing one eye, and using the thumb to mark and compare dimensions.
A Crucial Warning
One of the most common mistakes is to take the measurement from the subject and try to use that exact length on your paper. This will not work, unless you are using the Sight-Size method.
Remember, you are capturing information (a ratio), not a literal length. You first decide how big you want your drawing to be on the page (e.g., you decide the height of the bottle). Then, you use the ratio you found (e.g., "the height is 3 and 3/4 times the width") to calculate how wide to draw it.
Fundamentals of Drawing: Measuring and Proportion
The following guide gives an excellent step-by-step breakdown using a wine bottle as an example and specifically highlights this common mistake.
Read the sections titled "Measuring" (steps 1-7) and the important note that follows (step 8). The images labeled 'A' and 'B' clearly show the mistake of transferring the measurement directly to the paper. This is a critical point to understand.
4. Practice Drill: Just Measure (15-20 minutes)
For this lesson, we will isolate the skill of judging proportions. You won't be drawing at all. You are just going to practice seeing and measuring relationships in the world around you.
- Find three simple, everyday objects nearby (e.g., a coffee mug, a book, a computer mouse, a stapler).
- Choose your first object. Sit back, extend your arm, and get into the measuring posture.
- Select a unit of measure for that object. For the mug, the width is a good choice. For the book, the shorter side might be best.
- Using your pencil and thumb, capture that unit.
- Now, answer the question: How many times does your unit fit into the object's other dimensions?
- Example for a mug: "The height of the mug is about 1.5 times its width."
- Example for a book: "The long side of the book is about 1.25 times its short side."
- Verbally state or jot down the relationship you find.
- Now, use that same unit to measure one of the other objects.
- Example: "My monitor is about 4 'mug widths' tall."
- Repeat this process with all three objects, trying out different units of measure. The goal is to get comfortable with the physical act of measuring and the mental act of seeing the world in terms of ratios.
This exercise directly trains your eye and builds the muscle memory for the technique without the pressure of making a drawing.
Conclusion
Excellent work today. You've just learned the theoretical and practical foundation for all accurate observational drawing. This isn't just a "trick"; it's a new way of seeing.
Key Takeaways:
- Comparative measurement is a flexible system for capturing the proportional relationships within a subject.
- The process involves selecting a basic unit of measure and using it as a ruler for all other parts of the subject.
- Accurate measurement requires a consistent physical technique: arm locked straight, one eye closed, and using your thumb to mark units on your pencil.
- You are measuring ratios (information), not absolute lengths to be transferred directly to your drawing.
In this lesson, we focused on how to judge these proportional relationships. In our next lesson, we will put this skill into action. You'll learn how to apply the unit-measuring technique with a pencil to transfer proportions from a reference and create an accurate foundational drawing.