Introduction
Hello! In our last lesson, we focused on the physical act of judging proportions, learning how to use your pencil as a tool to see the world in terms of ratios. You practiced capturing a "unit of measure" from an object and comparing it to other dimensions.
Today, we take the crucial next step: applying that information to paper. This lesson is all about bridging the gap between observation and creation. You will learn how to apply the unit-measuring technique with a pencil to transfer proportions from a reference, ensuring your drawing's foundation is accurate from the very start. This skill is the engine that drives realistic observational drawing.
1. Recap: The Sighting Technique
Before we transfer measurements, let's quickly review the correct posture and technique for taking them. Consistency here is non-negotiable for accurate results.
- Hold your pencil and extend your arm straight out, locking your elbow.
- Close one eye to flatten the scene into a 2D image.
- Align the tip of the pencil with one end of your chosen unit and slide your thumb to mark the other end.
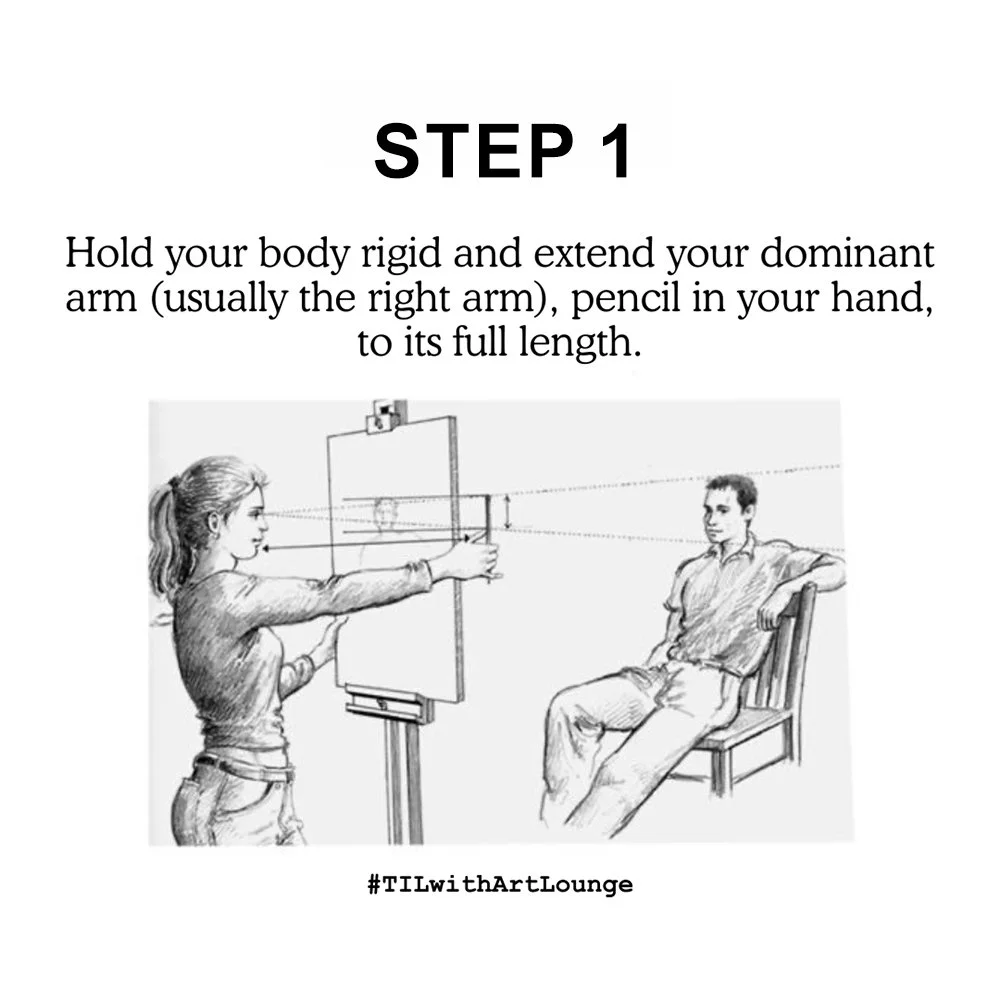
Now, let's see how we use the measurement you've just captured.
2. From Measurement to Mark-Making
Once you have a proportional relationship (e.g., "the height of this bottle is three times its width"), how do you translate that to your sketchbook? You are not transferring the literal length on your pencil. Instead, you are transferring the ratio.
There are two effective methods to do this:
- Gesture then Correct: You start with a quick, loose sketch to capture the feel of the object, then use your measurements to refine and correct its proportions.
- Map then Draw: You begin by establishing the overall size of your drawing on the paper, then use your measured ratios to systematically plot key landmarks before you start drawing the details.
Let's explore both.
Method 1: Gesture then Correct
This method is dynamic and feels very intuitive. It's great for subjects with a lot of life and energy. The process is:
- Draw a light, quick gestural sketch of your subject. Don't worry about accuracy yet.
- Use your pencil to measure the key proportions of the real subject (e.g., width vs. height).
- Now, measure your own gestural drawing with your pencil in the same way.
- Compare the ratio of your drawing to the ratio of the subject. If your drawing's height is only 1.5x its width, but the subject is 2x, you know you need to make your drawing taller or narrower.
- Adjust your initial lines to match the correct proportions.
This video from Drawsh Studio provides a perfect demonstration of the 'Gesture then Correct' method. Watch how the artist measures a pear and then uses that information to fix their initial drawing.
Please watch from 01:38 to 03:05. Observe the clear, two-part process: first, measuring the real object to get the ratio, and second, applying that ratio to correct the drawing on the paper.
Method 2: Map then Draw
This approach is more systematic and is excellent for ensuring your drawing fits perfectly on the page and has a solid structural foundation. It's a bit like allocating memory for an application before running it; you define the boundaries and structure first.
The process is:
- Decide the overall size and placement of your subject on the paper. Make a light mark for the very top and very bottom.
- Use your pencil to measure your reference subject and find a key ratio (e.g., "the figure is 7.5 heads tall").
- Take the total height you marked on your paper and divide it into that many units (in this case, 7.5). These tick marks become your guide.
- You now have a correctly scaled grid on which to build your drawing, ensuring all parts relate correctly to the whole.
The channel Proko has an excellent video explaining this systematic 'Map then Draw' approach. It's a powerful way to avoid the common beginner mistake of having your drawing slowly grow or shrink as you work.
Watch the segment from 03:02 to 05:15. Focus on the concept of establishing the drawing's total height on the paper first, and then subdividing that space according to the measured units.
To reinforce this, a text-based guide can be helpful. The following article illustrates the exact same process with clear diagrams.
Lesson 4: How to Draw with Accurate Proportions
This article from RapidFireArt breaks down the 'Map then Draw' method into simple, illustrated steps. It's a great static reference for the process you just saw in the video.
Please read the section titled 'How to Transfer that Information to Your Sketchbook'. The images showing the vertical line being divided into eight equal 'head' units is precisely the technique we're focusing on.
3. Practice Drill: Drawing a Simple Still Life (25 minutes)
Now it's time to put this into practice.
Your Task:
Create a simple line drawing of one or two everyday objects from observation. Focus purely on getting the proportions correct using the unit-measuring technique.
Setup:
- Choose one or two simple objects (e.g., a mug and a spoon, a book and a pair of glasses, a bottle).
- Arrange them in front of you. You can also work from a clear photograph on your screen if that's more convenient.
- Have your sketchbook and a pencil (a 2H or HB is good for light construction lines) ready.
Execution Steps:
- Choose Your Method: For this exercise, I recommend you try the "Map then Draw" method as it is more deliberate and reinforces the concept of transferring ratios.
- Measure Your Reference:
- Look at your still life and pick one object to be your primary reference.
- Choose a basic unit of measure on that object (e.g., the width of the mug).
- Measure the object's other dimensions in terms of that unit. (e.g., "The mug is 1.5 units tall").
- If you have a second object, measure its dimensions using the same initial unit. (e.g., "The spoon is 2.5 mug-widths long").
- Transfer to Paper:
- Decide how large you want your main object to be on the page. Make light marks for its overall height.
- Based on the ratio you found (height is 1.5x width), calculate and mark the width on your paper. You now have a bounding box for your first object.
- Sketch the object lightly within this box.
- Add the Second Object (if applicable):
- Use the proportional relationships you found in step 2 to place and scale the second object relative to the first.
- Refine: Once the proportions are blocked in, you can refine the contour lines of your drawing.
4. Self-Critique: Debugging Your Drawing
Given your background in CSE, you might appreciate a more data-driven way to check your work. If you worked from a photo, you can create a powerful feedback loop.
How to Draw Accurate Proportions - Proko
Proko describes a brilliant method for self-critique using digital tools. This is essentially a way to 'unit test' the accuracy of your drawing against the reference.
Read the section titled 'Self Critique for a Rapid Feedback Loop'. The core idea is to take a photo of your drawing and overlay it with transparency on top of the original reference photo in an image editor. This will instantly reveal any proportional inaccuracies.
This step is optional, but I highly recommend trying it. It's one of the fastest ways to train your eye to spot errors and will accelerate your progress significantly.
Conclusion
Great work today. You've moved from simply seeing proportions to actively using them to construct a drawing. This is a foundational skill that separates tentative sketching from confident, accurate drawing.
Key Takeaways:
- You transfer proportions by applying a measured ratio, not a literal length.
- The "Gesture then Correct" method is dynamic and useful for refining a loose sketch.
- The "Map then Draw" method is systematic, ensuring your drawing fits the page and has a solid proportional structure from the start.
- Using a consistent unit of measure across all objects in a scene ensures they relate to each other correctly in scale.
In our next lesson, we will add more tools to our accuracy toolkit. We'll move beyond simple unit measuring and learn to use alignment lines and negative space to verify the placement and relationship of elements, giving you another layer of cross-checks to make your drawings even more precise.