Introduction
Hello again! In our last lesson, we focused on converting your observations into accurate ratios using the unit-measuring technique and transferring those ratios onto your paper. This gave you a systematic way to build the foundational structure of your drawings.
Today, we're going to add two powerful "verification" tools to your process. Think of the last lesson as writing the initial code for your drawing's structure; this lesson is about writing the unit tests to debug and confirm that structure. We will focus on how to use alignment lines and negative space to verify the placement and relationship of elements. These techniques will act as a "lie detector" for your eyes, helping you catch and correct subtle errors that your brain might otherwise overlook.
1. Alignment Lines: Your Built-in Ruler
The first tool is the use of alignment lines, which are simply perfectly vertical and horizontal guides. They help answer two critical questions:
- "Is point A directly above or below point B?" (a plumb line)
- "Is point C at the same height as point D?" (a level line)
Because our minds are very good at judging true vertical and horizontal, these checks are often more reliable than trying to eyeball complex angles.
Let's start with a clear, text-based explanation of how to use them.
Measurement and Proportion Techniques - Cursa
This article from Cursa provides a clear, practical guide to using alignment lines to prevent common drawing errors, like 'wobbly furniture syndrome.'
Please read the section titled 'Technique 4: Plumb Lines and Level Lines (Alignment)'. Pay close attention to the step-by-step instructions for using both vertical (plumb) and horizontal (level) lines.
Now, let's see this technique in a dynamic demonstration.
In this clip, Proko demonstrates how to use plumb lines to find alignments in a figure drawing. Watch how he relates different parts of the body to one another along a single vertical axis.
Watch from 07:22 to 08:32. Notice how he checks for both vertical and horizontal alignments to confirm the position of different body parts. This is a quick way to ensure the overall pose is balanced and correctly proportioned.
To solidify the concept, here is a static visual example.
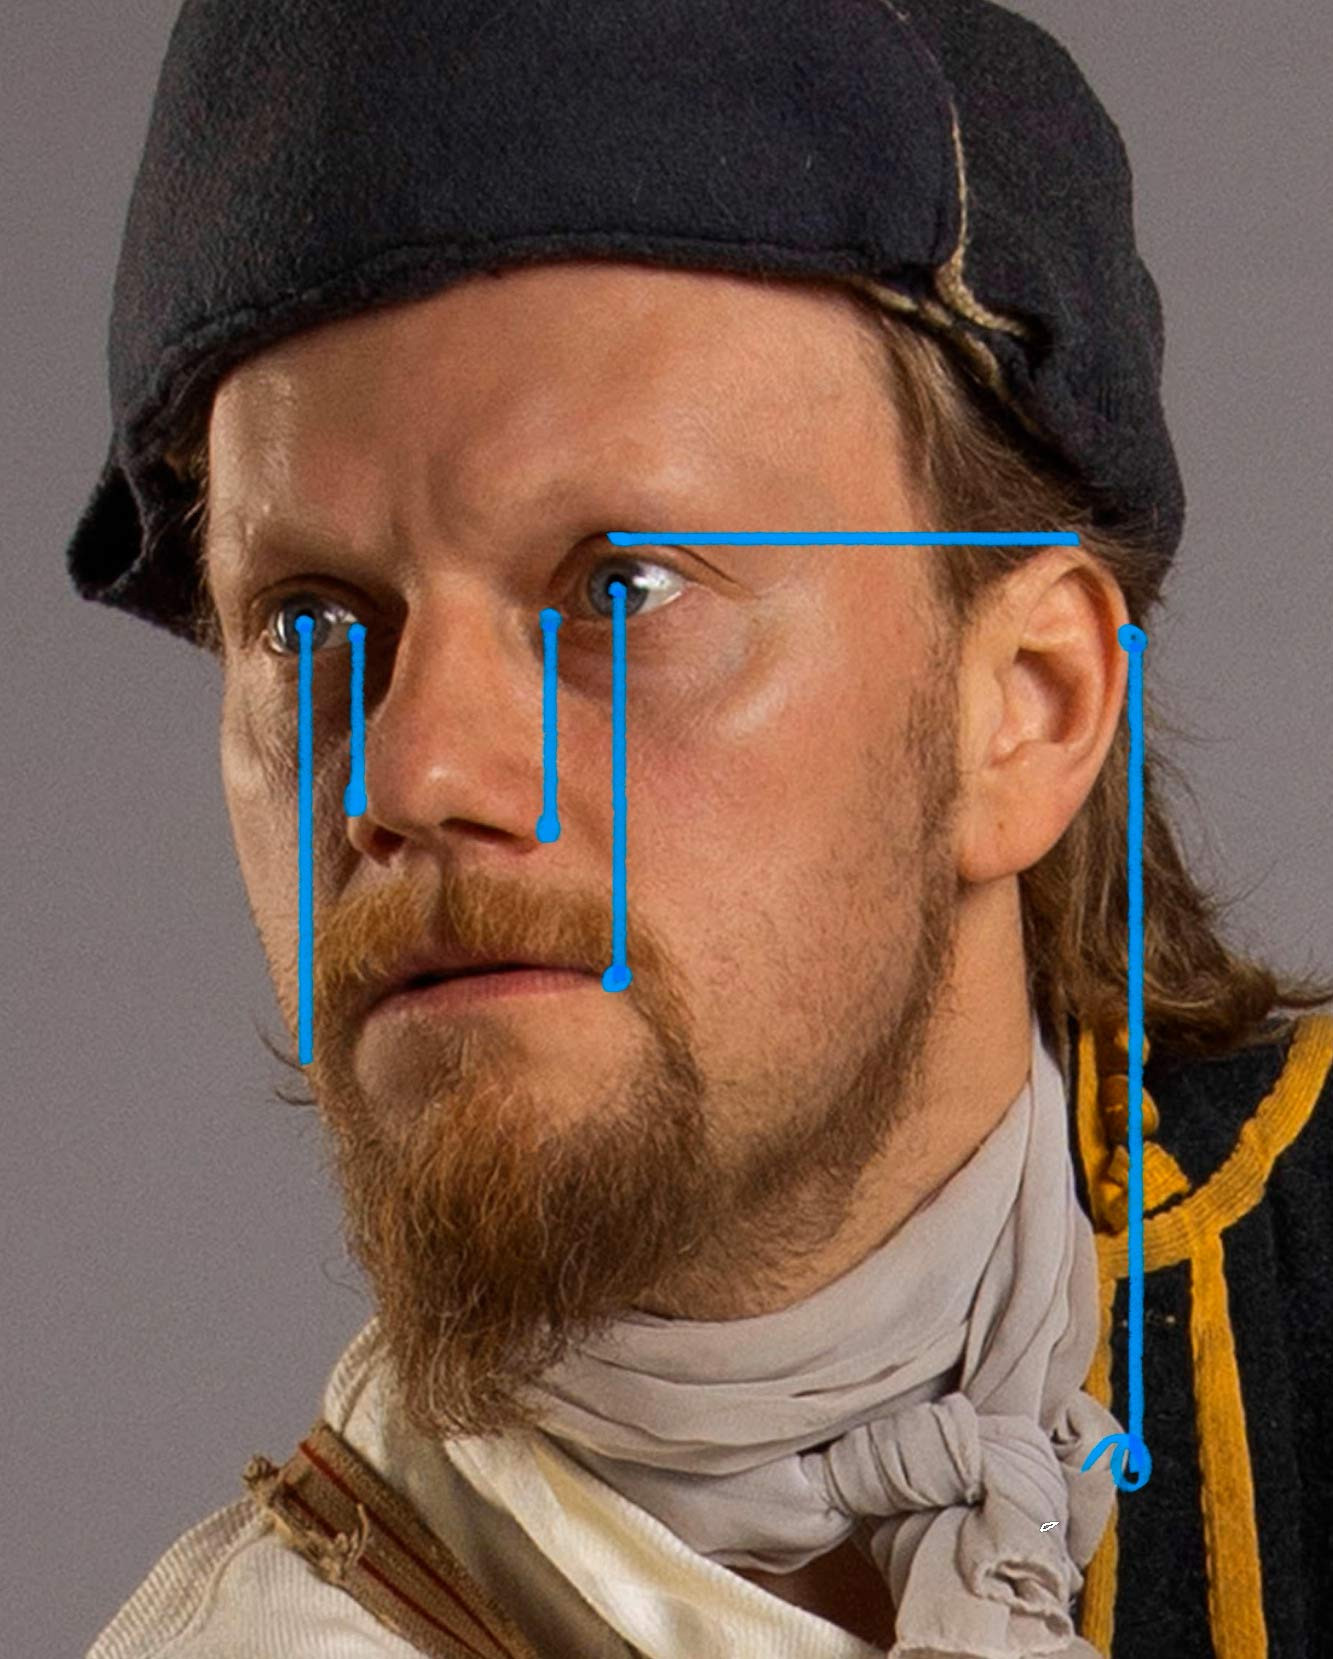
2. Negative Space: The Shape of Emptiness
Our second verification tool involves a shift in perception: instead of drawing the object itself (the positive space), you focus on drawing the shape of the space around and between the object (the negative space).
Why is this so effective? Your brain has strong preconceived ideas about what a "hand" or a "face" should look like. These symbols can interfere with your ability to see what's actually there. However, your brain has no symbol for the weird, abstract shape of the gap between a person's arm and their torso. By focusing on that negative shape, you can draw more objectively. In programming terms, you're avoiding a biased library and instead processing the raw data.
This resource provides an excellent breakdown of the technique.
Measurement and Proportion Techniques - Cursa
The Cursa article aptly calls this technique a 'proportion lie detector.' Let's look at the step-by-step process for using it.
Read the section 'Technique 6: Measuring Negative Space (A Proportion “Lie Detector”)'. Focus on the process of identifying, describing, and then drawing a negative shape to define the positive shapes around it.
And here is a quick video explanation to reinforce the concept.
Proko also offers a concise explanation of why observing negative shapes is such a useful trick for finding and fixing errors in your drawing.
Watch from 09:55 to 10:36. The key insight is that our lack of preconceived notions about negative shapes allows for a more unbiased evaluation.
This image of a stool provides a perfect example of this principle in action.

3. Practice Drill: The Chair Challenge (30 minutes)
It's time to integrate these tools into a practical drawing exercise. A chair is an excellent subject because it combines straight and curved lines, has clear alignments, and is full of negative space.
Your Task:
Create a line drawing of a chair from observation, using alignment lines and negative space to verify your proportions.
Setup:
- Place a simple chair (like a kitchen or desk chair) in front of you.
- Have your sketchbook and a pencil (HB or 2H) ready.
Execution Steps:
-
Block-In (5 mins): Start by using the unit-measuring technique from our previous lesson. Determine the chair's overall height-to-width ratio and sketch a light bounding box for it. Then, loosely block in the major shapes (seat, back, legs). Don't worry about accuracy yet.
-
Alignment Check (10 mins): Now, "debug" your block-in with alignment lines.
- Hold your pencil perfectly vertical to use it as a plumb line. Check things like: Does the front corner of the seat line up with the outer edge of the front leg?
- Hold your pencil perfectly horizontal to use it as a level line. Check things like: Are the tops of the two front legs level with each other? Is the top of the armrest level with a point on the chair's back?
- Make light corrections to your drawing based on these checks.
-
Negative Space Check (10 mins):
- Identify two or three prominent negative shapes. Good candidates are the space under the seat between the legs, or the space between the slats on the chair's back.
- Focus on one of these empty shapes and draw its outline. Compare its proportions (height vs. width) and angles to what you see.
- Adjust the lines of your chair (the positive shapes) until the negative shape you've drawn is correct. You'll often find that fixing the negative space automatically corrects the object itself.
-
Refine (5 mins): With your placements now verified by two different methods, you can go over your construction lines with more confident, clean contour lines.
For a reminder of this exercise's goal, you can refer back to the Cursa article.
Measurement and Proportion Techniques - Cursa
This exercise is a practical application of the 'Negative Space Trap' drill described in the Cursa article.
You can quickly review 'Practical Exercise 2: The “Negative Space Trap”' for a written summary of the goal. Our chair challenge simply combines that idea with the alignment checks we've also discussed.
Conclusion
Excellent work. You've now added two essential verification techniques to your drawing toolkit. These methods are not about replacing your initial construction, but about providing a robust system of checks and balances to improve its accuracy.
Key Takeaways:
- Alignment Lines (Plumb & Level): Use a vertically or horizontally held pencil to check if key points in your subject line up. This is your high-precision tool for placement.
- Negative Space: Shift your focus from the object to the shapes of the empty spaces around it. This helps bypass mental biases and allows you to see the true relationships between edges.
- Integrated Workflow: The most effective process involves a loop: block in with measurement, verify with alignments, check with negative space, and then refine.
In our next lesson, we'll put these tools to further use as we learn to recognize and correct common proportion errors. We'll look at a "rogues' gallery" of frequent mistakes and see how alignment and negative space are the perfect diagnostic tools to find and fix them.