Hello and welcome back to your sketching course!
Introduction
In our last lesson, you learned how to observe everyday objects and deconstruct them into their fundamental 3D forms like spheres, cubes, and cylinders. This "construction" approach is a powerful way to understand and draw the structure of any object.
Today, we move from drawing objects in isolation to placing them within a convincing three-dimensional space. This lesson introduces you to the core principles of perspective, addressing the learning outcome: Identify the horizon line, eye level, and vanishing points in a given scene or reference.
You'll learn the fundamental "rules" that govern how we perceive depth. For someone with a background in building logical systems, the rule-based nature of perspective should feel both intuitive and powerful. By the end of this lesson, you'll be able to look at a photograph or a scene and deconstruct its spatial structure, just as you learned to deconstruct an object's physical structure.
1. The Most Important Line in Your Drawing: The Horizon Line is Your Eye Level
Everything in perspective starts with one key concept: the horizon line. This isn't just a line where the sea meets the sky; in drawing, it represents the artist's (or viewer's) eye level. Everything you draw is understood in relation to this line.
To grasp this core idea, let's watch a short video that explains it clearly.
The Horizon Line & Vanishing Points EXPLAINED - In Depth Beginner Guide
The video 'The Horizon Line & Vanishing Points EXPLAINED' by Dan Beardshaw provides an excellent conceptual breakdown. We'll start with the first part, which focuses exclusively on the horizon line.
Watch from 00:25 to 04:00. Pay close attention to the 3D demonstration showing three figures at different heights. Notice how changing their 'eye level' dramatically changes their view of the cube. This directly illustrates how your chosen eye level determines what you can see of an object (e.g., its top, bottom, or neither).
The key takeaways are:
- Horizon Line = Eye Level: This is a non-negotiable rule.
- If an object is above your eye level (and the horizon line), you see its underside.
- If an object is below your eye level, you see its top surface.
- If an object is on your eye level, you see neither its top nor its bottom.
This concept is crucial for creating a sense of scale and position, especially when drawing figures.
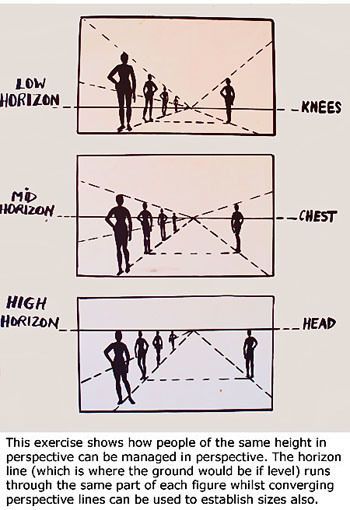
A common point of confusion is what to do when you're indoors and can't see the actual horizon. The rule still applies! The eye level is an imaginary horizontal plane that extends infinitely in all directions from your eyes.
Eye Level. An essential perspective tip for artists
The article 'Eye Level. An essential perspective tip for artists' offers a very practical explanation of this idea.
Read the first section (up to 'Those vanishing points') and the section titled 'Horizon or eye level?'. The author's use of a camera at 'dog eye level' and the analogy of running masking tape around a room are great ways to solidify this concept.
2. Points of Convergence: Introducing Vanishing Points
Now for the second key element. If you've ever looked down a long, straight road or railway track, you've noticed that the parallel lines of the edges seem to get closer together and eventually meet at a single point in the distance. That meeting point is called a vanishing point (VP).
Crucially, vanishing points always lie on the horizon line. (This is true for most common scenarios where objects are parallel to the ground).
Let's return to the video from Dan Beardshaw to see how vanishing points relate to the horizon line.
The Horizon Line & Vanishing Points EXPLAINED - In Depth Beginner Guide
We'll now watch the next segment of 'The Horizon Line & Vanishing Points EXPLAINED' to formally introduce vanishing points.
Watch from 04:56 to 06:45. The train track example is a classic for a reason—it's the clearest illustration of convergence. Then, notice how the parallel edges of the cube from the first segment all converge to a single vanishing point located on the horizon line.
So, the rule is: Sets of parallel lines that are receding from the viewer will appear to converge to a single vanishing point on the horizon line.
3. How to Find the Horizon and Vanishing Points in any Image
Now that you understand the "what" and "why," let's focus on the "how." Your goal for this lesson is to be able to look at a reference photo and identify these key structural elements. The process is like reverse-engineering the perspective of the scene.
The method is simple:
- Find parallel lines: Look for elements in the image that you know are parallel in real life (e.g., the top and bottom of windows, the edges of a road, ceiling corners, rooflines).
- Trace the lines: Extend these parallel lines with a ruler or straight edge until they intersect.
- Locate the Vanishing Point: The point where they intersect is your vanishing point.
- Find the Horizon Line: The horizontal line that passes through your vanishing point(s) is the horizon line (your eye level).
This next video demonstrates this process on real-world photos.
Find The Horizon Line & Vanishing Points On ANY Image...
Let's watch 'Find The Horizon Line & Vanishing Points On ANY Image...' by the same instructor. This is the practical application of the theory we just covered.
Watch the demonstrations for one-point perspective (02:20 to 04:33) and two-point perspective (04:33 to 06:47). Don't just watch passively; try to predict which lines he will use and where they will converge. Notice how he uses the lines of windows and buildings to find the vanishing points, which in turn reveals the horizon line.

4. Practice Drill: Deconstruct a Scene (20 minutes)
Theory is great, but perspective only truly clicks when you do it yourself. This exercise is designed to put your new identification skills into practice.
For this drill, you will need:
- Your sketchbook or some paper.
- A pencil and a straight edge (a ruler is best).
- A few images that contain strong perspective, like cityscapes or room interiors. You can find these on websites like Unsplash or Pinterest by searching for "street photography," "architectural interior," or "one point perspective room." The article below also has a few examples you can use.
Exercises to learn Perspective Drawing
The article '5 great Exercises to learn Perspective Drawing' contains an exercise that is perfect for our purposes. We will adapt it for our drill.
Read through the exercise titled '3 With a trace'. You don't need to use tracing paper, but look at the example images provided. They are excellent candidates for this drill.
Your Task:
- Choose one of the images from the article or find your own. Print it out or have it open on a screen.
- In your sketchbook, make a quick, rough sketch of the main shapes in the image. Don't worry about details; just block in the major buildings, walls, or furniture.
- Now, place your ruler over your sketch (or over the original image itself) and identify at least two lines that you know are parallel and receding into the distance.
- Draw these lines so they extend across the page until they meet. Mark this intersection with a dot. This is your first vanishing point.
- If it's a two-point perspective image (where you're looking at the corner of a building), find a second set of parallel lines receding in the other direction and repeat the process to find the second VP.
- Finally, draw a horizontal line that connects your vanishing points. This is your horizon line/eye level.
Repeat this process with 2-3 different images. The goal is not to create a beautiful drawing, but to successfully "solve" the perspective puzzle of each image.
Conclusion
Fantastic work today. You've just learned the foundational grammar of drawing in 3D space. It's a technical skill, but one that unlocks a massive amount of artistic freedom.
Key Takeaways:
- Horizon Line is Eye Level: This is the master rule that determines the viewer's position relative to the scene. Objects above it show their bottoms; objects below it show their tops.
- Vanishing Points are on the Horizon: In most cases, receding parallel lines appear to converge at a vanishing point located on the horizon line.
- You Can Reverse-Engineer Perspective: By finding parallel lines in a reference (windows, roads, architectural features) and tracing them to their intersection, you can identify the vanishing points and horizon line of any scene.
In our next lesson, you will take this knowledge from identification to creation. We will focus on drawing boxes and other simple rectilinear objects in one-point perspective. You'll use a horizon line and a vanishing point to construct objects that look solid and correctly placed in space.