Hello! Welcome to the third lesson in our module on perspective.
Introduction
In our last session, you learned how to act like a detective, analyzing photographs and scenes to identify the key structural elements of perspective: the horizon line (as your eye level) and the vanishing points. You learned to reverse-engineer the 3D space captured in a 2D image.
Today, we switch from analysis to creation. You will use those same elements to build convincing 3D forms from scratch. Our learning outcome is to draw boxes and other simple rectilinear objects in one-point perspective.
Think of the last lesson as learning the syntax of a programming language, and this lesson as writing your first simple "hello world" program. One-point perspective is a straightforward, rule-based system for creating the illusion of depth. Given your background, you'll likely appreciate its logical structure. By the end of this lesson, you'll be able to construct solid-looking boxes that appear correctly oriented in a 3D environment.
1. The Rules of One-Point Perspective
One-point perspective is used when the object you're drawing has a flat face that is directly parallel to you, the viewer. Imagine looking straight down a hallway or at the front of a building.
The system is governed by a few simple rules:
- Lines that represent width and height are drawn as perfectly horizontal and vertical lines. The front face of your box will look like a flat square or rectangle. This is called its "true shape."
- Lines that represent depth (the lines that travel away from you) all appear to converge towards a single vanishing point (VP) on the horizon line.
To see these rules in action and get familiar with the core terminology, let's watch the first part of a fantastic video by art instructor Stan Prokopenko (Proko).
This video, 'Perspective for Beginners,' breaks down one-point perspective into simple, manageable steps. We'll start with the introduction to get the key concepts down.
Watch from the beginning to 02:37. Pay close attention to how he defines the X, Y, and Z axes (width, height, and depth) and how the Z-axis (depth) always points towards the vanishing point in this system.
2. Constructing Boxes in One-Point Perspective
Now that we have the rules, let's build something. The process is a direct application of what you just learned. The position of your box relative to the horizon line determines which of its sides you can see.
Let's watch Proko demonstrate how to draw boxes in various positions. As you watch, notice the sequence he follows:
- Draw the front face (a rectangle).
- Project the corners back to the vanishing point using light construction lines.
- "Cap off" the box by drawing the back edges (a horizontal line and a vertical line).
In these next segments, Proko will walk you through constructing boxes above, below, and to the side of the vanishing point. This covers all the fundamental variations.
Watch from 02:37 to 08:25. Observe carefully: Below the Horizon (02:37): Notice how you see the top plane of the box. To the Side (04:10): Shifting the box sideways reveals a side plane. On the Horizon (06:18): When the box straddles the horizon line, you see neither the top nor the bottom. Above the Horizon (07:21): Now, you see the bottom plane of the box.
Here is a static image that breaks down the process into clear steps. You can refer back to this during your practice.

To reinforce these steps, the following article provides a concise, text-based explanation. Reading through it will help solidify the "why" behind the process before you jump into drawing.
One Point Perspective Drawing: The Ultimate Guide
Let's read the first exercise from 'One Point Perspective Drawing: The Ultimate Guide' from the Student Art Guide. It's a great summary of the concepts we've just seen.
Read the section titled 'EXERCISE 1: CUBES AND RECTANGULAR BLOCKS'. Focus on the three bullet points that summarize what you see when an object is above, below, or on the horizon line.
3. Practice Drill: A Page of Boxes (30 minutes)
This is where theory meets practice. Your goal for this exercise is to fill at least one page of your sketchbook with boxes drawn in one-point perspective. This is a fundamental drill that builds both your understanding of perspective and your line confidence.
Your Task:
- Start by drawing a horizontal line across your page. This is your horizon line.
- Place a single dot somewhere on this line. This is your vanishing point.
- Now, begin drawing boxes. Aim for variety:
- Draw boxes of different sizes and proportions (tall and thin, short and wide).
- Place them all around the page: far above the horizon line, far below, right on it, and to the left and right of the vanishing point.
- Draw some boxes that are transparent (drawing through) so you can see all their back corners and edges. This reinforces the 3D structure.
- Use light lines for your receding construction lines and darker, more confident lines for the final edges of the boxes, as you learned in Module 1.
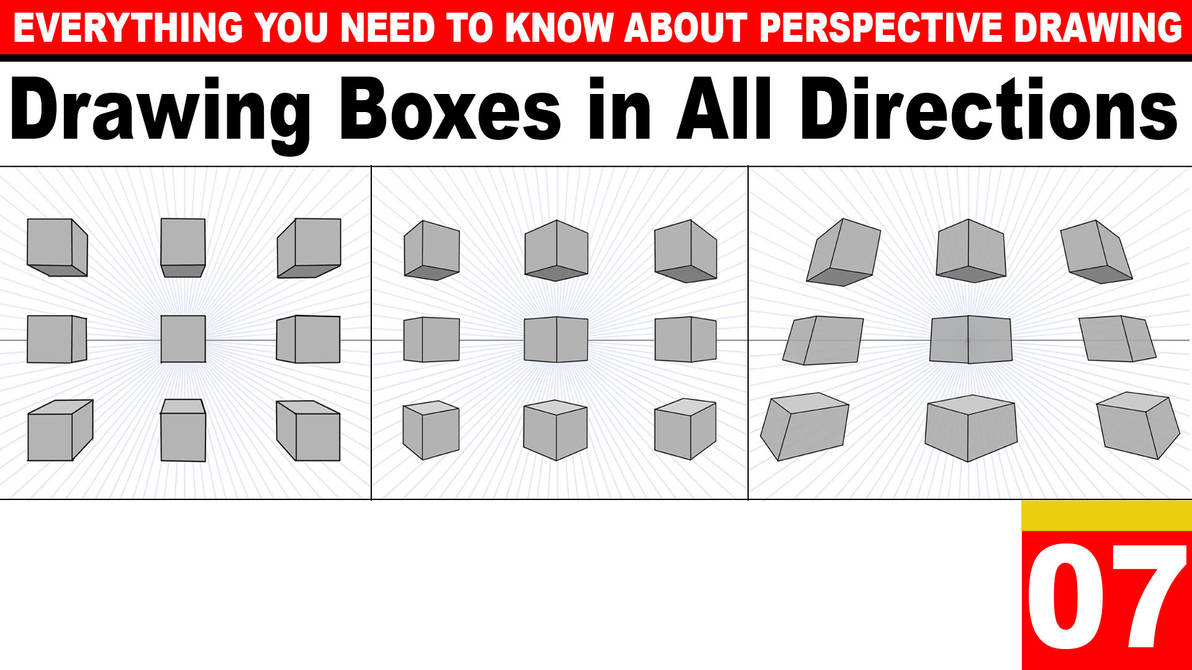
The image below gives you a great idea of the variety you can explore. Try to replicate some of these forms.
A Note on Common Mistakes:
The most common error in one-point perspective is drawing the receding lines incorrectly—making them parallel to each other instead of converging at the VP. This makes the object look distorted. As you draw, constantly check that every line representing depth is aimed directly at your single vanishing point. The video by SamDoesArts demonstrates this clearly from 06:18 to 07:21 in his video, "How to Draw Perspective for Beginners," showing how a train looks "off" when the lines don't converge correctly. Keep this in mind as you work.
Conclusion
Excellent work today! You have successfully moved from identifying perspective to using it as a constructive tool. This skill is the bedrock for drawing anything that has rectilinear structure, from furniture and rooms to entire cityscapes.
Key Takeaways:
- One-Point Perspective: Used when viewing an object 'front-on'.
- The Rules: Front faces are drawn with true horizontal and vertical lines. All depth lines recede to a single vanishing point on the horizon line.
- Position Matters: An object's location relative to the horizon line dictates whether you see its top, bottom, or neither.
- Construction Process: Draw the front face, project corners to the VP, and cap off the back edges.
In our next lesson, we'll add a layer of complexity. We will answer the question: what happens when we rotate a box so that a corner is facing us, not a flat face? This will lead us into the world of two-point perspective.