Hello! Welcome back to your sketching course.
Introduction
In our last lesson, you practiced a challenging but crucial skill: constructing composite objects by intersecting basic primitives from your imagination. You learned how to define the spatial relationship between forms like boxes and cylinders, making them feel solid and cohesive.
Today, we take that abstract skill and apply it to the real world. This lesson addresses the learning outcome: Sketch everyday objects from observation by first establishing their underlying forms.
Instead of inventing forms, you will learn to see the primitive forms that make up the objects around you. This is the bridge between understanding 3D shapes in theory and drawing what you see in practice. Just as in software development you might break down a complex user feature into smaller, well-defined functions, in drawing, we deconstruct complex objects into simple geometric volumes to understand and represent them accurately.
1. The Mindset: See Forms, Not Just Outlines
Before we pick up a pencil, let's establish the core mindset for this lesson. Many beginners try to draw by tracing the outline of an object. This is like copying code line-by-line without understanding the logic; it might look right, but you don't learn how it works or how to build it yourself. The goal is to understand the object's three-dimensional structure.
The following video from Proko brilliantly explains why simplifying complex subjects into basic forms is the secret to being able to draw them from any angle, not just copy them.
Let's watch a short, conceptual video from Proko called 'The Secret of Simple Forms'. It perfectly frames the 'why' behind today's lesson.
Watch from 01:03 to 02:37. Pay attention to the distinction he makes between 'copying' and 'redrawing with form'. The key idea is that by establishing a simple structure (like a box), we can understand and reconstruct an object, rather than just duplicating its appearance from one specific viewpoint.
This idea of simplifying to understand structure is the foundation of everything we'll do today.
2. A Practical Framework: Deconstruction and Refinement
Now that we have the "why," let's establish the "how." The process of drawing an object via construction can be broken down into a simple, repeatable framework.
First, let's look at a visual summary of this process applied to several different objects.

This "breakdown" approach is a universal strategy. The article "The Ultimate Guide To Drawing In Perspective..." provides an excellent step-by-step description of this simplification process.
The Ultimate Guide To Drawing In Perspective From Simple Shapes ...
Let's read the 'Simplify and Conquer' section from the article 'The Ultimate Guide To Drawing In Perspective From Simple Shapes...'. This provides a clear, actionable guide to analyzing an object from life.
Read the section titled 'Simplify and Conquer'. Focus on the three steps demonstrated with the ball cap example: Analyze different views to understand the object's proportions. Orient the object for easier drawing. Match major parts to basic volumes (e.g., the cap is a half-sphere, the bill is a half-cylinder). This process of analysis and volume-matching is exactly what you'll be doing in our practice drill.
The core takeaway is a two-step process:
- Construction: Identify and sketch the simple 3D primitives (spheres, cubes, cylinders) that make up the object's main structure. Draw these forms lightly, remembering to "draw through" them as if they were transparent.
- Refinement: Once the underlying structure is established, sketch the object's more specific contours and details over your construction lines, using the primitives as a guide.
3. Guided Practice: Drawing Everyday Objects (30 minutes)
It's time to put this into practice. Get your sketchbook and pencil ready. We're going to follow along with a video that demonstrates this process on a few common household objects. We'll tackle them one by one.
The instructor in this video does an excellent job of showing the loose, sketchy nature of this process. Don't worry about perfect lines; focus on finding the forms.
Learn How To Draw Pt 3: How To Use Simple Shapes To Draw Objects
This video, 'Learn How To Draw Pt 3: How To Use Simple Shapes To Draw Objects' from The Pencil Room Online, will be our draw-along guide.
We will watch this in segments. I will guide you through each object. First, watch the introduction from 00:00 to 01:13 to get an overview of the two-step process she will be using.
Drill 1: The Apple (Sphere)
First, we'll start with the simplest form: a sphere.
Learn How To Draw Pt 3: How To Use Simple Shapes To Draw Objects
Now, let's draw the apple.
Watch from 01:13 to 04:51. Follow along in your sketchbook. Start by lightly sketching a sphere. Observe the specific shape of the apple and 'chisel' into your sphere, adding the flatter planes and angles that make the apple unique. Add the small detail of the stem divot to complete the form. As the instructor suggests, draw it a second time to apply what you learned from the first attempt.
Drill 2: The Jar (Cylinder)
Next, we'll tackle a cylindrical object. This brings back the challenge of drawing ellipses correctly.
Learn How To Draw Pt 3: How To Use Simple Shapes To Draw Objects
Let's move on to the glass jar.
Watch from 04:51 to 10:16 and draw along. Begin by constructing a cylinder. Remember to draw through the form, sketching both the top and bottom ellipses. Pay attention to how she builds the lid by stacking another, slightly wider cylinder on top. Notice the subtle refinement where the glass jar curves inward below the lid. This is a great example of modifying the basic primitive to match the observed object.
Drill 3: The Bottle (Composite Form)
This final object combines what you learned in the last lesson (combining primitives) with today's observational skills.
Learn How To Draw Pt 3: How To Use Simple Shapes To Draw Objects
Finally, we'll draw the bottle, which is a composite object.
Watch from 10:16 to 15:09. Deconstruct the bottle into its main parts: a large cylinder for the body, a cone for the neck, and a small cylinder for the top. Sketch these primitive forms stacked on top of each other. Now, refine the drawing by connecting the forms with smooth curves. This is where you transform the blocky construction into an organic shape.
When connecting primitives with curves, like the shoulder of that bottle, it helps to first think in straight lines and then round them off. For complex curves, like a mug handle, this approach is essential.
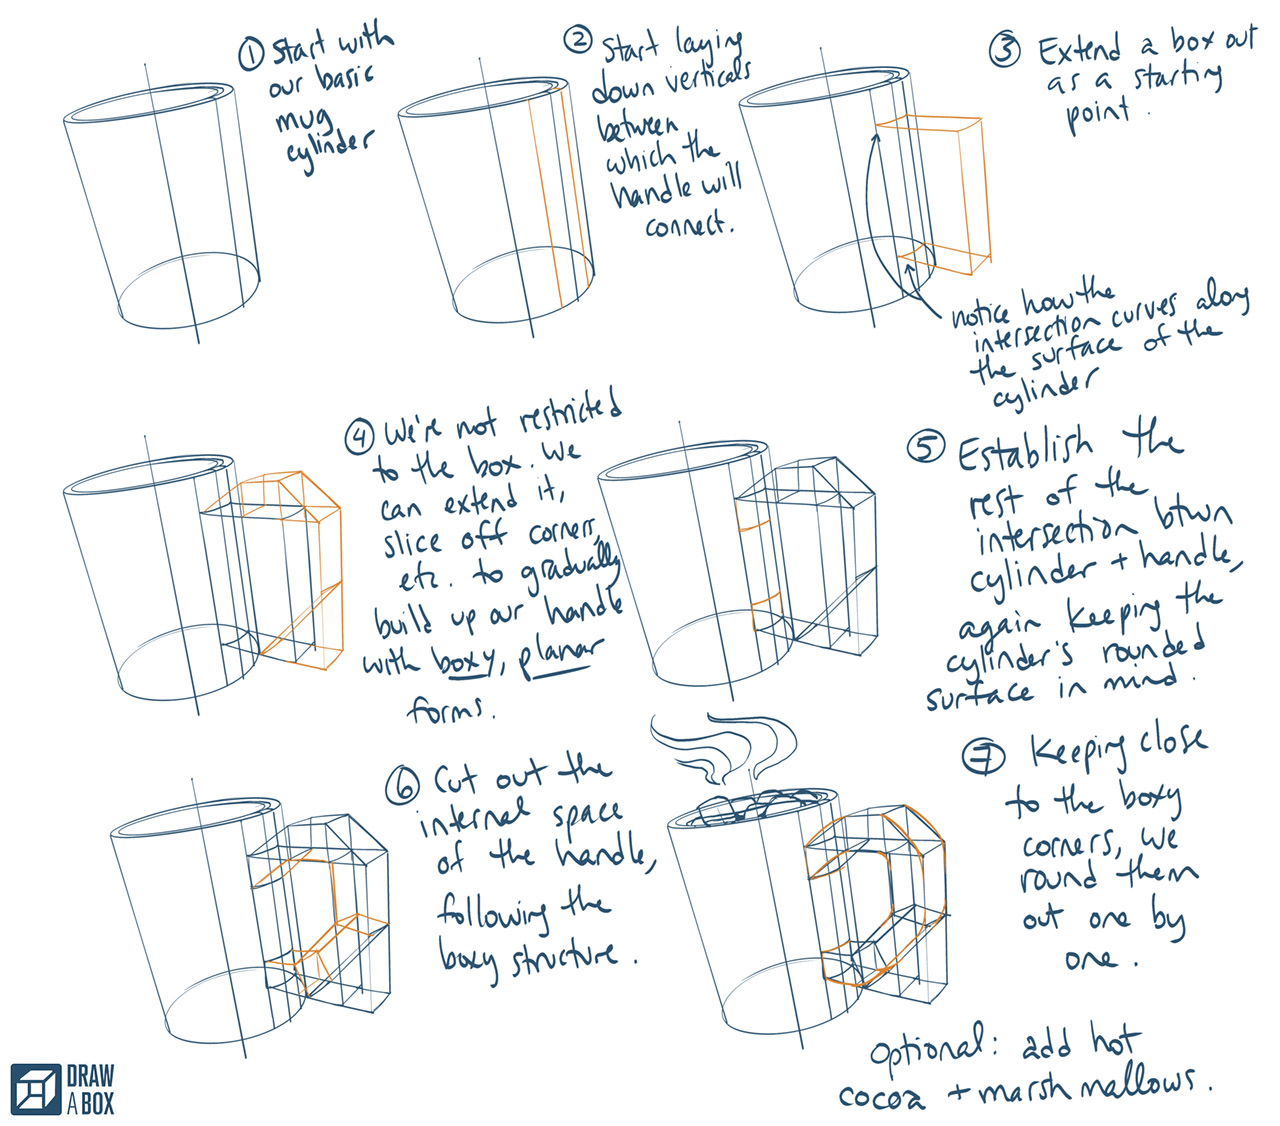
Keep this "box-first" idea in mind whenever you encounter a tricky curved element on an object.
Conclusion
Excellent work today! You have taken a major step in your drawing journey by connecting the abstract world of geometric forms to the objects you see every day.
Key Takeaways:
- See Like an Artist: The primary skill is to look at a complex object and mentally deconstruct it into its underlying primitives (spheres, cubes, cylinders, cones).
- A Two-Step Process: A reliable method for drawing from observation is to first sketch the light, transparent construction of these primitives, and then refine the contours and details over that foundation.
- Construction Governs Curves: For complex curved parts, build them with straight-line, boxy forms first to ensure a solid structure before rounding the edges.
In our next lesson, we will begin our study of Perspective. Now that you can construct an object, you'll learn how to place it convincingly within a three-dimensional space by understanding the roles of the horizon line, eye level, and vanishing points. This will allow you to create drawings with a true sense of depth and realism.